
Published July 9, 2026 08:52AM
Yoga Journal’s archives series is a curated collection of articles originally published in past issues beginning in 1975. This article about backbends first appeared in the November-December 1986 issue of Yoga Journal.
Unlike many yoga poses, the backbend is not a part of many daily activities. But it has a number of anatomical benefits, as well as the potential for being emotionally cleansing.
“Bending over backward.” The very phrase implies difficulty and strain. But learning to bend backward in the practice of yoga can be a satisfying, releasing, and opening experience. The key to enjoying and benefiting from backbends lies in the attitude one brings. Many students practice backbending with gritted teeth and a “have to,” “this is good for me” mindset. But rather than causing tension, backbending, like forward bending, can be a way to experience release. Much depends on the technique used and the psychology of the student.
What Is a Backbend?
The technique of bending backward is determined in large part by the structures of the vertebral column. In each of the movable segments of the column—cervical (neck), thoracic (mid-back), and lumbar (back waist)—the direction of movement is determined by the facet joints, the flattened surfaces on the top and bottom of the posterior (rear) portion of the vertebrae. Where these surfaces join with the vertebrae above or below, a joint is formed and movement is possible.
In the lumbar spine, the way the facets join allows for easy forward and backward bending, but virtually no rotation and little side-bending. Because of this anatomical fact, bending backward is easier in the lumbar region than elsewhere in the spine. The segment directly above—the thoracic spine—provides great stability for heart and lungs but little freedom in backbending (though sidebending is relatively easy here). This is due in part to the overlapping of the large, downward-pointing spinous processes, which, because they overlap, create a bony block to further movement. The blockage is greatest at about the eighth thoracic segment, which is opposite the heart.
Because backward movement is structurally impeded in the thoracic spine and aided in the lumbar spine, the student often takes the path of least resistance and puts most of the backbending action into the lumbar spine, overloading and stressing that area while allowing the stiffer thoracic spine to grow even stiffer. Good technique in backbends calls on the student to heighten awareness of extending from the thorax while not overbending in the lumbar spine. This understanding creates a back arch that is more evenly spread out; it feels less compressed and appears even and beautiful. When practiced in this way, backbends can leave the mind feeling refreshed and the body invigorated.
Writing about the benefits of Bow Pose, or Dhanurasana (Figure 9), B. K. S. Iyengar states that the pose brings elasticity to the spine and tones the abdominal organs (Light on Yoga, p. 82). The same can generally be said of most backbends. In addition, backbending strengthens all the muscles on the posterior side of the body, including the triceps brachii (upper back arm); the erector muscles of the spine; the muscles of the posterior trunk like the latissimus dorsi and posterior serratus; the muscles between the scapulae (shoulder blades); and the hamstrings. Most of these muscles are important in maintaining a graceful and efficient upright posture. Gravity tends to pull most people forward with age – a tendency counteracted by backbends.
How to Bend Backward
Unfortunately, many students approach backbending with a pushy, aggressive attitude. As they push up into a back arch, they create tension in their tongue, throat, eyes, diaphragm, belly, and brain. Because of this, images that create a feeling of ease, lightness, and letting go are helpful in practicing the intermediate and more advanced back arches. The most “delicious” backbends are those in which one can feel the strength of arms and legs and at the same time experience a lightness of spine and mind.
Admittedly, becoming truly “at one” with a difficult backbend may take years of practice, but even beginners can learn some of the positive releasing aspects of backbends. One area in which opening is often powerfully experienced in backbends is the heart.
Traditionally the “heart” has been considered the site of love and compassion, but it can also be a reservoir for a very different emotion – sadness. Sometimes, when students practice backbends with attention and awareness, they feel a sense of sadness or loss, an unresolved feeling from the past that has been released to the surface. This feeling should be viewed as an energy shift; the asana has given the student the opportunity to fully live the sadness and then release it forever. This does not require an intellectual understanding of what caused the sadness, but rather the ability to just accept the feeling as it is. Teachers should be aware of the occasional need to allow students to express the range of feelings released by backbends in a manner appropriate to a yoga class.
Traditionally, backbends are practiced after one has warmed up with standing poses. But the simpler supported ones described in this article can be practiced very early in a session, depending on the student and the circumstances. Many students enjoy devoting a significant portion of their asana practice to backbends once or twice a week. Backbends are usually followed by a sitting or lying twist, which relieves the back of any residual tension.
16 Backbends to Try Today
Backbends form a critical part of a complete asana practice. Yet much of their benefit is negated when one feels agitated or aggressive during practice.
One must remember to keep the breath even and to extend to others the feelings of release and openness that are engendered. In this way asana practice becomes more than something done just for one’s own sake; it becomes an activity that can help bring peace and harmony to others as well.
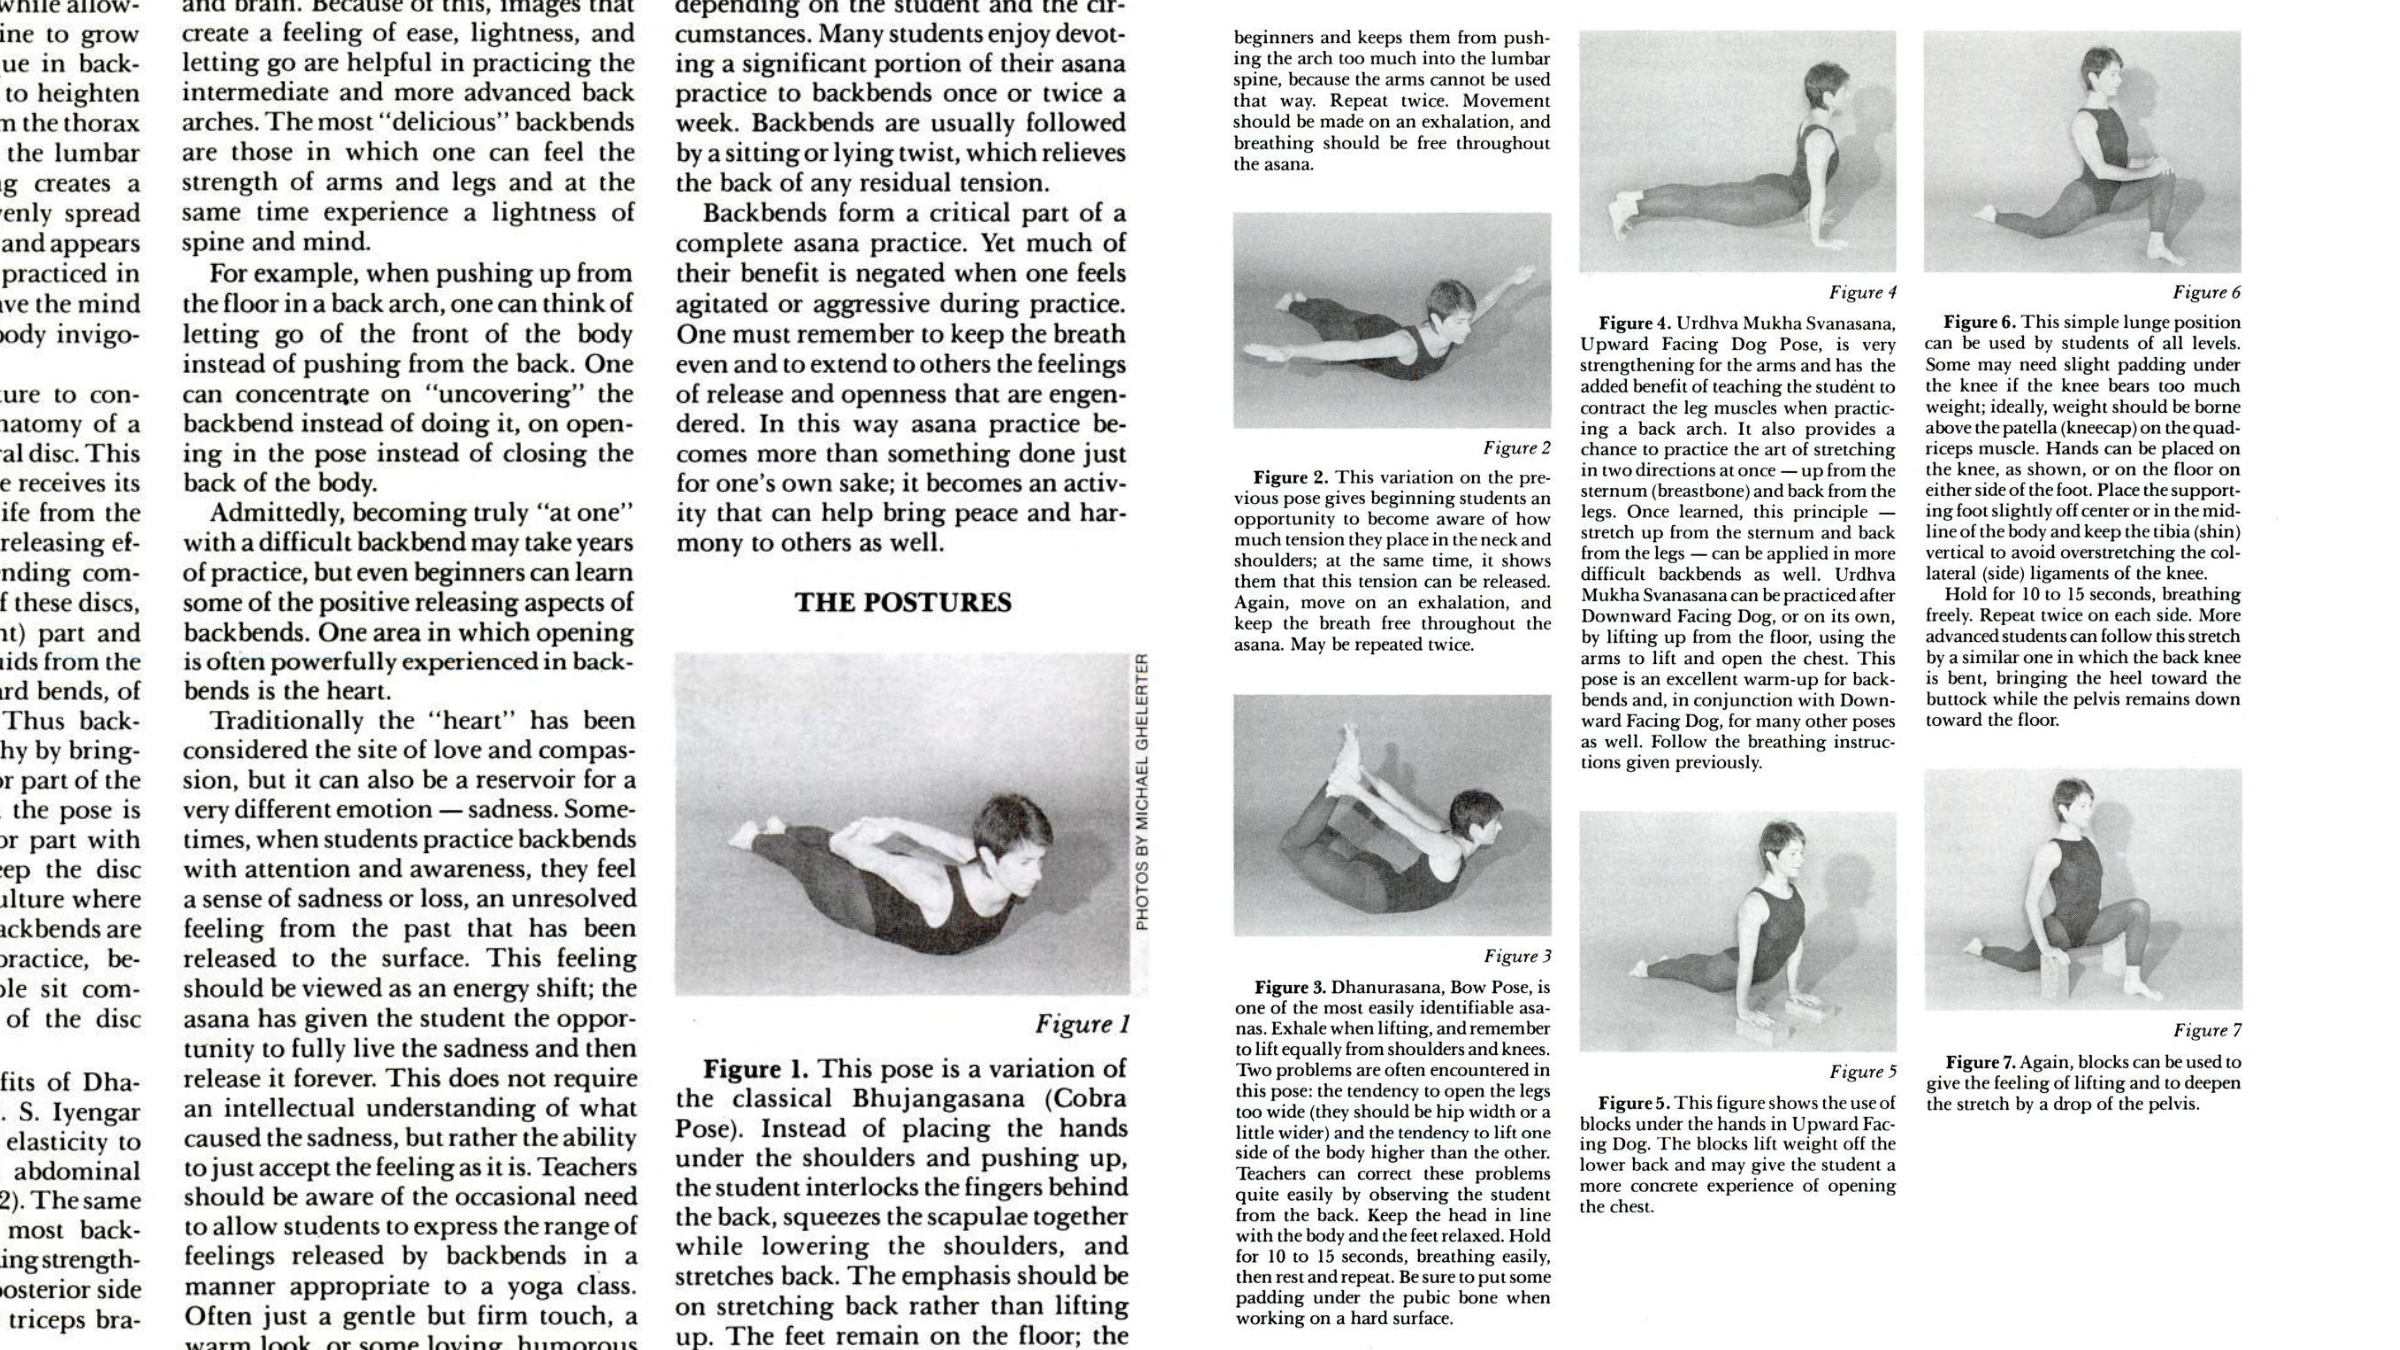
1. Cobra Pose Variation
This pose is a variation of the classical Bhujangasana (Cobra Pose). Instead of placing the hands under the shoulders and pushing up, the student interlocks the fingers behind the back, squeezes the scapulae together while lowering the shoulders, and stretches back. The emphasis should be on stretching back rather than lifting up. The feet remain on the floor; the student may curl the toes under, toward the body, to help avoid cramps in the soles of the feet. This asana is good for beginners and keeps them from pushing the arch too much into the lumbar spine, because the arms cannot be used that way. Repeat twice. Movement should be made on an exhalation, and breathing should be free throughout the asana.
2. Cobra Pose Variation 2
This variation on the previous pose gives beginning students an opportunity to become aware of how much tension they place in the neck and shoulders; at the same time, it shows them that this tension can be released.
Again, move on an exhalation, and keep the breath free throughout the asana. May be repeated twice.
3. Bow Pose
Bow Pose (Dhanurasana), is one of the most easily identifiable asanas. Exhale when lifting, and remember to lift equally from shoulders and knees.
Two problems are often encountered in this pose: the tendency to open the legs too wide (they should be hip width or a little wider) and the tendency to lift one side of the body higher than the other.
Teachers can correct these problems quite easily by observing the student from the back. Keep the head in line with the body and the feet relaxed. Hold for 10 to 15 seconds, breathing easily, then rest and repeat. Be sure to put some padding under the pubic bone when working on a hard surface.
4. Upward-Facing Dog Pose
Upward-Facing Dog Pose (Urdhva Mukha Svanasana) is very strengthening for the arms and has the added benefit of teaching the student to contract the leg muscles when practicing a back arch. It also provides a chance to practice the art of stretching in two directions at once – up from the sternum (breastbone) and back from the legs. Once learned, this principle – stretch up from the sternum and back from the legs — can be applied in more difficult backbends as well. Urdhva Mukha Svanasana can be practiced after Downward Facing Dog, or on its own, by lifting up from the floor, using the arms to lift and open the chest. This pose is an excellent warm-up for backbends and, in conjunction with Downward Facing Dog, for many other poses as well. Follow the breathing instructions given previously.
5. Upward-Facing Dog Variation
This figure shows the use of blocks under the hands in Upward-Facing Dog. The blocks lift the weight off the lower back and may give the student ore concrete experience of opening the chest.
6. Low Lunge
This simple Low Lunge position can be used by students of all levels.
Some may need slight padding under the knee if the knee bears too much weight; ideally, weight should be borne above the patella (kneecap) on the quadriceps muscle. Hands can be placed on the knee, as shown, or on the floor on either side of the foot. Place the supporting foot slightly off center or in the midline of the body and keep the tibia (shin) vertical to avoid overstretching the collateral (side) ligaments of the knee.
Hold for 10 to 15 seconds, breathing freely. Repeat twice on each side. More advanced students can follow this stretch by a similar one in which the back knee is bent, bringing the heel toward the buttock while the pelvis remains down toward the floor.
7. Low Lunge Variation
Again, blocks can be used to give the feeling of lifting and to deepen the stretch by a drop of the pelvis.
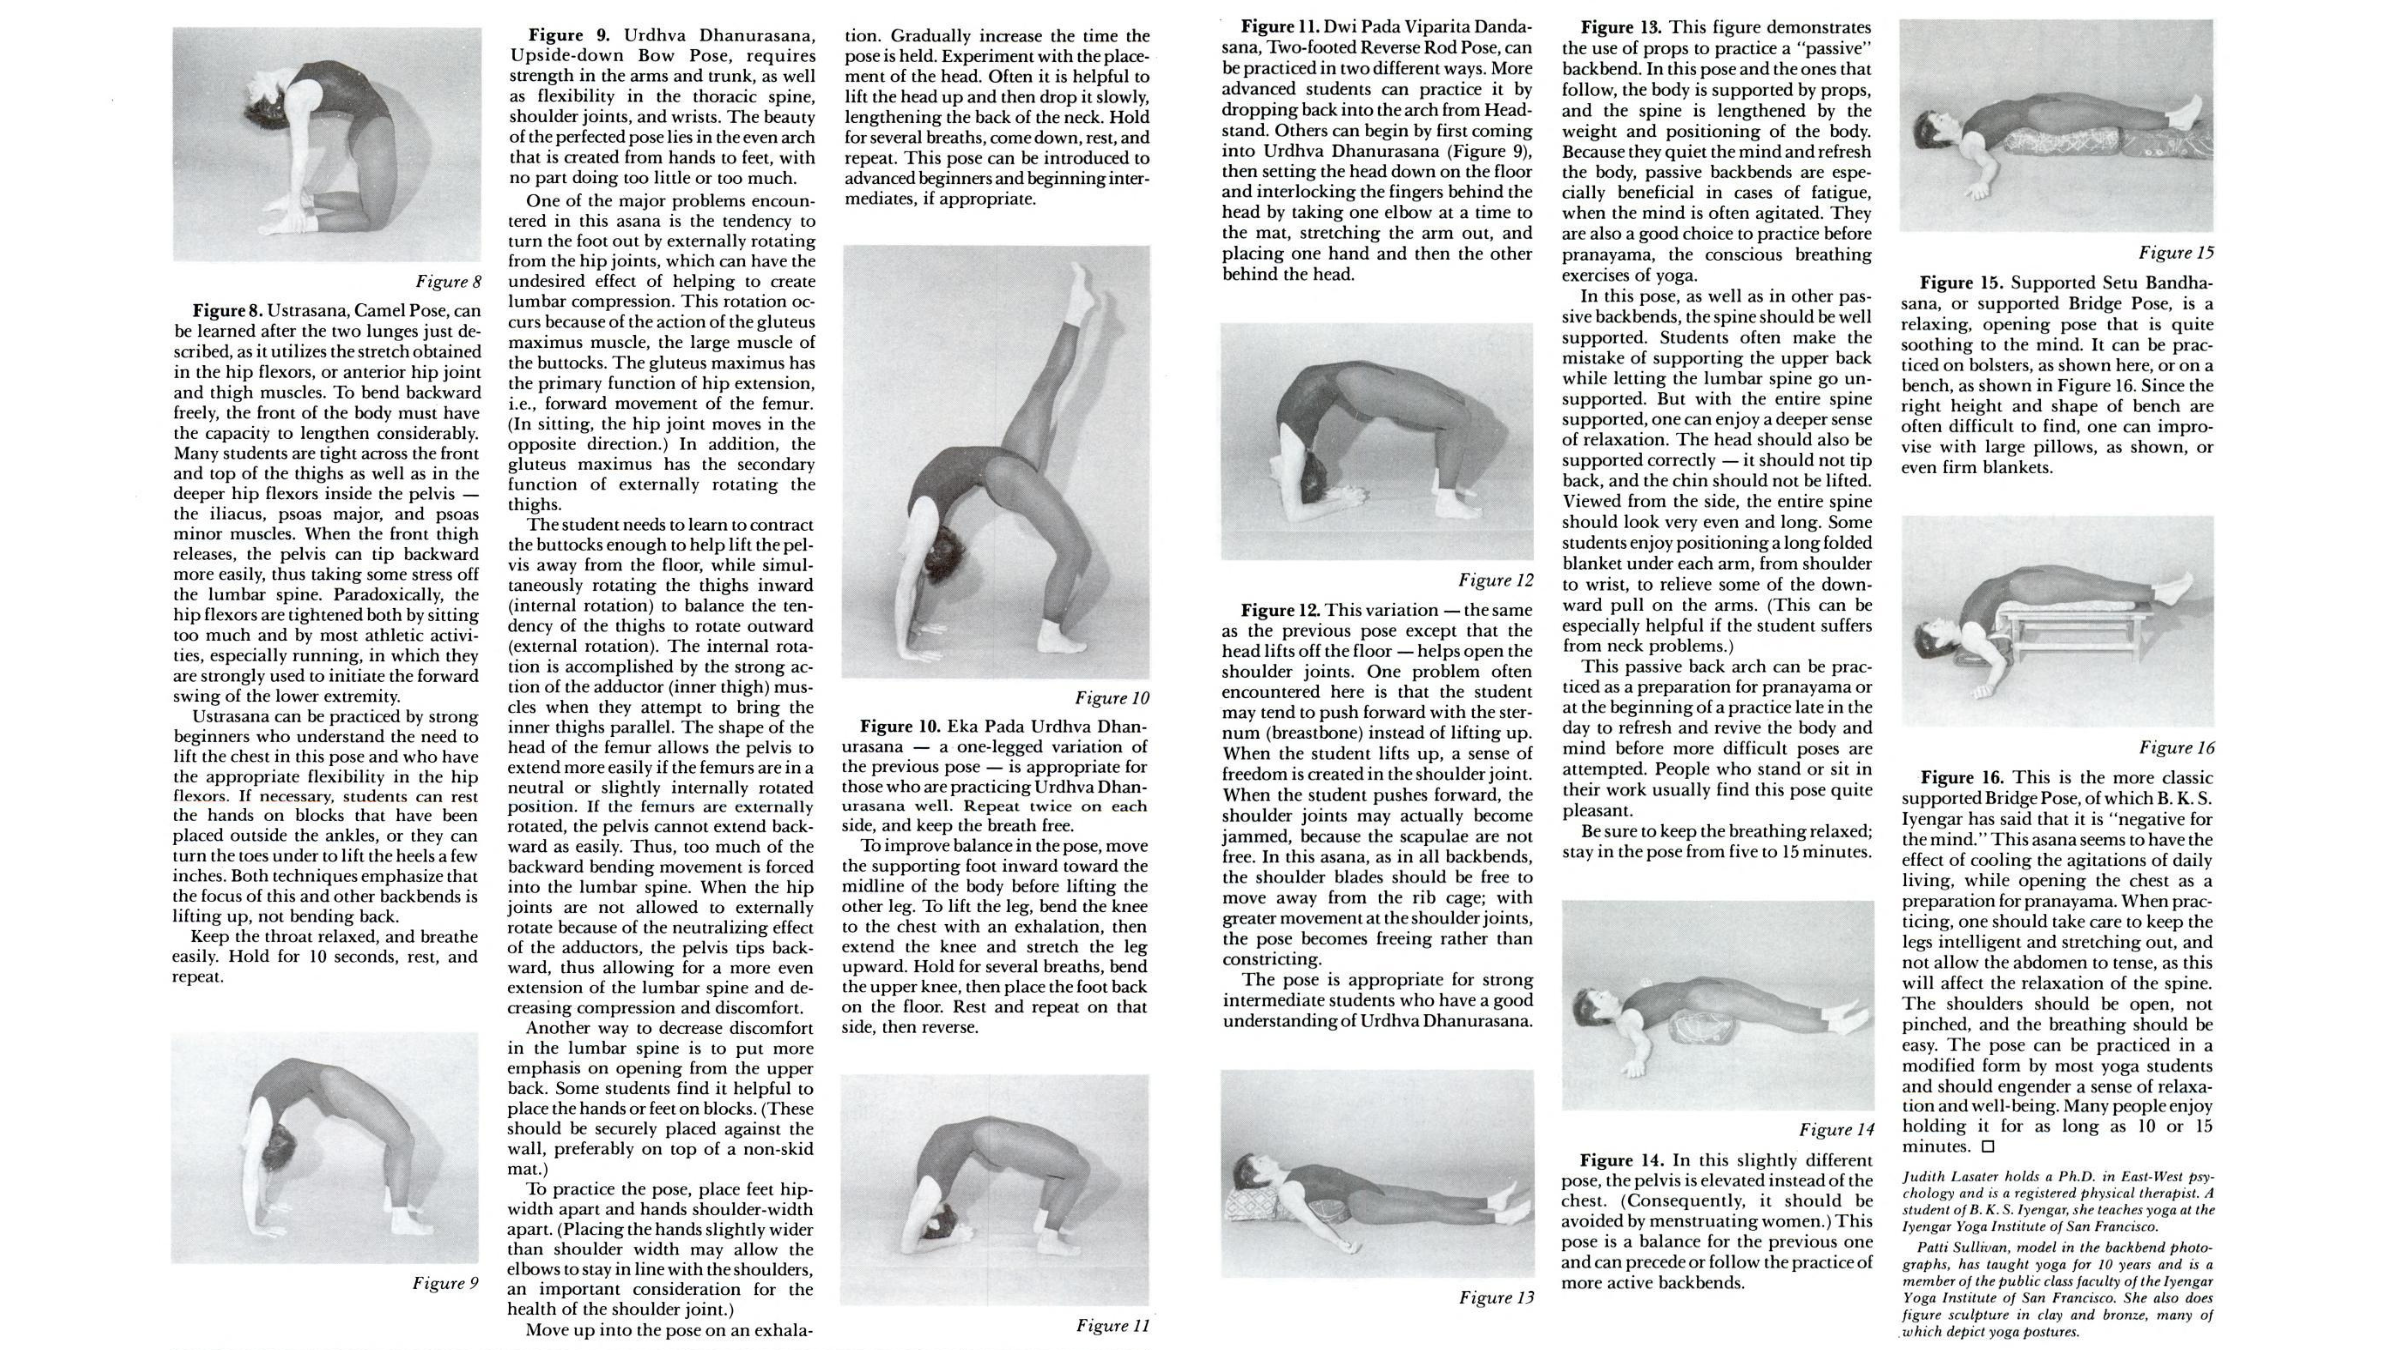
8. Camel Pose
Camel Pose (Ustrasana) can be learned after the two lunges just described, as it utilizes the stretch obtained in the hip flexors, or anterior hip joint and thigh muscles. To bend backward freely, the front of the body must have the capacity to lengthen considerably.
Many students are tight across the front and top of the thighs as well as in the deeper hip flexors inside the pelvis—the iliacus, psoas major, and psoas minor muscles. When the front thigh releases, the pelvis can tip backward more easily, thus taking some stress off the lumbar spine. Paradoxically, the hip flexors are tightened both by sitting too much and by most athletic activities, especially running, in which they are strongly used to initiate the forward swing of the lower extremity.
Camel Pose can be practiced by strong beginners who understand the need to lift the chest in this pose and who have the appropriate flexibility in the hip flexors. If necessary, students can rest the hands on blocks that have been placed outside the ankles, or they can turn the toes under to lift the heels a few inches. Both techniques emphasize that the focus of this and other backbends is lifting up, not bending back.
Keep the throat relaxed, and breathe easily. Hold for 10 seconds, rest, and repeat.
9. Upside Down Bow Pose
Upside-down Bow Pose requires strength in the arms and trunk, as well as flexibility in the thoracic spine, shoulder joints, and wrists. The beauty of the perfected pose lies in the even arch that is created from hands to feet, with no part doing too little or too much.
One of the major problems encountered in this asana is the tendency to turn the foot out by externally rotating from the hip joints, which can have the undesired effect of helping to create lumbar compression. This rotation occurs because of the action of the gluteus maximus muscle, the large muscle of the buttocks. The gluteus maximus has the primary function of hip extension, ie., forward movement of the femur. (In sitting, the hip joint moves in the opposite direction.) In addition, the gluteus maximus has the secondary function of externally rotating the thighs.
The student needs to learn to contract the buttocks enough to help lift the pelvis away from the floor, while simultaneously rotating the thighs inward (internal rotation) to balance the tendency of the thighs to rotate outward (external rotation). The internal rotation is accomplished by the strong action of the adductor (inner thigh) muscles when they attempt to bring the inner thighs parallel. The shape of the head of the femur allows the pelvis to extend more easily if the femurs are in a neutral or slightly internally rotated position. If the femurs are externally rotated, the pelvis cannot extend backward as easily. Thus, too much of the backward bending movement is forced into the lumbar spine. When the hip joints are not allowed to externally rotate because of the neutralizing effect of the adductors, the pelvis tips backward, thus allowing for a more even extension of the lumbar spine and decreasing compression and discomfort.
Another way to decrease discomfort in the lumbar spine is to put more emphasis on opening from the upper back. Some students find it helpful to place the hands or feet on blocks (These should be securely placed against the wall, preferably on top of a non-skid mat.)
To practice the pose, place feet hip-width apart and hands shoulder-width apart. (Placing the hands slightly wider than shoulder width may allow the elbows to stay in line with the shoulders, an important consideration for the health of the shoulder joint.)
Move up into the pose on an exhalation. Gradually increase the time the pose is held. Experiment with the placement of the head. Often it is helpful to hift the head up and then drop it slowly, lengthening the back of the neck. Hold for several breaths, come down, rest, and repeat. This pose can be introduced to advanced beginners and beginning inter-mediates, if appropriate.
10. Upside Down Bow Pose Variation
A one-legged variation of the previous pose, this shape is appropriate for those who are practicing Upward-Facing Bow Pose as well. Repeat twice on each side, and keep the breath free.
To improve balance in the pose, move the supporting foot inward toward the midline of the body before lifting the other leg. To lift the leg, bend the knee to the chest with an exhalation, then extend the knee and stretch the leg upward. Hold for several breaths, bend the upper knee, then place the foot back on the floor. Rest and repeat on that side, then reverse.
11. Two-Footed Reverse Rod Pose
Two-footed Reverse Rod Pose can be practiced in two different ways. More advanced students can practice it by dropping back into the arch from Headstand. Others can begin by first coming into Upward-Facing Bow Pose (Figure 9), then setting the head down on the floor and interlocking the fingers behind the head by taking one elbow at a time to the mat, stretching the arm out, and placing one hand and then the other behind the head.
12. Two-Footed Reverse Rod Pose Variation
This variation—the same as the previous pose except that the head lifts off the floor—helps open the shoulder joints. One problem often encountered here is that the student may tend to push forward with the sternum (breastbone) instead of lifting up.
When the student lifts up, a sense of freedom is created in the shoulder joint. When the student pushes forward, the shoulder joints may actually become jammed, because the scapulae are not free. In this asana, as in all backbends, the shoulder blades should be free to move away from the rib cage; with greater movement at the shoulder joints, the pose becomes freeing rather than constricting.
The pose is appropriate for strong intermediate students who have a good understanding of Upward-Facing Bow.
13. Supported Fish Pose Variation
This figure demonstrates the use of props to practice a “passive” backbend. In this pose and the ones that follow, the body is supported by props, and the spine is lengthened by the weight and positioning of the body.
Because they quiet the mind and refresh the body, passive backbends are especially beneficial in cases of fatigue, when the mind is often agitated. They are also a good choice to practice before pranayama, the conscious breathing exercises of yoga.
In this pose, as well as in other passive backbends, the spine should be well supported. Students often make the mistake of supporting the upper back while letting the lumbar spine go unsupported. But with the entire spine supported, one can enjoy a deeper sense of relaxation. The head should also be supported correctly—it should not tip back, and the chin should not be lifted.
Viewed from the side, the entire spine should look very even and long. Some students enjoy positioning a long folded blanket under each arm, from shoulder to wrist, to relieve some of the downward pull on the arms. (This can be especially helpful if the student suffers from neck problems.)
This passive back arch can be practiced as a preparation for pranayama or at the beginning of a practice late in the day to refresh and revive the body and mind before more difficult poses are attempted. People who stand or sit in their work usually find this pose quite pleasant.
Be sure to keep the breathing relaxed; stay in the pose from five to 15 minutes.
14. Supported Fish Pose Variation 2
In this slightly different pose, the pelvis is elevated instead of the chest. (Consequently, it should be avoided by menstruating women.) This pose is a balance for the previous one and can precede or follow the practice of more active backbends.
15. Supported Bridge Pose
Supported Bridge Pose is a relaxing, opening pose that is quite soothing to the mind. It can be practiced on bolsters, as shown here, or on a bench, as shown in Figure 16. Since the right height and shape of bench are often difficult to find, one can improvise with large pillows, as shown, or even firm blankets.
16. Supported Bridge Pose 2
This is the more classic supported Bridge Pose, of which B. K.S. Iyengar has said that it is “negative for the mind.” This asana seems to have the effect of cooling the agitations of daily living, while opening the chest as a preparation for pranayama. When practicing, one should take care to keep the legs intelligent and stretching out, and not allow the abdomen to tense, as this will affect the relaxation of the spine.
The shoulders should be open, not pinched, and the breathing should be easy. The pose can be practiced in a modified form by most yoga students and should engender a sense of relaxation and well-being. Many people enjoy holding it for as long as 10 or 15 minutes.