


“], “filter”: { “nextExceptions”: “img, blockquote, div”, “nextContainsExceptions”: “img, blockquote, a.btn, a.o-button”} }”>
Heading out the door? Read this article on the new Outside+ app available now on iOS devices for members!
>”,”name”:”in-content-cta”,”type”:”link”}}”>Download the app.
Perhaps two of the most obvious—and maybe the most talked about—benefits of a physical yoga practice are greater flexibility and improved strength. However, there’s a less-discussed element that is just as crucial on the yoga mat as it is in everyday life—and that’s mobility.
“Most people make the mistake of seeing mobility as synonymous with flexibility,” says Jack Santora, exercise physiologist and founder of Stronghold Strength and Conditioning Co. “But mobility encompasses flexibility, strength, range of motion, stability, and more.”
We all have physical strengths and weaknesses, whether in yoga, at the gym, or while carrying bags of groceries. Practicing mobility exercises is one way to help support you in all the ways you move your body, whether that means developing greater body awareness, sustainable movement habits, or better posture.
Why Mobility Matters
Mobility generally refers to the ability to move your body in the ways you intend to with relative ease. Though it may sound like a simple concept, it involves the synchronization of many parts of the body. “It ties together our fascial, neuromuscular, and musculoskeletal systems and how well they’re all actually working together as a team,” says Santora. “If you’re lacking mobility, your team is struggling as a whole and lacking efficiency or only running at half speed.”
Less mobility generally means more tension in the muscles and joints, poor posture, and a higher risk of injury.
Even if you’re physically active, you’re not necessarily activating your mobility in ways that help you maintain or improve it. If your typical workout focuses on stretching and strengthening, for example, you might be overlooking range of motion, coordination, or balance. The result? “You use greater force and place more stress on certain joints than they were designed to carry,” says Santora. “The thousands of exercises you do with poor form eventually catch up to you and then you find yourself wondering how you got hurt.”
7 Ways to Use Resistance Bands in Yoga Poses
Using bands in yoga poses helps increase muscle function in ways that are more challenging, yet also more effective, than practicing without resistance. Practicing with bands can also help you gain better control, strength, and form in these poses when you return to them without the bands.
Santora recommends starting at a lighter resistance. “Even starting with a lighter band, you can step back further and increase tension if needed before making the jump to a tighter band,” he says. A rule of thumb to follow while working with the bands: “There should always be some degree of tension on the band—never allowing it to go lax,” Santora adds.
Any looped resistance band will do, but Santora uses Monster Bands in the practice below. He also recommends the fabric bands by Vector Athletics. “In general, the Monster Bands tend to be a bit more stiff and provide more resistance, but for some exercises, the fabric is a more comfortable option depending on where the band is pressing against the body.”
Some exercises call for anchoring the band. You can tie it to a post (such as that found on a gym station) or the leg of a heavy piece of furniture—just make sure it won’t move while you stretch. You can also explore anchor straps to set up on a door.
1. Cat-Cow
Activating your muscles in your ribs (serratus), abdomen, and glutes in this exercise may help mitigate shoulder and spinal injuries and can even play a role in addressing them.
How to:
- Holding onto either end of the band, wrap it behind you so that it sits between your shoulder blades and lumbar spine.
- Come to all fours, with your hands stacked below your shoulders and knees stacked below your hips. Face your elbows toward your ribs and keep your arms as straight as possible.
- Exhale and draw your chin toward your chest, rounding your upper back in Cat Pose. Press your shoulders as much as possible against the resistance of the band.
- Inhale, look forward, tilt your pelvis, and arch your back in Cow Pose. Draw your shoulder blades together and allow the band to help your back arch. Cycle between Cat and Cow for up to 30 seconds.
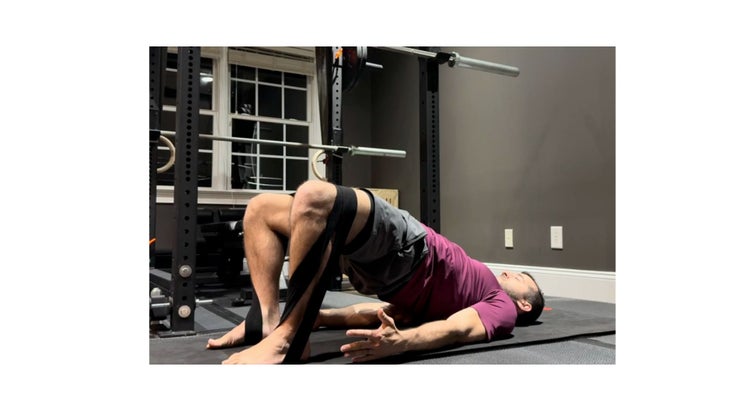
2. Bridge Pose
Take your Bridge strength up a notch to help increase stability in the hips and knees.
- Sit with your knees bent and your feet flat on the mat hip-width apart. Hold your band at about shoulder width so the ends hang down and form loops. Place the ends of each loop over each foot and then slide the band up past your knees and over your thighs.
- Lie on your back, keeping your feet planted and your knees pointed toward the ceiling. Inch your heels as close to your glutes as possible. Draw your shoulder blades down away from your ears and reach your fingers toward your heels.
- Engage your abdominals, press your feet into the floor, and lift your hips into Bridge Pose. Press your knees out to the sides against the resistance of the band. Stay here for up to 30 seconds. Rest and repeat.
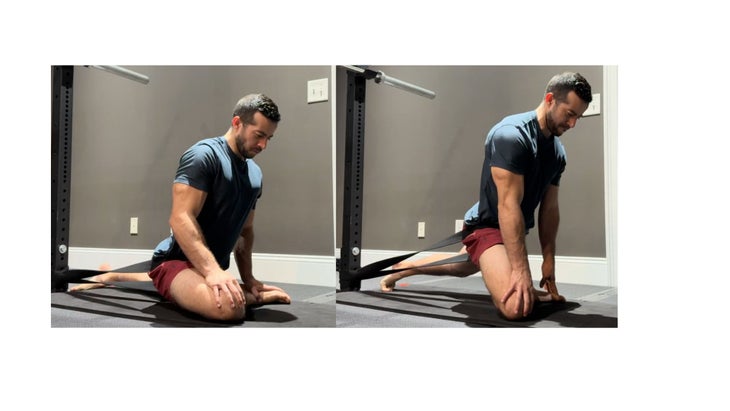
3. Pigeon Pose
Lifting your hips in Pigeon against the resistance of the band helps improve lower body strength. Return to the stretch in between reps.
How to:
- Anchor your band low on a post. Step one leg inside of the loop of the band, placing the loop at your hip crease. Turn away from the band so that it pulls your hips toward the post.
- Make your way to a kneeling position. Draw the foot of your banded leg across the front of your body, lowering your shin and outer thigh to the mat. Extend your back leg behind you in Pigeon Pose.
- Place one hand on your front foot and one hand on your front knee to help make sure you’re facing forward as much as possible. Breathe here.
- Tuck your back toes and lift your hips for 4-5 seconds, pushing against the resistance of the band. Release back down, allowing the band to help you sink deeper into the stretch. Lift and lower your hips in Pigeon for up to 2 minutes.
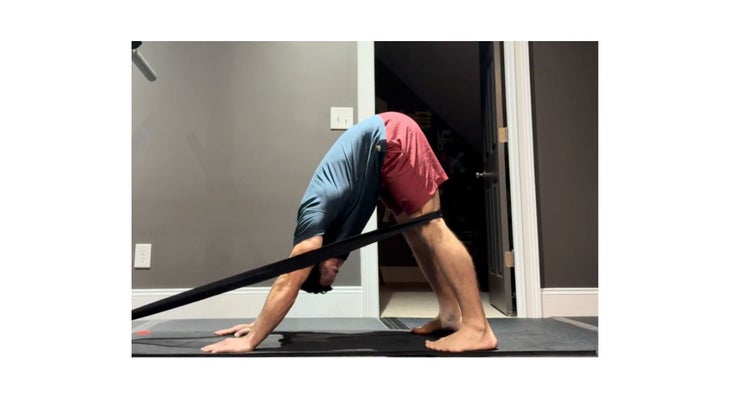
4. Downward-Facing Dog
Using the band in Down Dog activates reciprocal inhibition, which engages muscles on one side of the body (quadriceps) and releases muscles on the opposite side (hamstrings). This unlocks new range of motion.
How to:
- Anchor your band low on a post. Step both legs inside of the band and come to hands and knees facing the band. The band should be at the back of your knees.
- From all fours, shift away from the band a few inches to increase the tension. Face your elbows toward your ribs.
- Start to straighten your legs and reach your chest toward your thighs with your head between your arms in Down Dog. Focus on lowering your heels toward the floor as you engage your quadriceps. Push the backs of your knees against the tension of the band.
- Stay here for up to 5 seconds. Cycle between all fours and Downward Dog for up to 2 minutes.
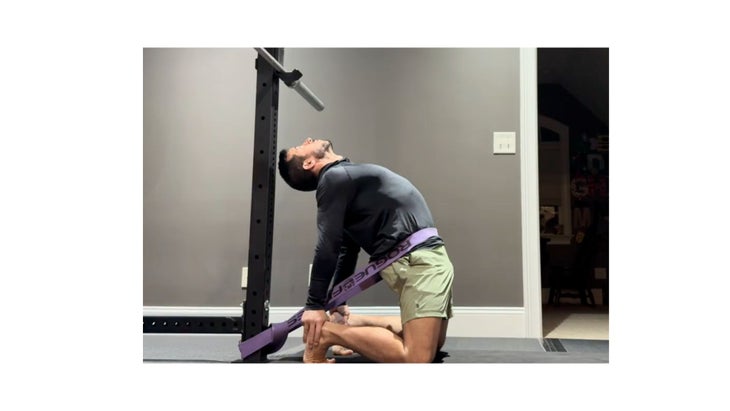
5. Camel Pose Variation
Here’s a simple banded set up that you can use to take your Camel to the next level.
How to:
- Anchor your band low on a post. Facing away from the post, step one leg at a time into the loop of the band. Kneel, with your toes tucked beneath you, facing away from the band, inching yourself far enough away to create tension in the band. The band should be at about hip level.
- Separate your knees hip-width apart and reach your hands back to grasp your heels with your thumbs on the inside of your ankles.
- Engage your glutes and shift your hips forward against the tension of the band. Fully extend your arms as your upper back arches over your heels. Draw your shoulder blades toward each other.
- Stay here for a few seconds, then lower your hips back down and return to kneeling. Cycle between kneeling and Camel for 30 to 60 seconds.
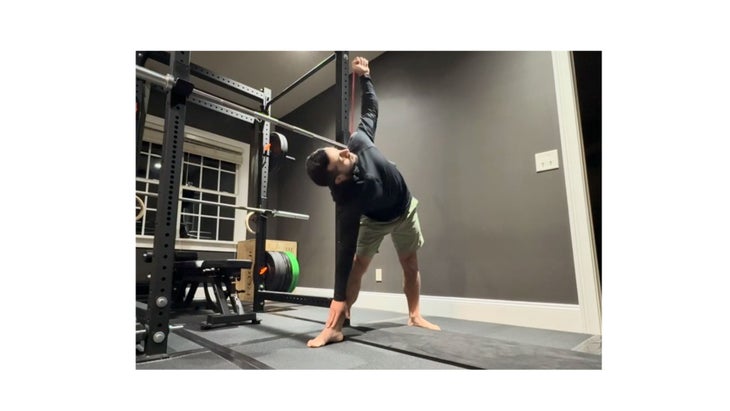
6. Triangle Pose
Using the band in Triangle can help improve thoracic rotation, such as twisting, which plays a significant role in the mobility of your shoulders and lower back.
How to:
- Anchor your band low on a post, holding the loop in one hand. Turn away from the band so it wrap it around your upper back and shoulder.
- Plant your feet so they’re more than hip-width apart. The leg on the side of the band faces forward. The other leg is straight with your foot turned out to the side.
- Place your free hand on that same side thigh just above your knee. Slide it toward your shin as you lean forward and straighten your banded arm as you reach toward the ceiling. Allow the band to rotate your torso open in a shape similar to Triangle Pose. Keep your banded wrist straight. Stay here for up to 30 seconds. For an added challenge, slide your bottom hand back up your leg to your thigh and down again. Then release and repeat on the other side.

7. Happy Baby Pose
This exercise helps develop range of motion and flexibility in the hip adductors and hamstrings, which are tight in almost everyone, whether you’re a runner, cyclist, or office worker. Because you’re lying on the floor and band act as external feedback to help you feel your core bracing the spine in a neutral position. (This position also translates into better posture in any yoga pose, your deadlifts, and in life.)
How to:
- Sit on the mat and draw your feet close to your hips. Anchor the band around the arch of one foot, wrap it around your low back, and anchor the other side around your other foot.
- Roll onto your back with your knees bent and drawn toward your chest. Roll your shoulders down away from your ears and establish a neutral spine.
- Grasp the outside of each foot, stacking your ankles over your knees and pushing your feet against the resistance of the band. Stay here or try pushing your feet against the bands to try and straighten your legs for 5 seconds, then returning to Happy Baby. Cycle through these two positions, or stay in Happy Baby, for up to 2 minutes.
- To release, roll onto your side and remove the band.


