


Published May 13, 2026 11:41AM
A lot of people are living with low back discomfort these days. One of these seemingly pervasive issues is lower back pain. According to the World Health Organization (WHO), it’s likely most of us will experience a bout of back pain at least once in their life. Approximately 90 percent of these cases falling under the umbrella of “non-specific lower back pain.” That means there isn’t a distinct or defined musculoskeletal injury underlying the issue. Yet you’re still experiencing pain—and wanting relief. Hello, yoga poses for back pain.
Most mild low back pain—especially the generalized, non-specific type of low back pain that seemingly happens out of nowhere—can be eased through stretching and prevented by strengthening the muscles of the back and core. An abundance of research supports yoga as an effective modality for chronic low back pain, and additional evidence suggests yoga can be as effective as traditional physical therapy for reducing pain and restoring function associated with some back injuries.
Not only that, yoga can improve your core strength, flexibility, and body awareness, each of which can potentially lessen lower back pain and help prevent you from experiencing a relapse. The muscles of the core include the superficial and deeper muscles of the abdomen, spine, and pelvic floor. These help stabilize and support the spine so you can find proper alignment. But slouching, failing to engage your core when you’re exercising or performing functional everyday activities, and using poor lifting mechanics by leaning over and bending your back rather than squatting down and using your legs to pick up an object can all contribute to back injuries and chronic back pain.
The following yoga poses for back pain are designed for when you’re past the worst of throngs of pain and seeking general relief from discomfort and ways to elude pain in the future.
10 Best Yoga Poses for Back Pain
The following yoga poses for back pain help bring awareness to the core muscles so that you can properly activate them during movement and even more static situations, such as sitting in a chair. Some of the yoga poses also directly strengthen the core muscles, lower back muscles, and/or hips and glutes.
As you practice these yoga poses for lower back pain, explore how each feels in your body and always err on the side of less, not more, sensation. If anything increases your pain, ease up or opt out of the pose.
1. – 2. Cat-Cow
These poses ask you to move between two shapes and, in so doing, bring awareness and mobility to each section of your spine. It’s also a helpful warm-up before practicing any other poses for back strengthening.
How to: Come onto hands and knees with your shoulders over wrists and hips over knees. As you inhale, lower your belly and arch your back in Cow Pose.
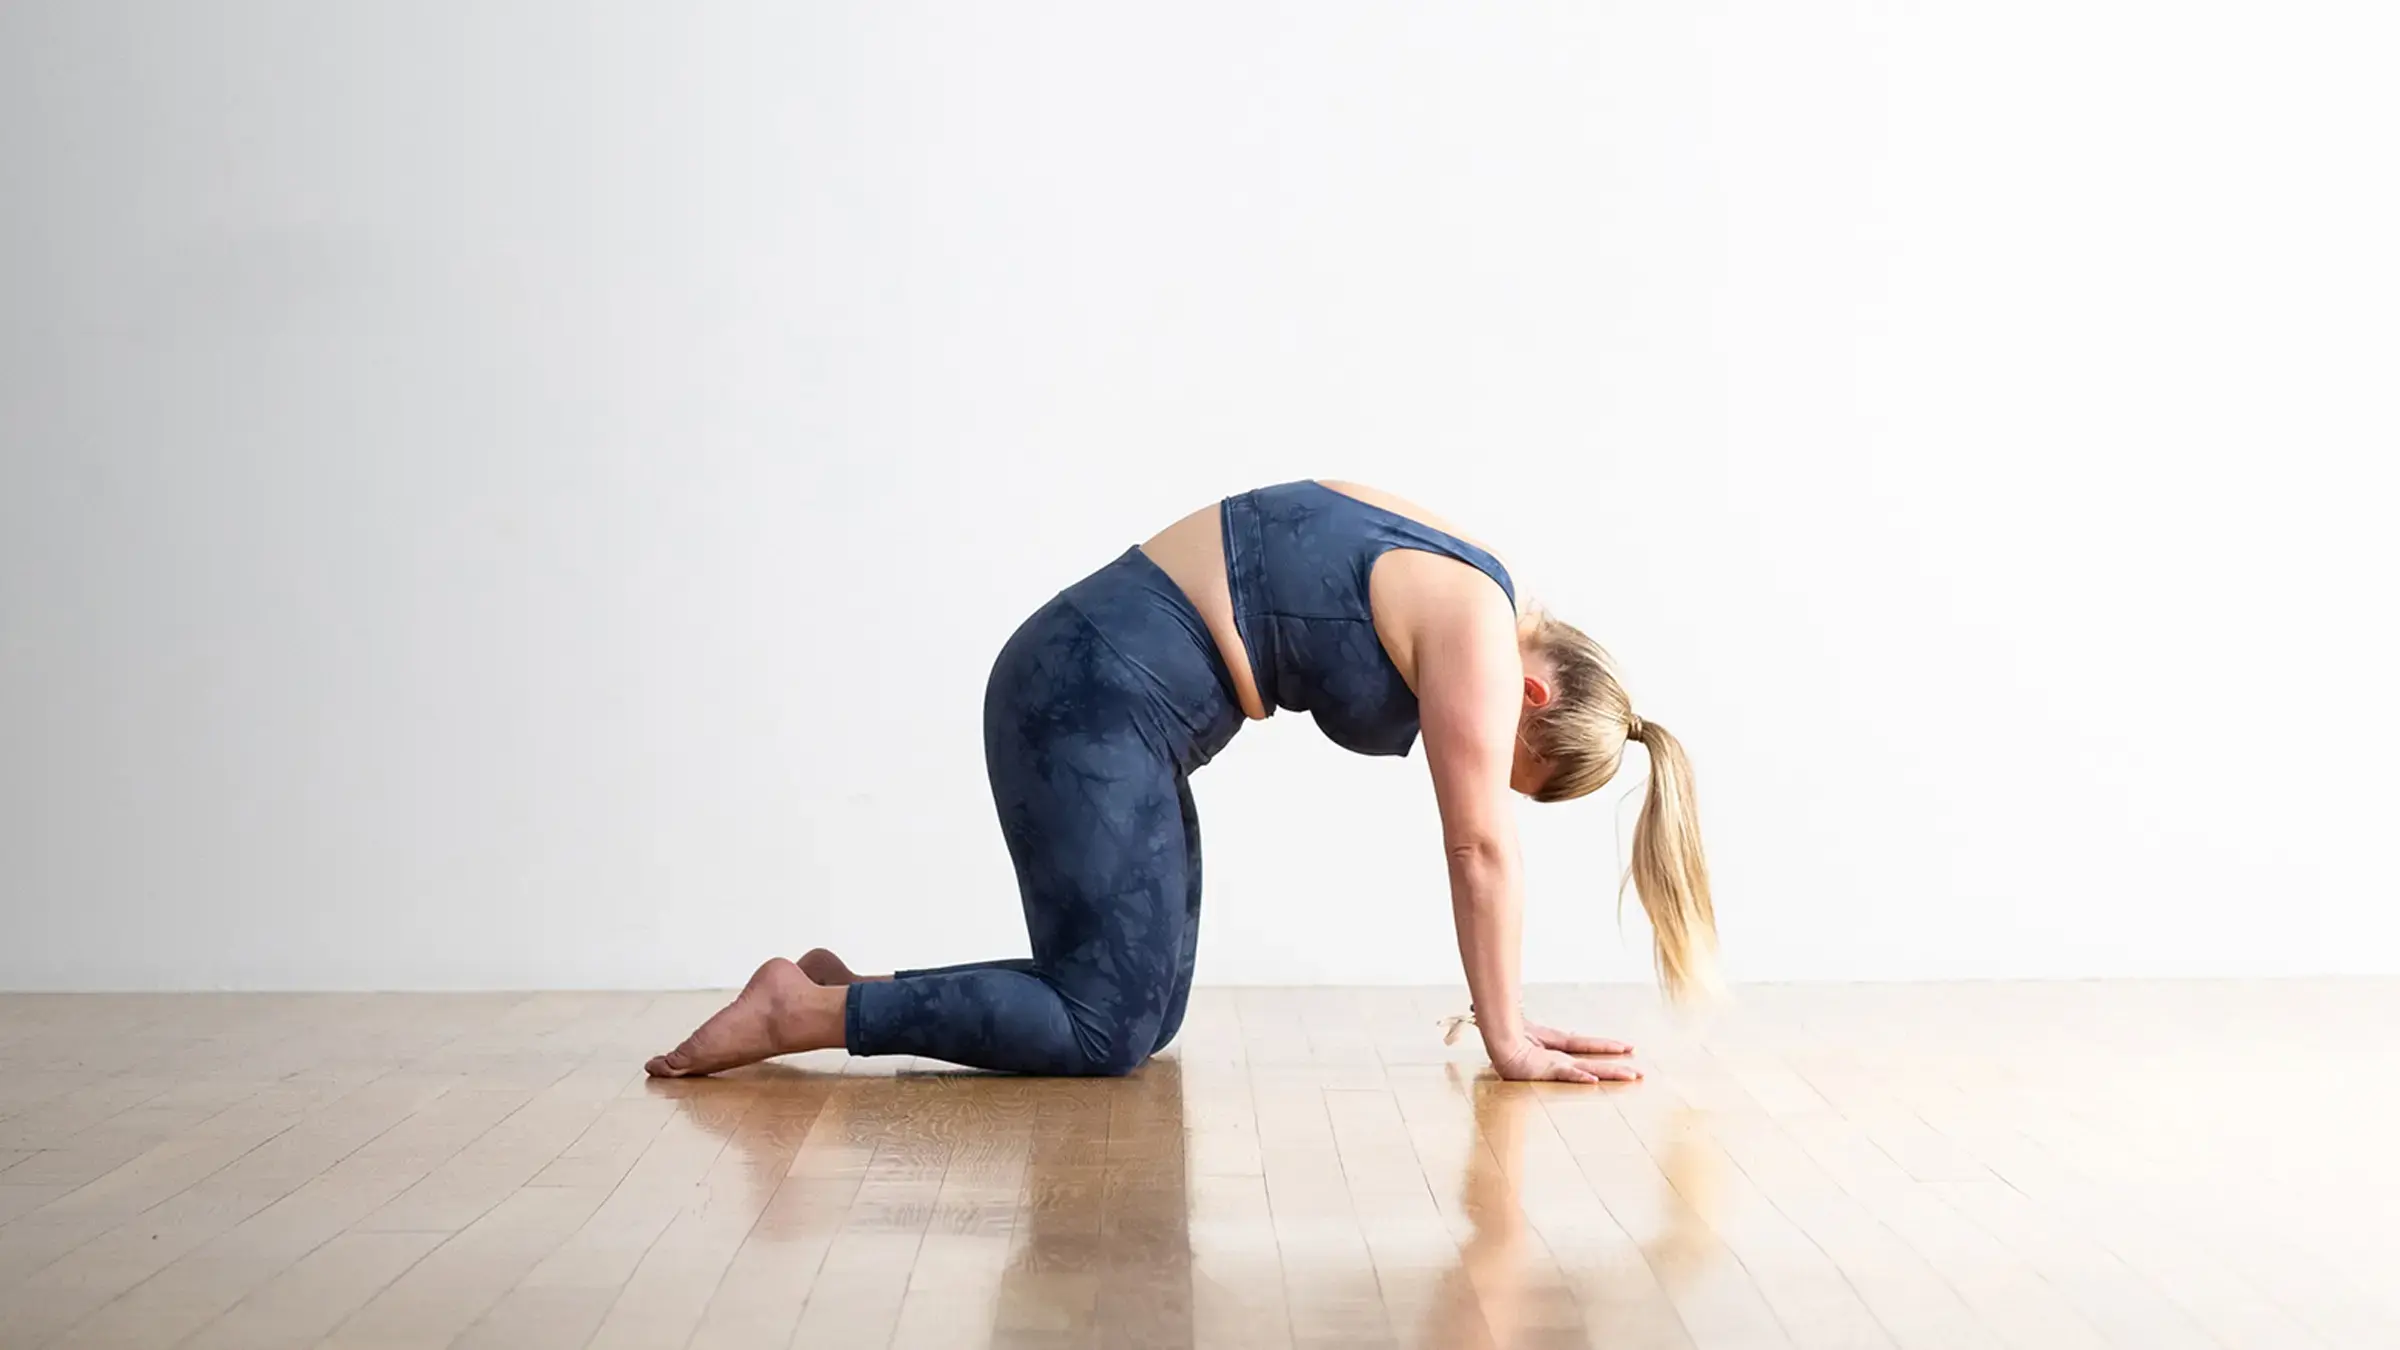
As you exhale, round your back and release your neck in Cat Pose.
Continue moving between these shapes for at least 30 seconds. Try visualizing each individual vertebra moving sequentially as you transition between shapes. Rest and then repeat it for another 30 seconds.
3. Chair Pose
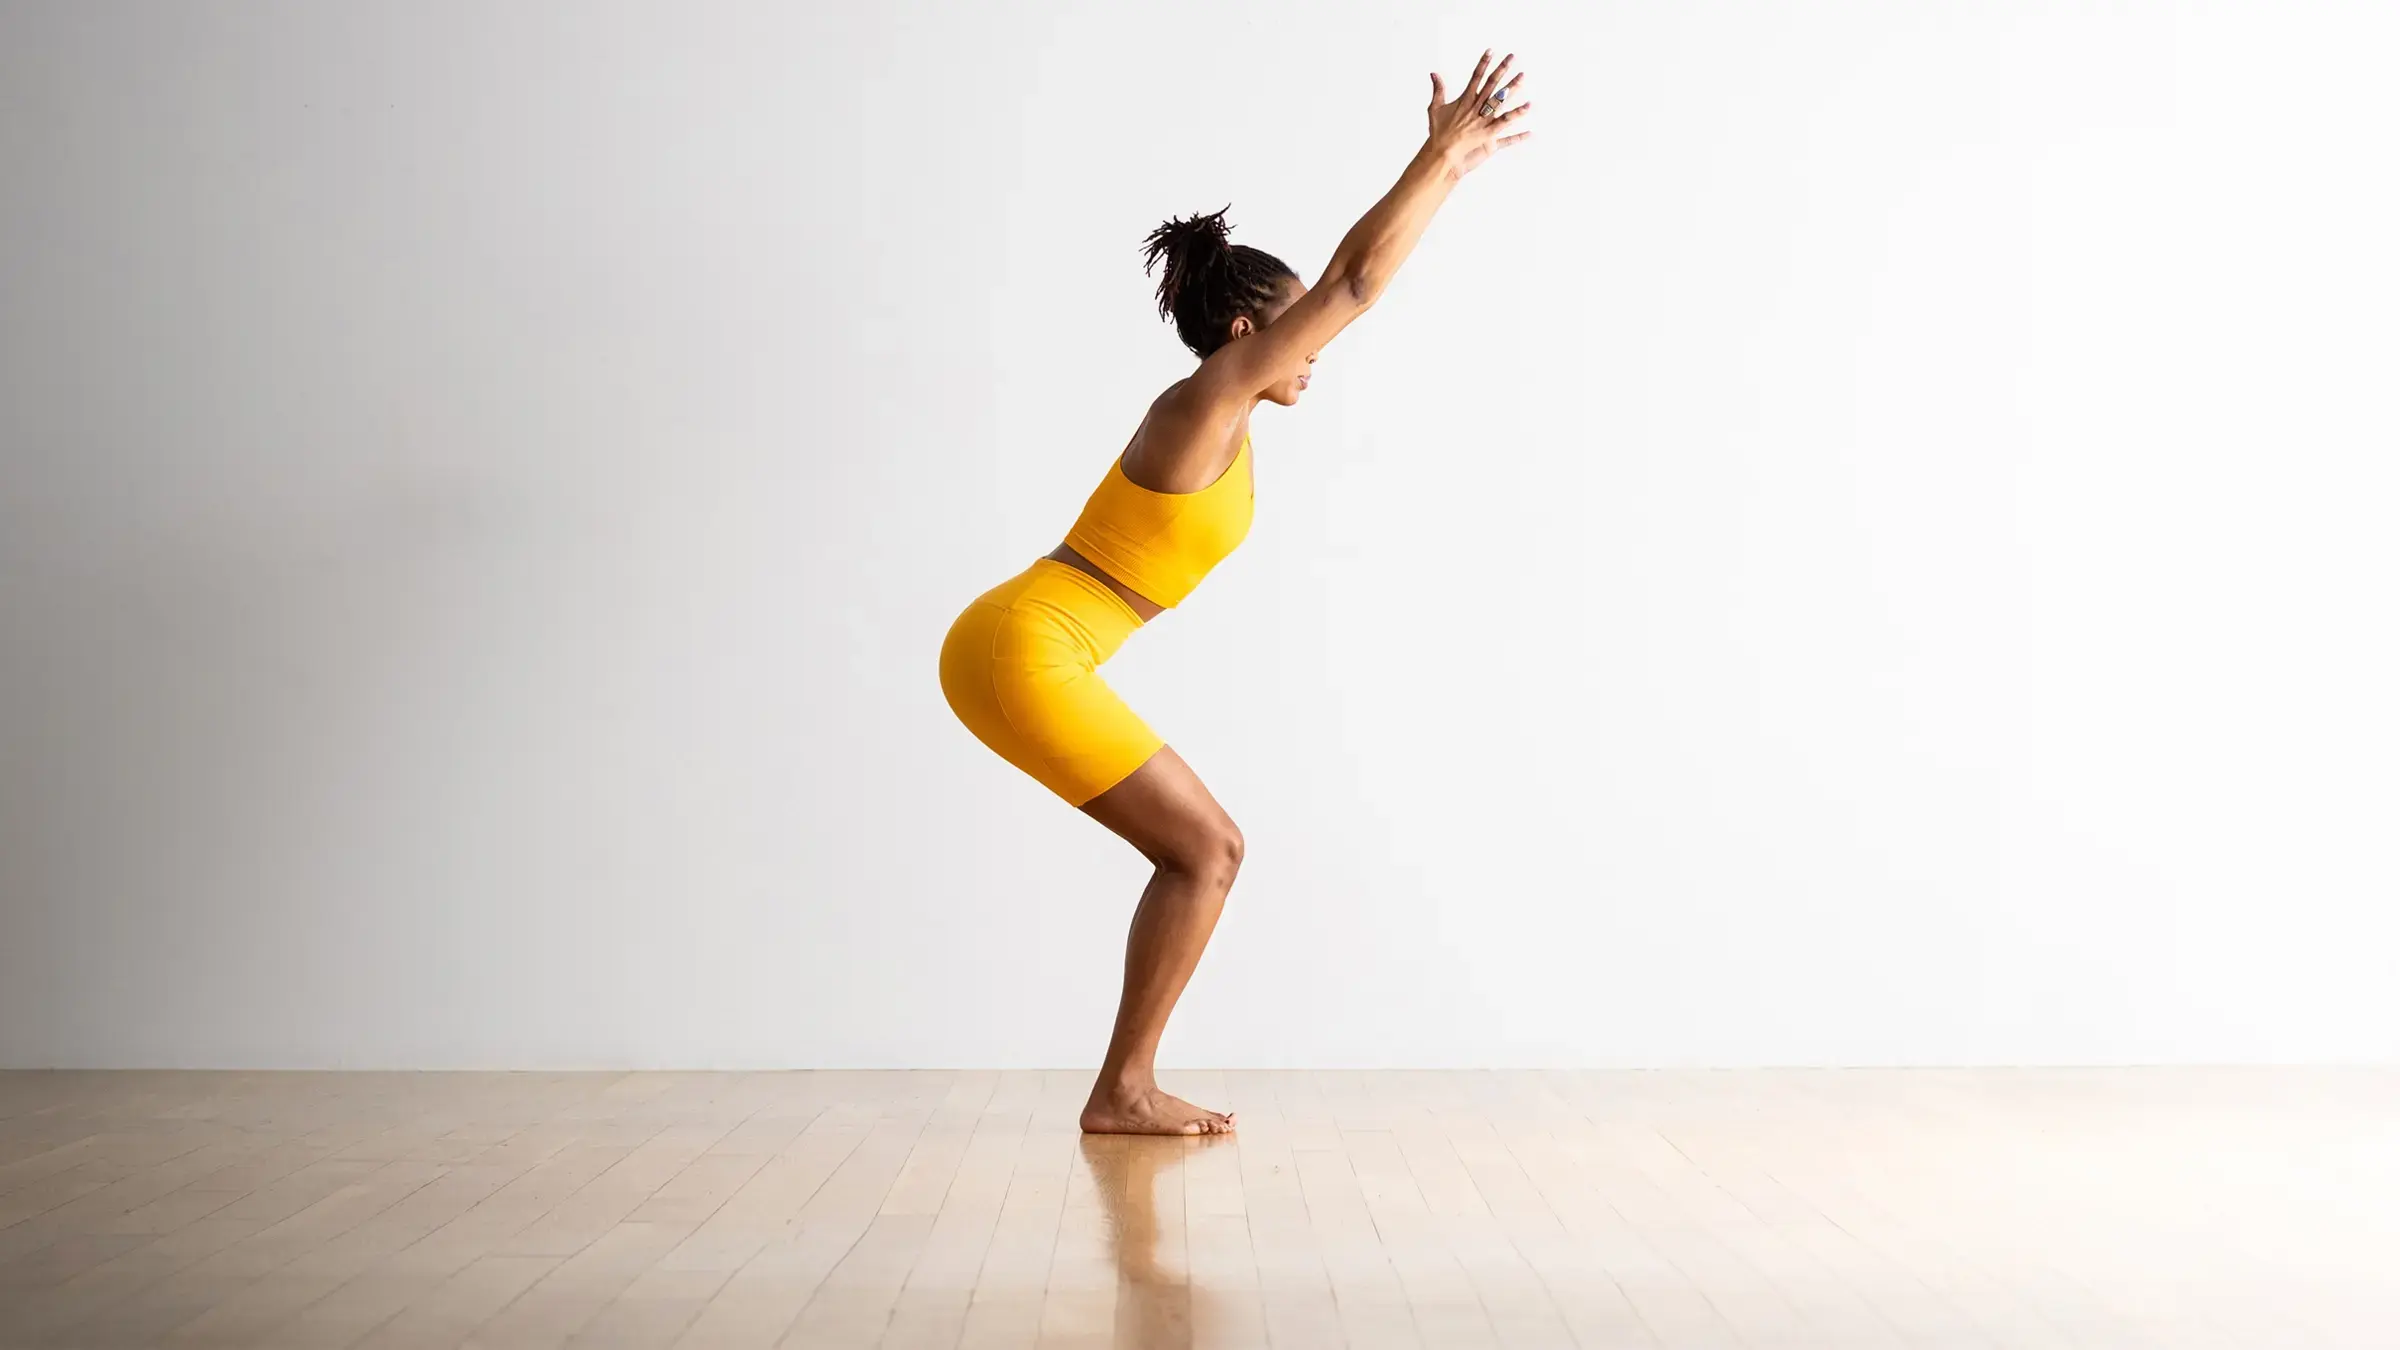
This pose is typically thought of as a leg-strengthening posture. And it is. But strong legs (and glutes!) are the foundation for a strong back. Also, the overhead reach elongates the spine and strengthens the shoulders as well as the smaller stabilizing muscles that support your posture.
How to: Start standing with your feet together or, if it’s more comfortable for your lower back, hip-distance apart. Bend your knees and sink your hips as if you’re about to sit back into a chair. Reach your arms alongside your ears, palms facing each other, in Chair Pose. Notice if you’re arching your back and if so, draw your navel toward your spine. Stay here and breathe for 30 seconds.
4. Standing Forward Bend
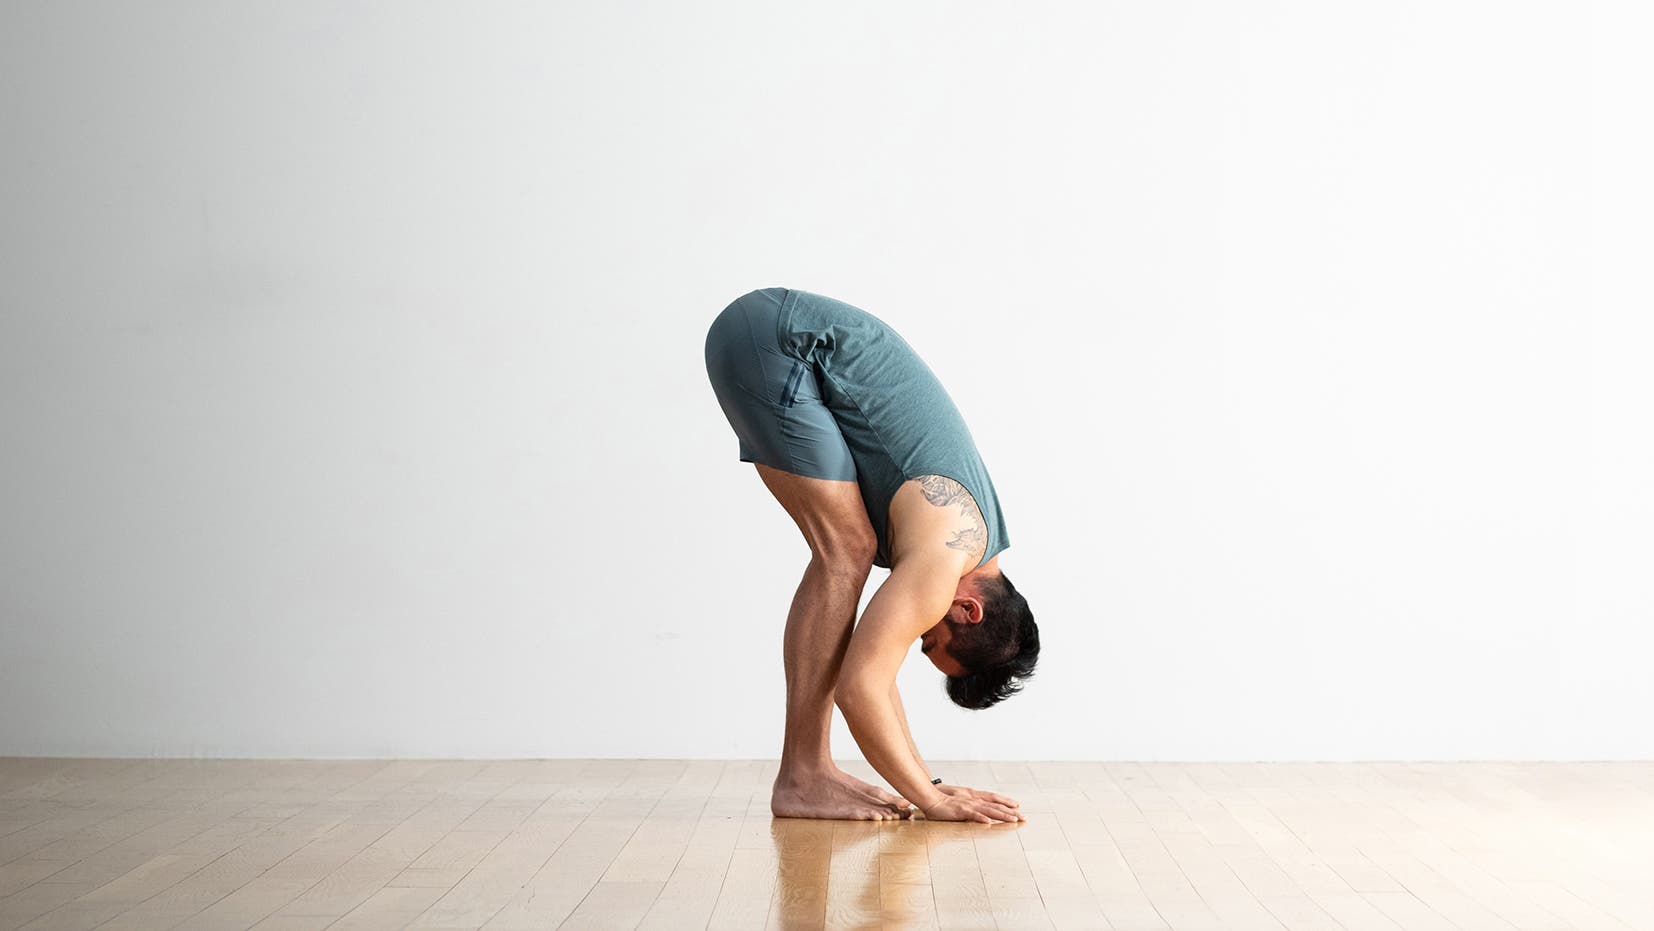
This shape stretches the entire back body, from your heels to the back of your head. And you don’t need a mat or a change of clothes in order to practice it. Simply step away from your desk every couple hours and let yourself release. The same shape can also be practiced seated.
How to: Stand with your feet hip-distance apart. Keep a slight bend in your knees as you slowly lean forward from your hips. Allow your back to round as you lean forward in Standing Forward Bend. Don’t force the stretch; think of allowing gravity to draw you closer to the mat. You want to feel a mild stretching sensation along the backs of your legs and/or your lower back. Stay here and breathe.
5. Extended Triangle Pose
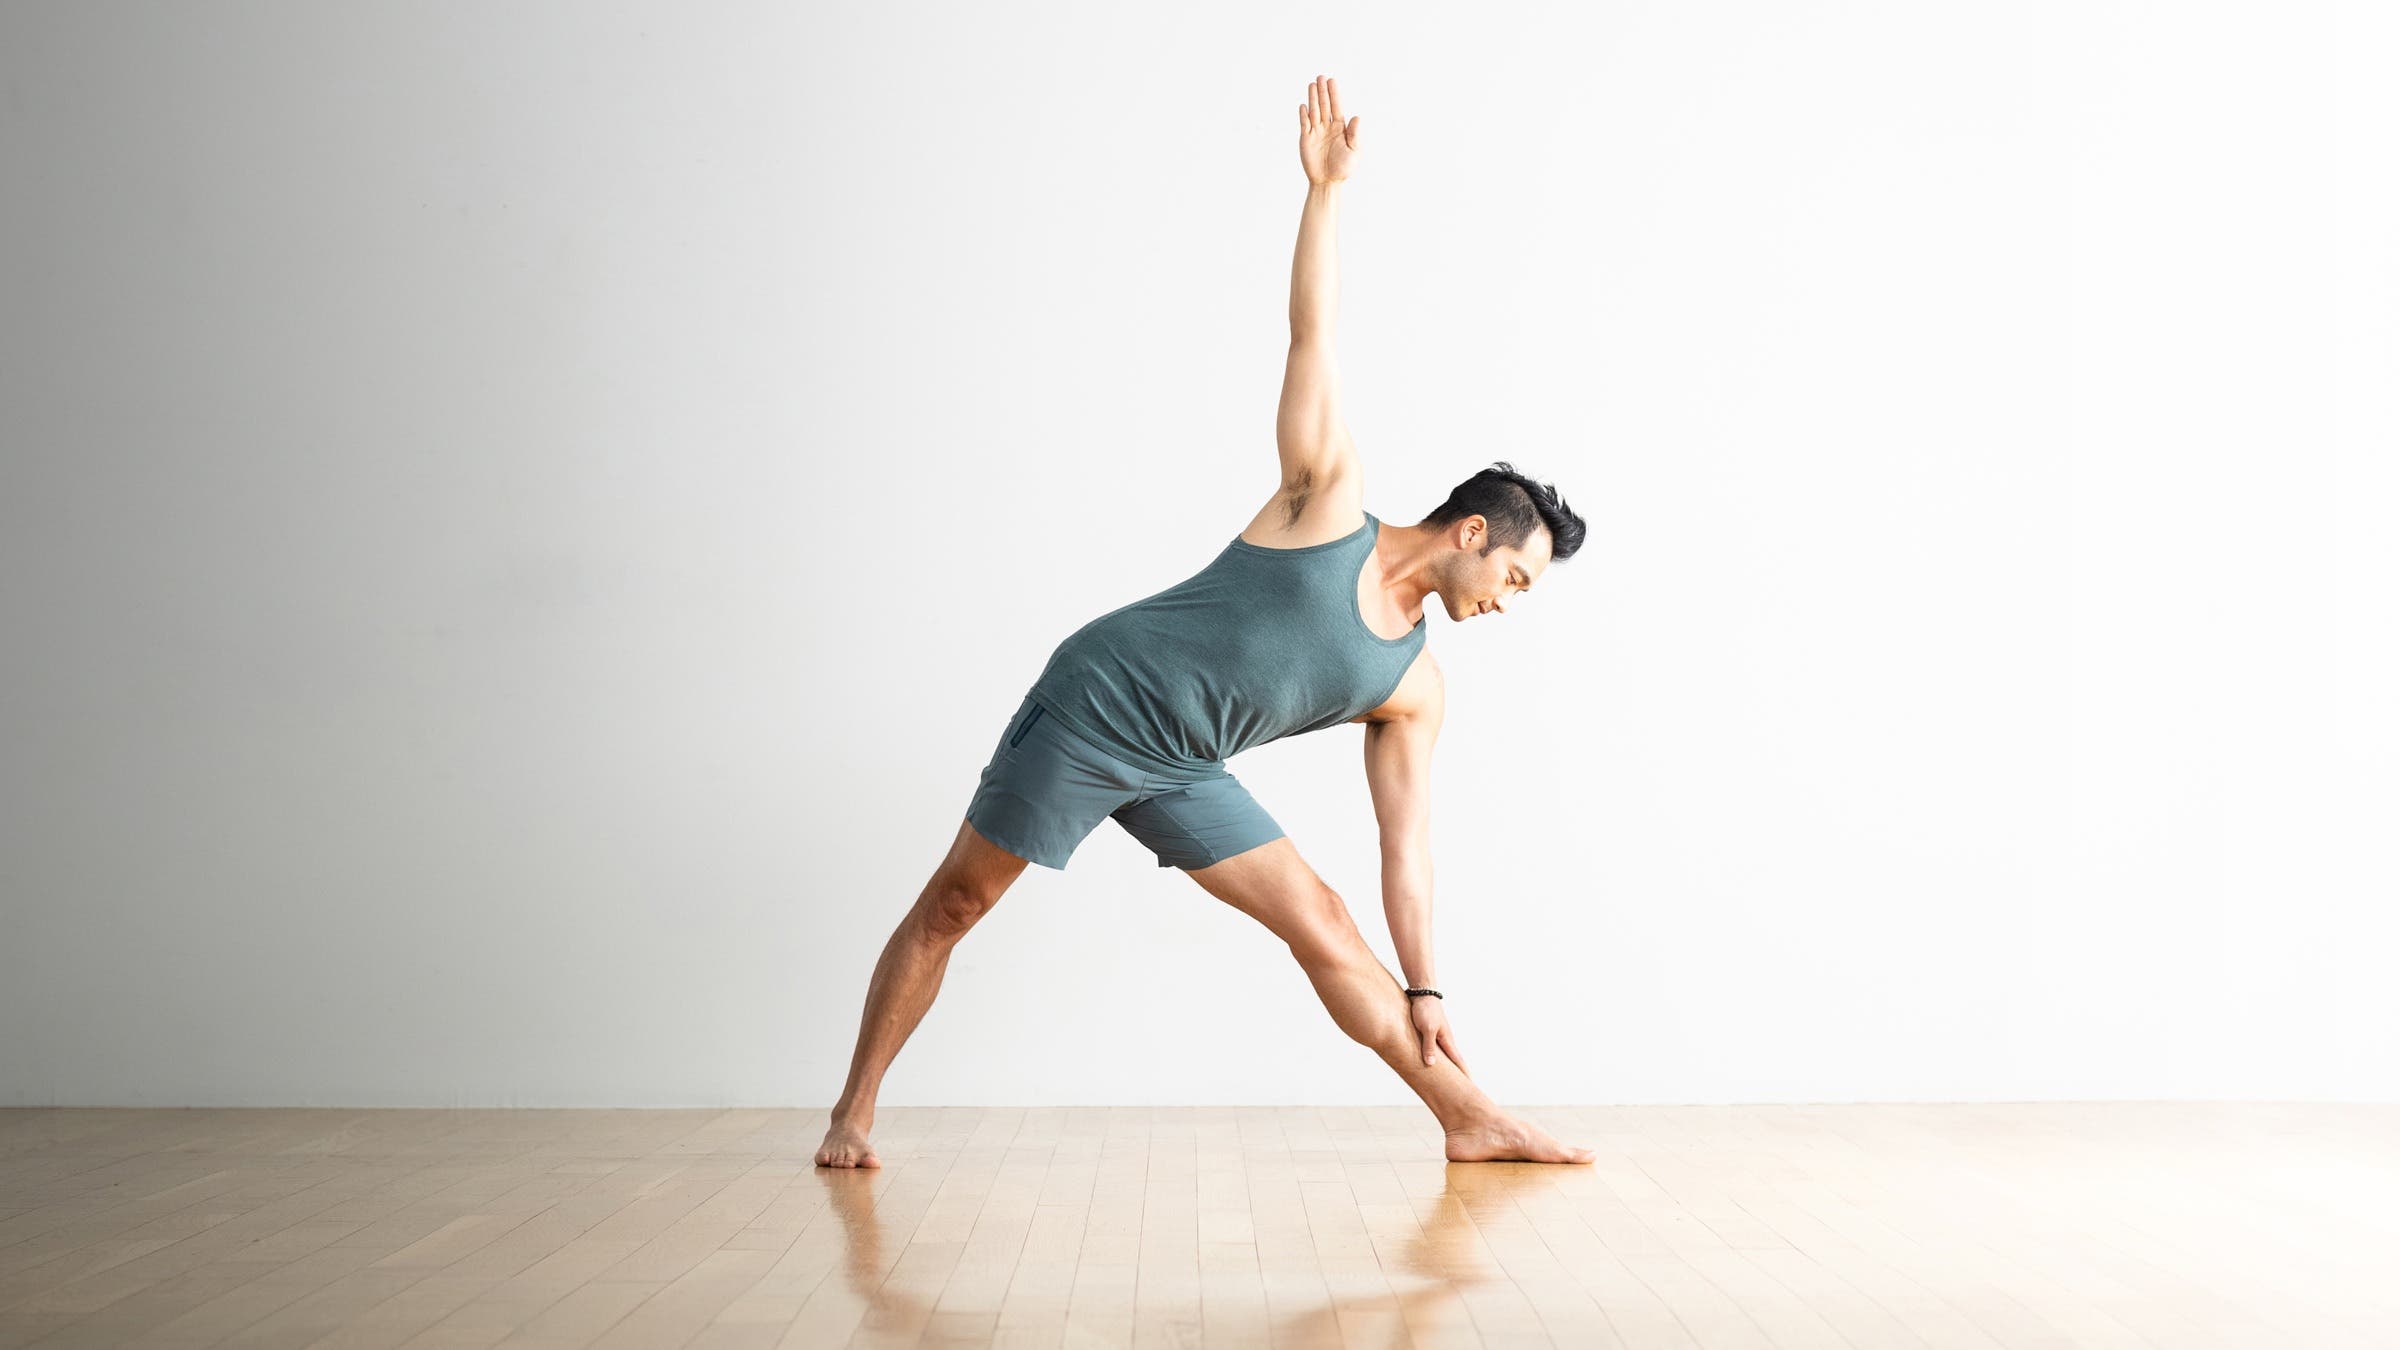
This standing pose lengthens the back muscles and, at the same time, strengthens them.
How to: Stand in Warrior 2, straighten your front leg, and keep your chest facing the side of the mat as you lean forward and then lower your front hand to your shin or a block alongside your foot. Your other hand will be reaching toward the ceiling in a slight twist. Gaze down at your front foot or slowly turn your gaze upward toward your top hand in Triangle Pose. Stay here and breathe. Slowly come out of the pose and switch sides.
6. Bridge Pose
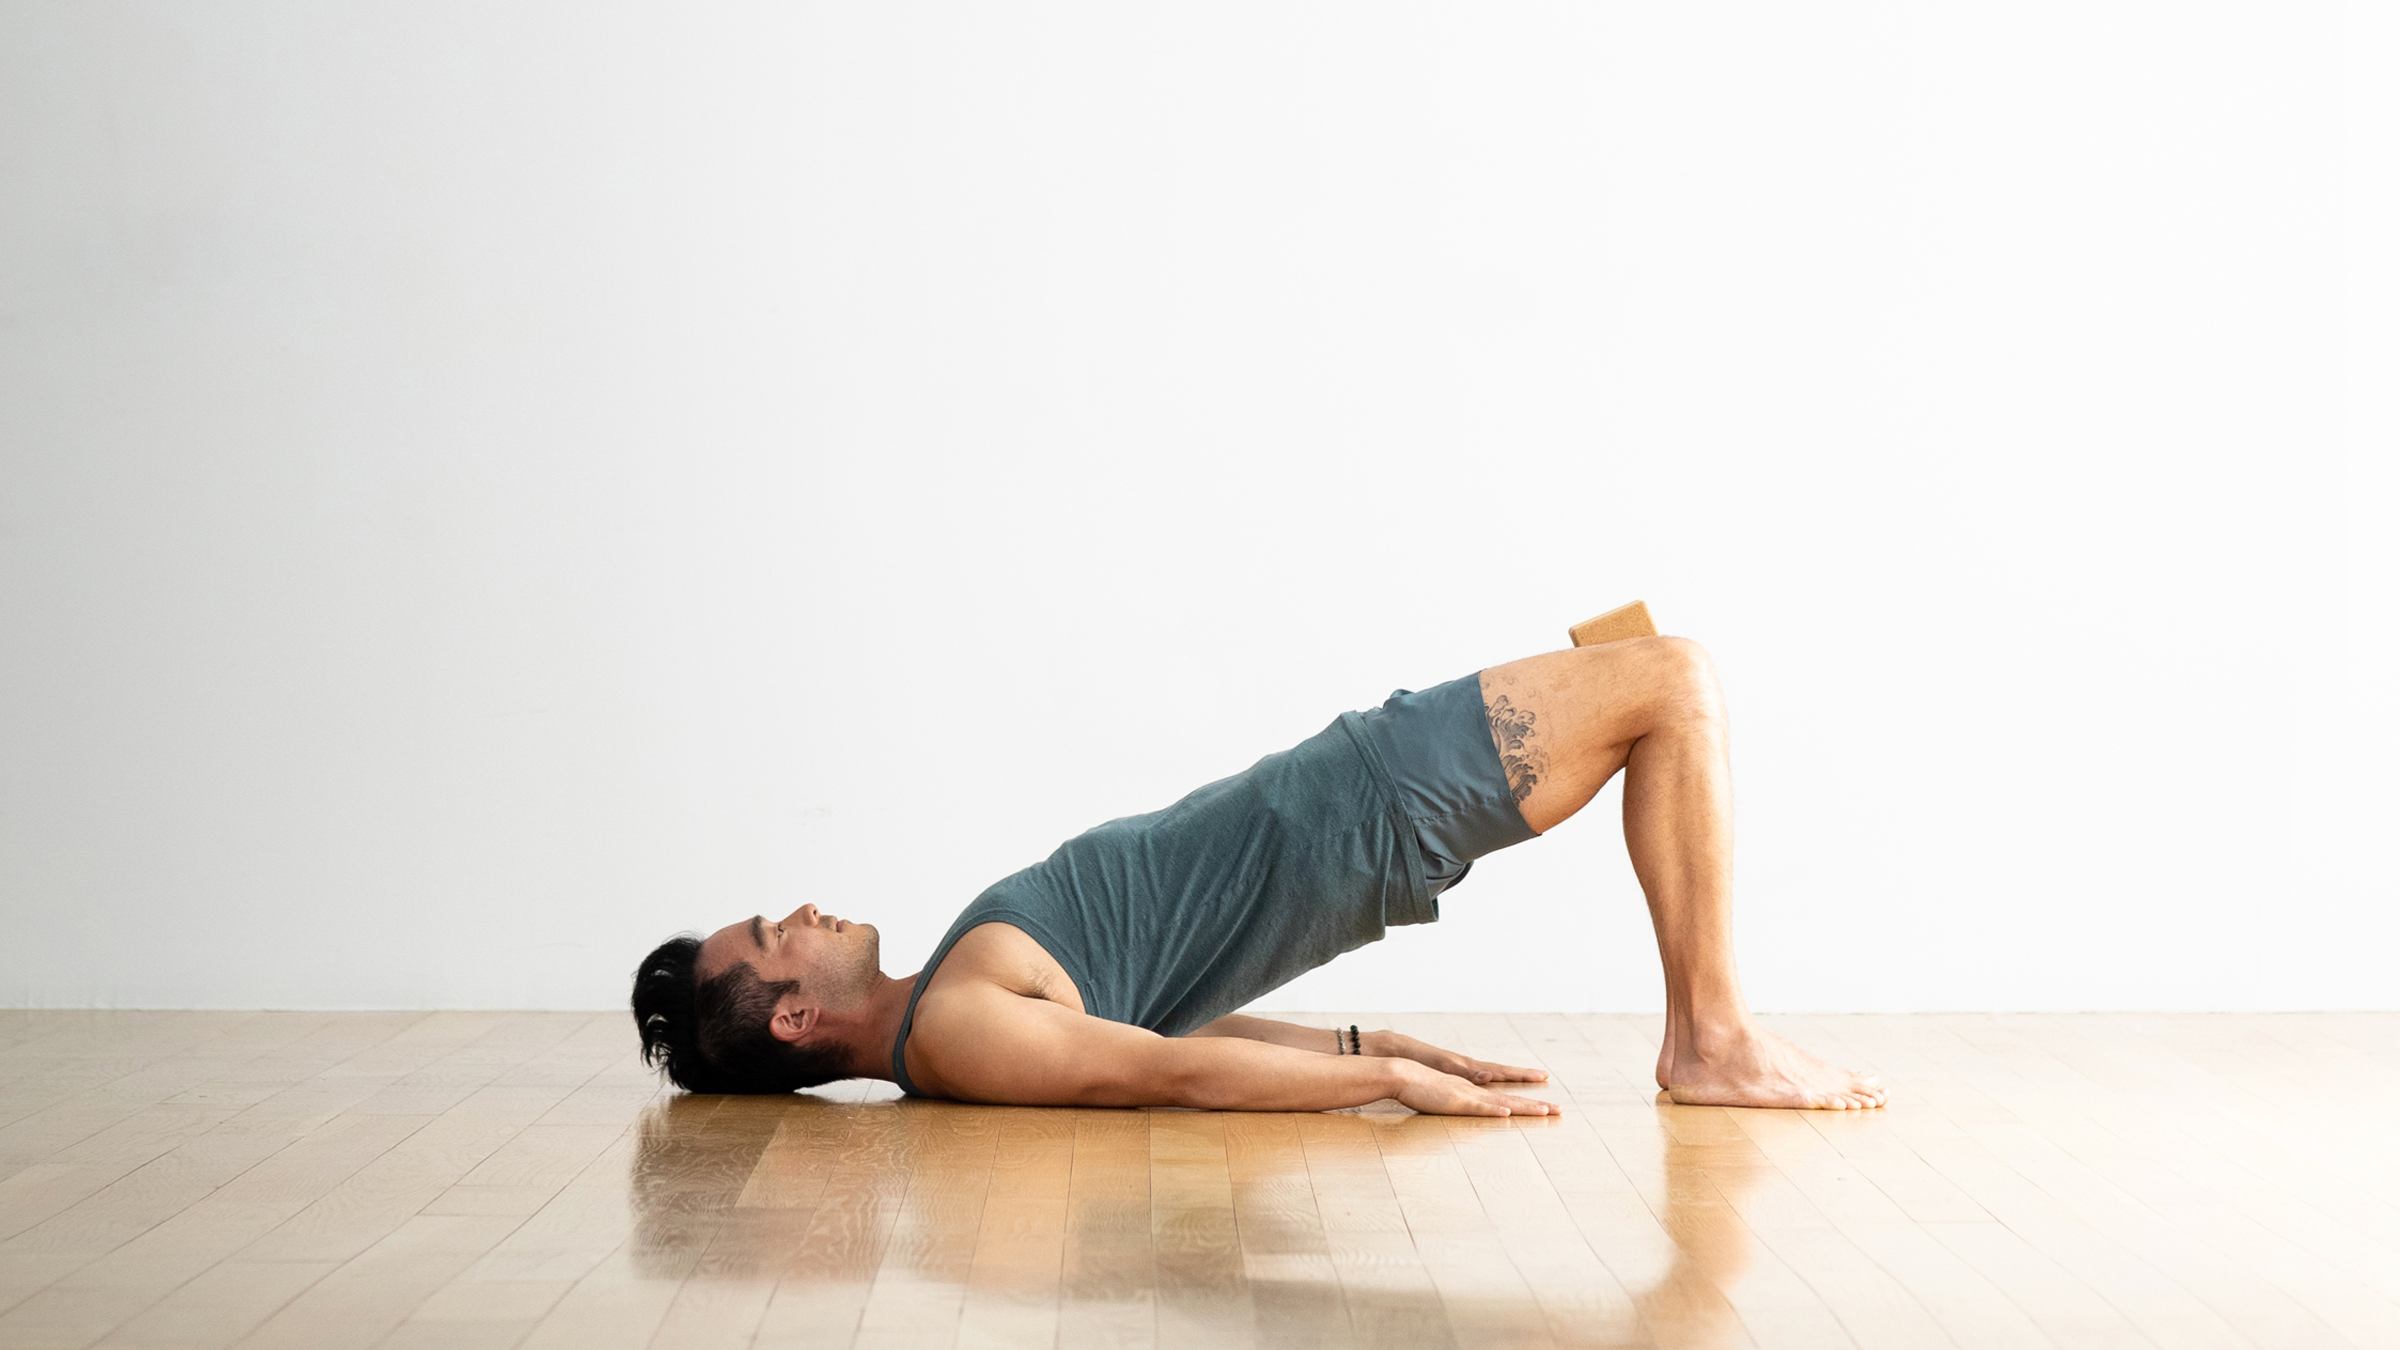
This pose strengthens the glutes, hamstrings, and lower back all at the same time. You get to determine how much you lift your lower back off the mat.
How to: Come onto your back, bend your knees, and bring your feet on the mat hip-distance apart. Shrug your shoulders away from your ears. Press into your feet, engage your glutes, and lift your hips toward the ceiling in Bridge Pose. You want to power the upward movement from the glutes rather than pushing through your shoulders. At the same time, create length in your spine by reaching your hips toward your glutes toward your knees. For even more strengthening, squeeze a block or pillow between your thighs.
7. Plank Pose
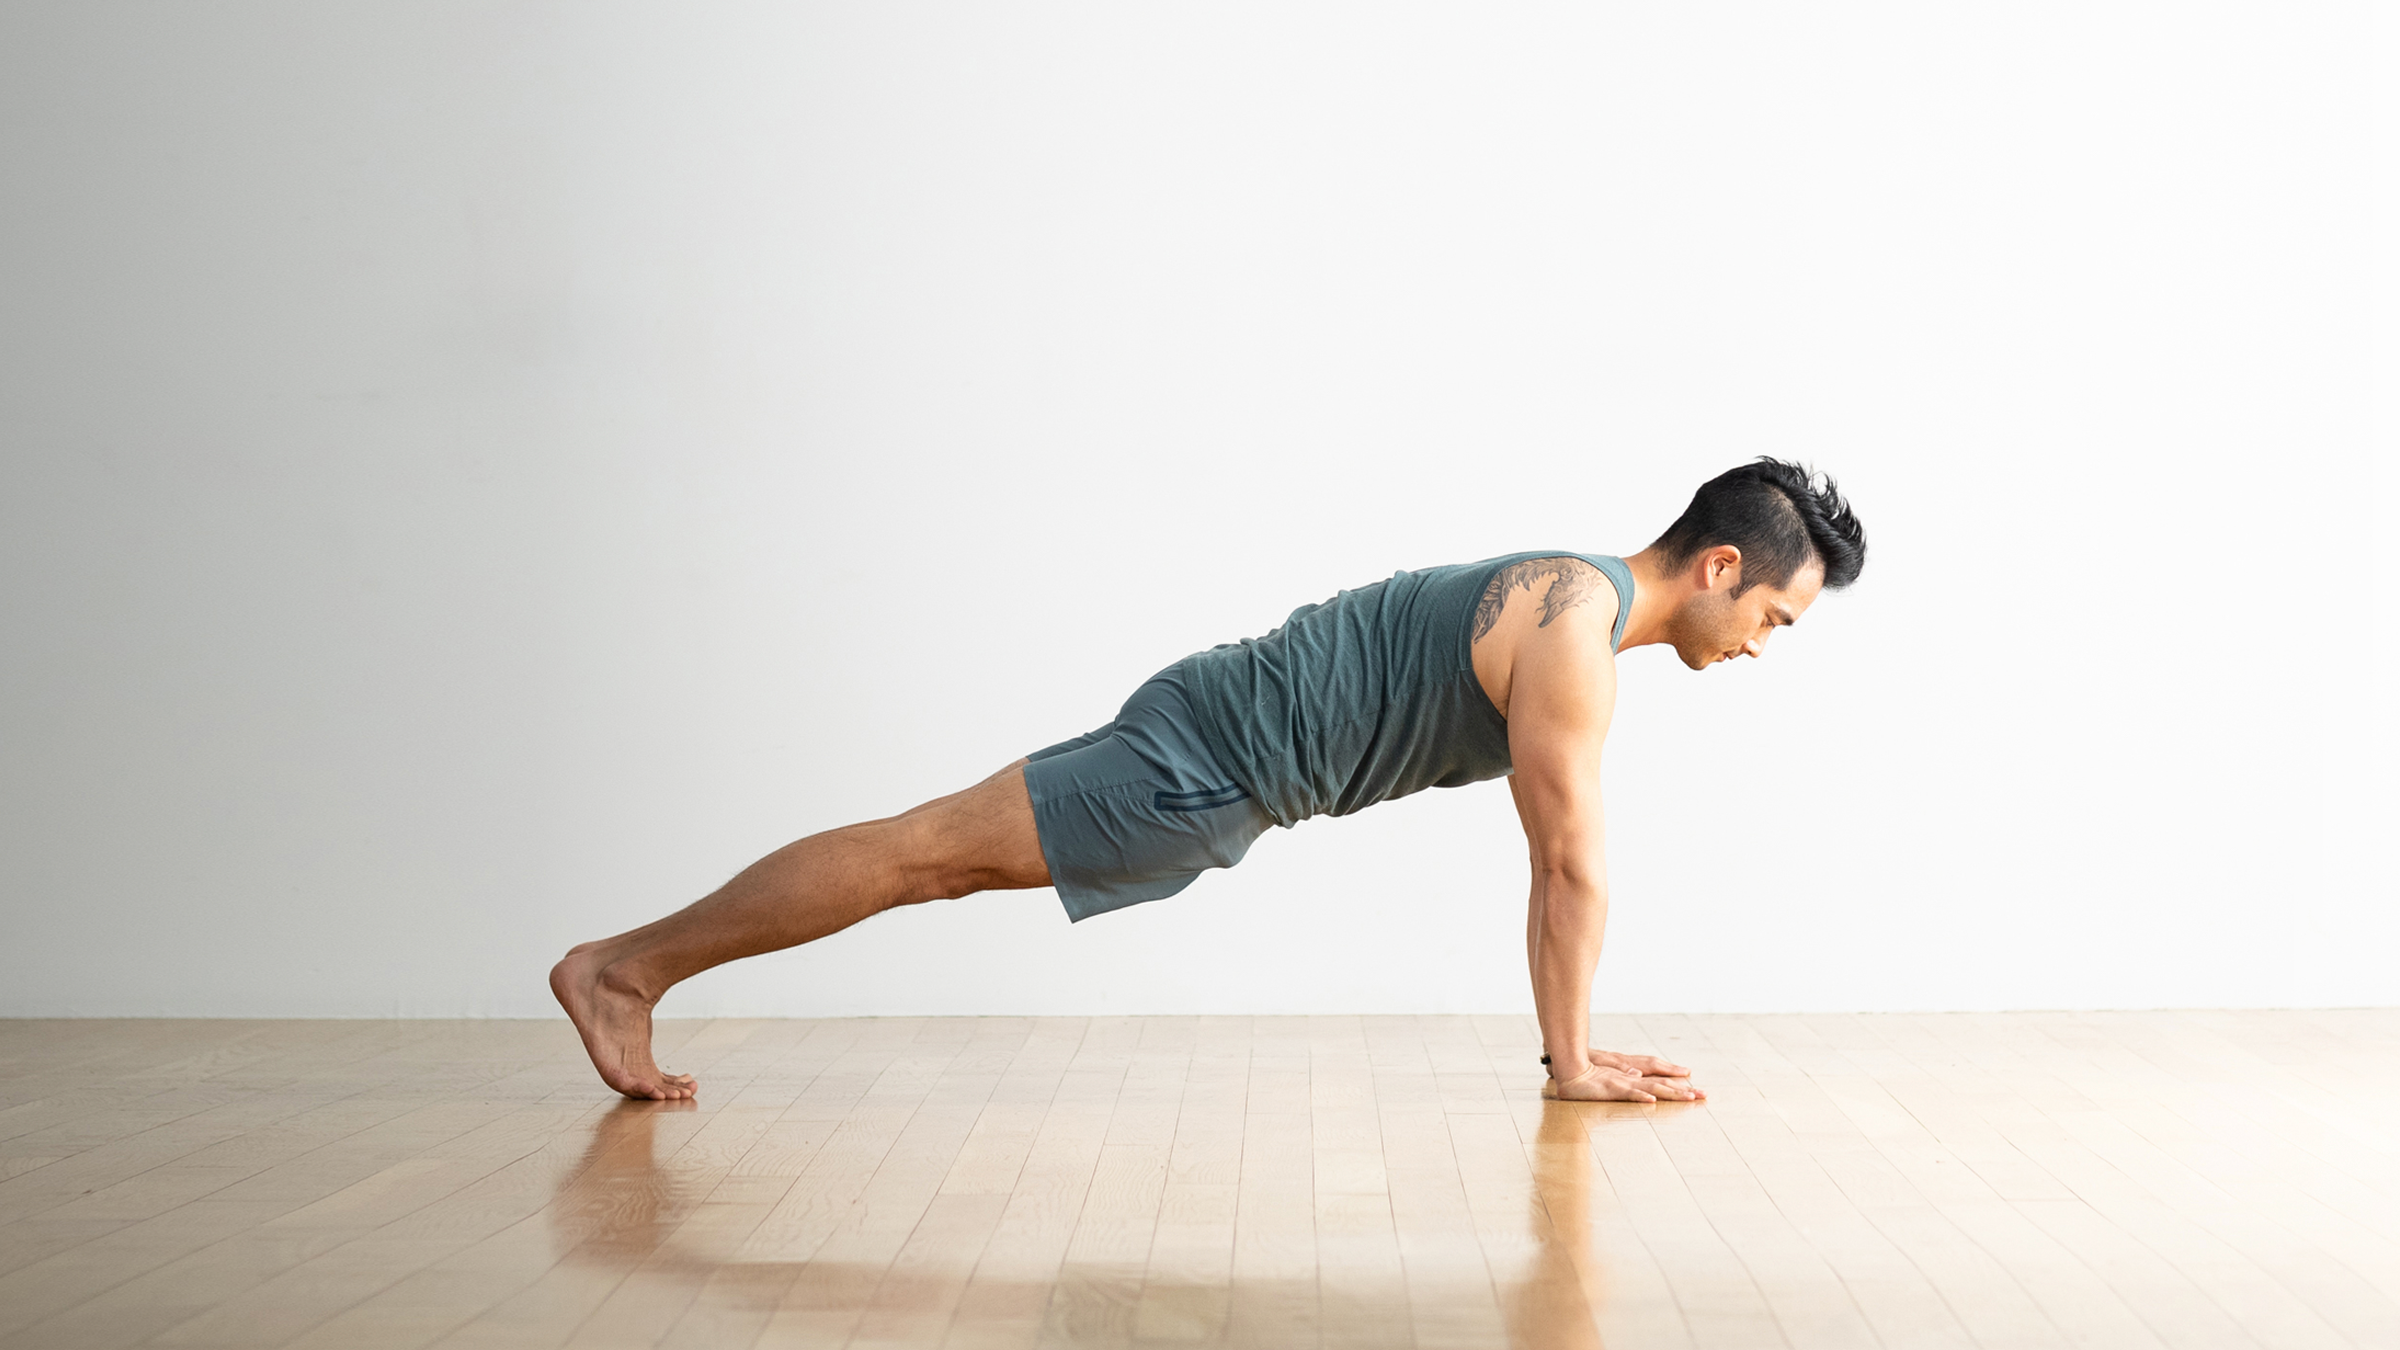
Perhaps more commonly known as the top of a push-up, Plank Pose strengthens your entire core, which comprises all the muscles along the back, front, and sides of your spine.
How to: Come to the top of a push-up with your hands beneath your shoulders and your feet hip-distance apart in Plank Pose. Reach the top of your head toward the wall in front of you and look straight down to keep the back of your neck long. Your entire body should form a diagonal straight line.
8. Cobra Pose
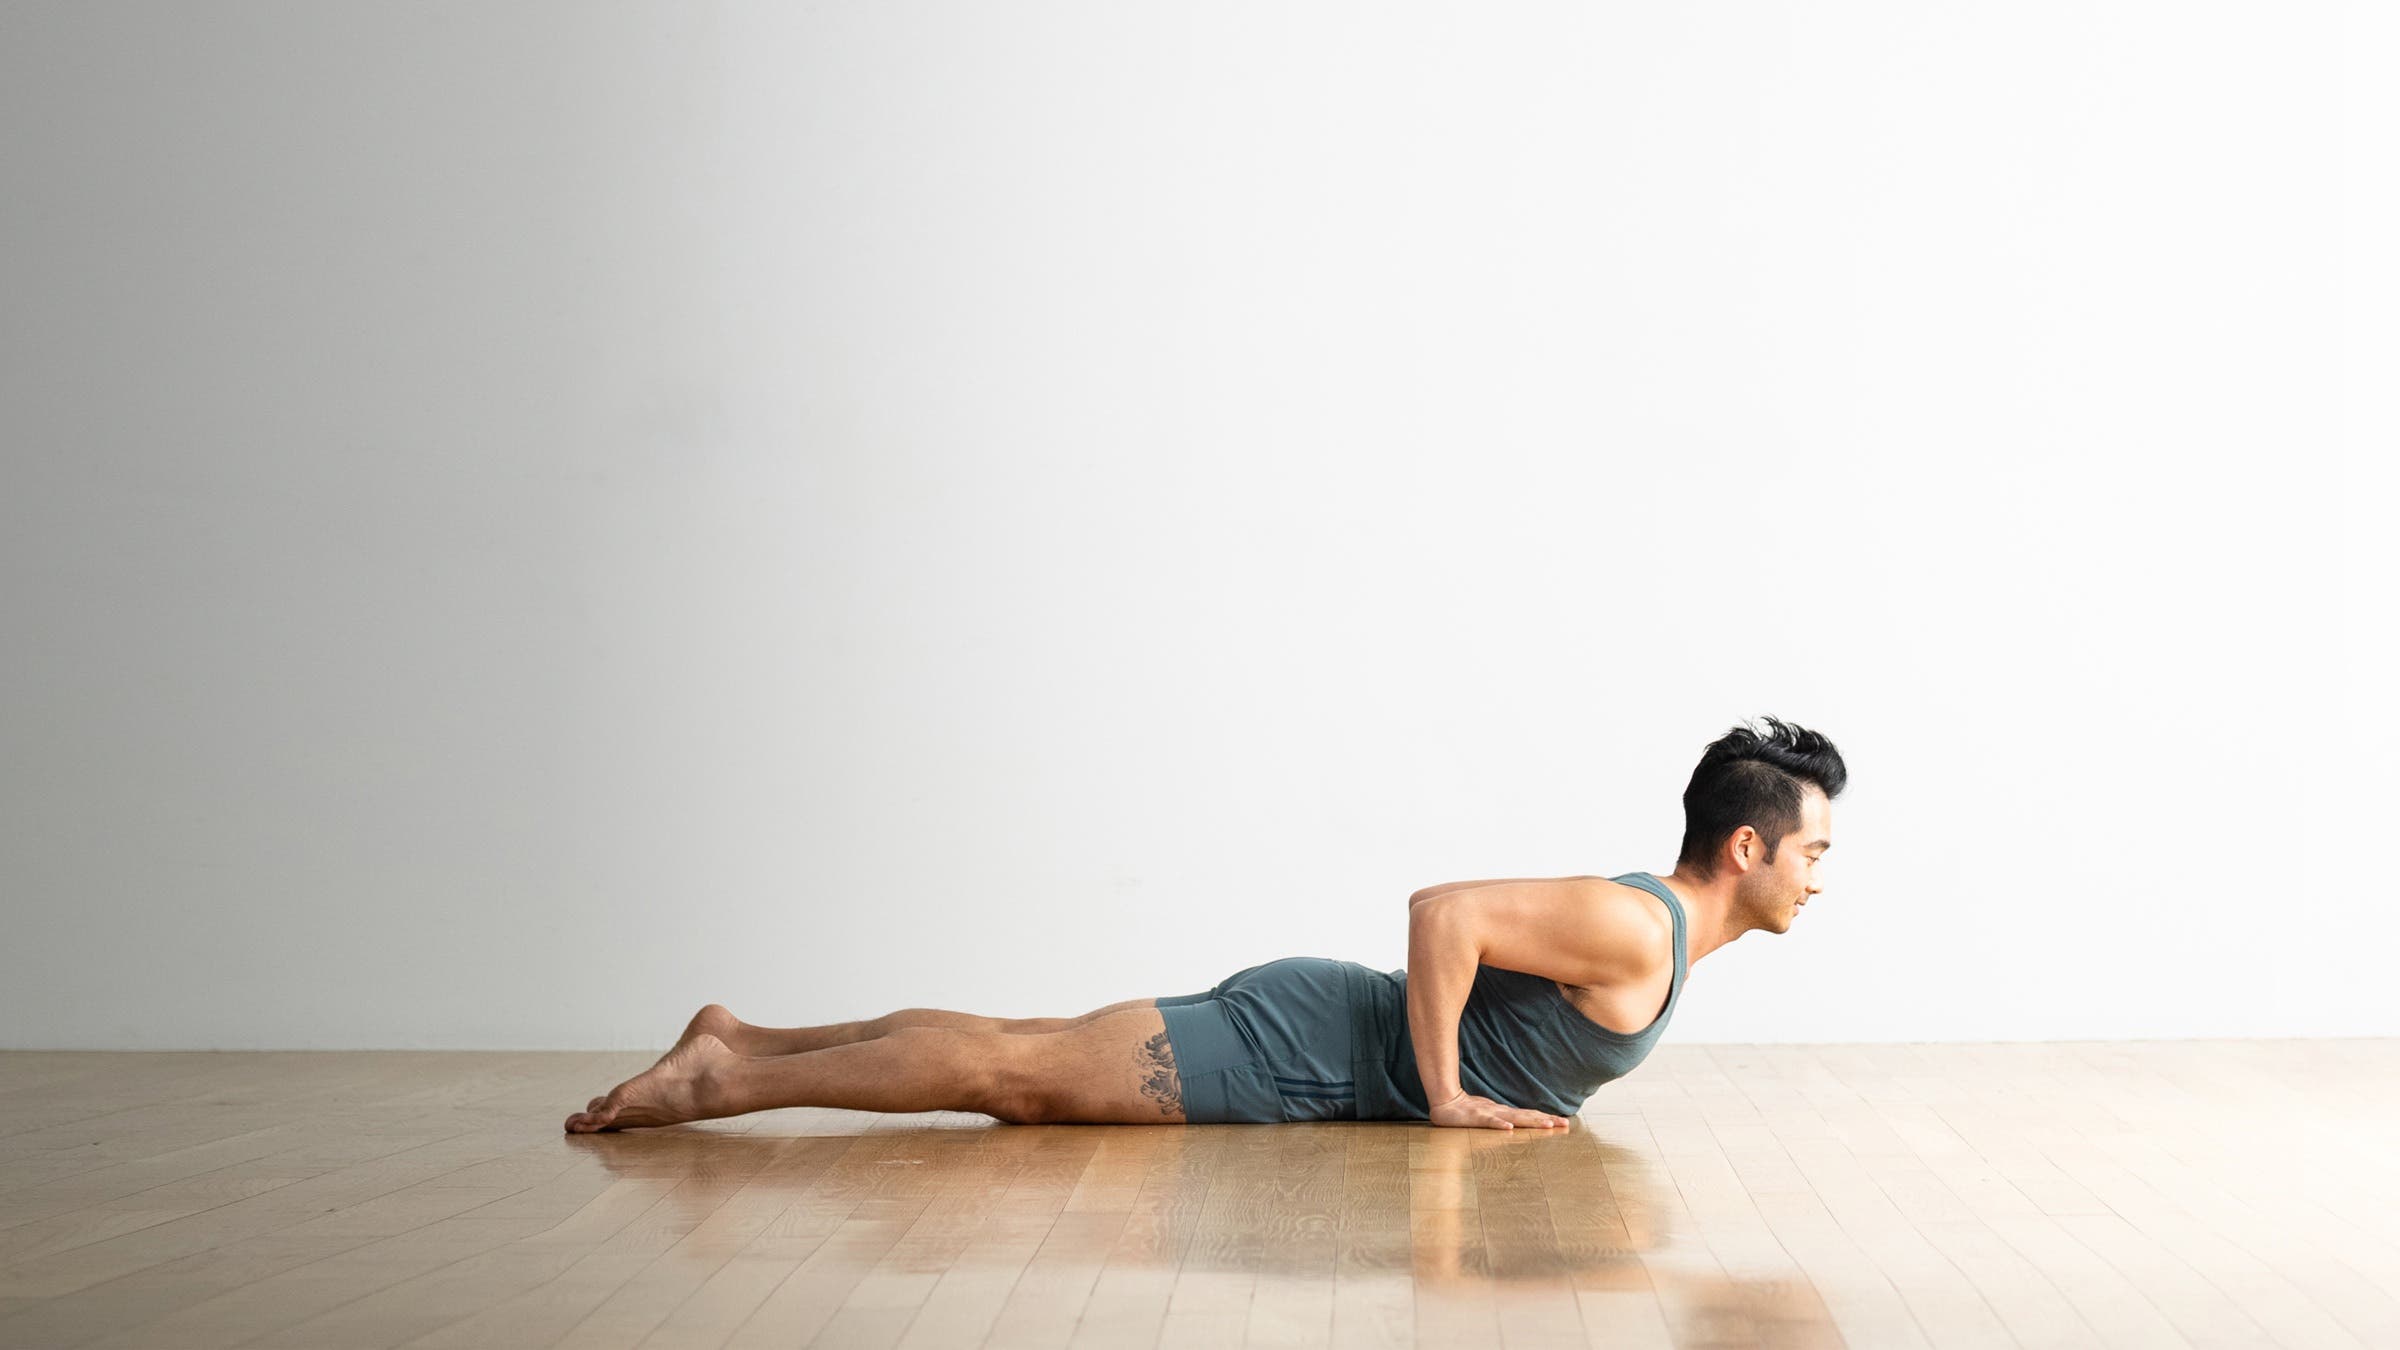
Cobra uses both the strength of your back muscles, including some commonly overlooked ones, as well as your arms to lift your upper body off the mat. This allows you to determine the intensity of the pose, both in terms of how much you lift your chest and how heavily you rely on your back muscles. More is not more here. A slight backbend can still bring strong results.
How to: Lower yourself onto the mat, belly down. Press your palms into the mat beneath your shoulders to lift your upper body off the mat in Cobra. At the same time, press through the tops of your feet and the fronts of your hips. You can keep your elbows bent or intensify the backbend by starting to straighten your arms. Stay here for a few breaths.
9. Locust Pose
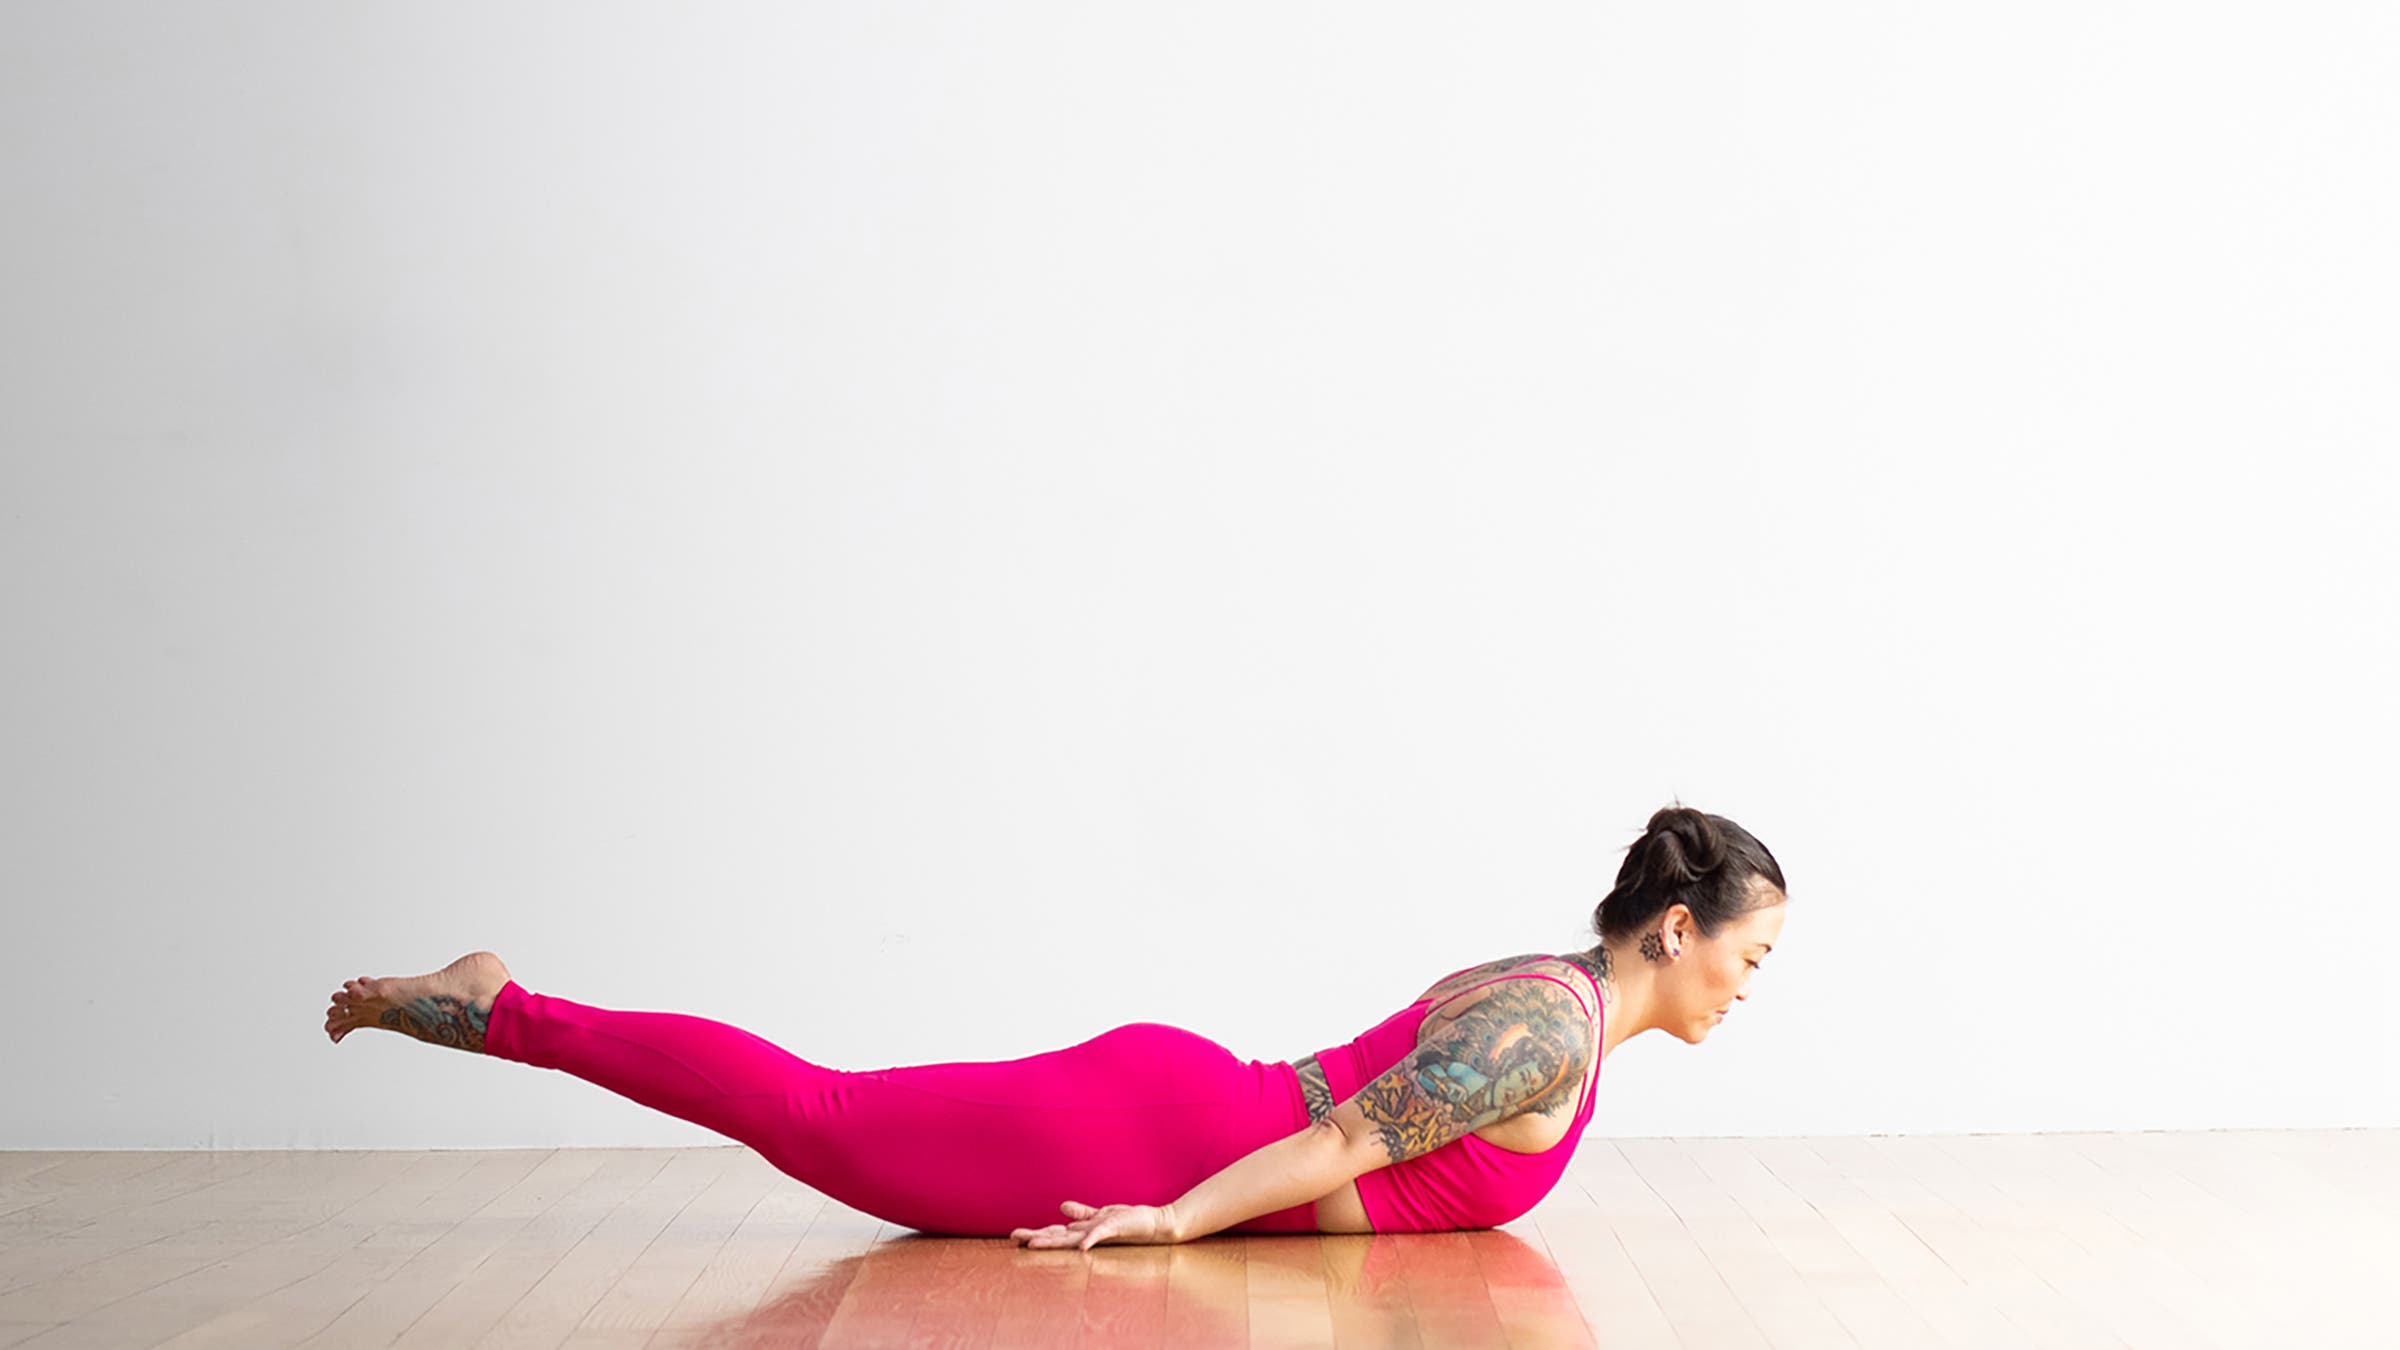
This back-strengthening exercise is similar to Cobra and can appear less intense. Yet it demands even more effort from the back and glutes. In so doing, it builds strength in the spinal stabilizer muscles, including the erector spinae and multifidus.
How to: Lower yourself onto the mat, belly down. Bring your arms alongside your body. Press the tops of your feet and your front hip points into the mat and then clench your glutes to lift your upper body off the mat in Locust Pose. It doesn’t matter how much you lift your chest. The focus is that you’re relying entirely on your back and glute muscles to do the work. Keep your gaze forward and down to create length along the back of your neck. Stay here for a few breaths. For more intensity, lift your legs off the mat.
10. Child’s Pose
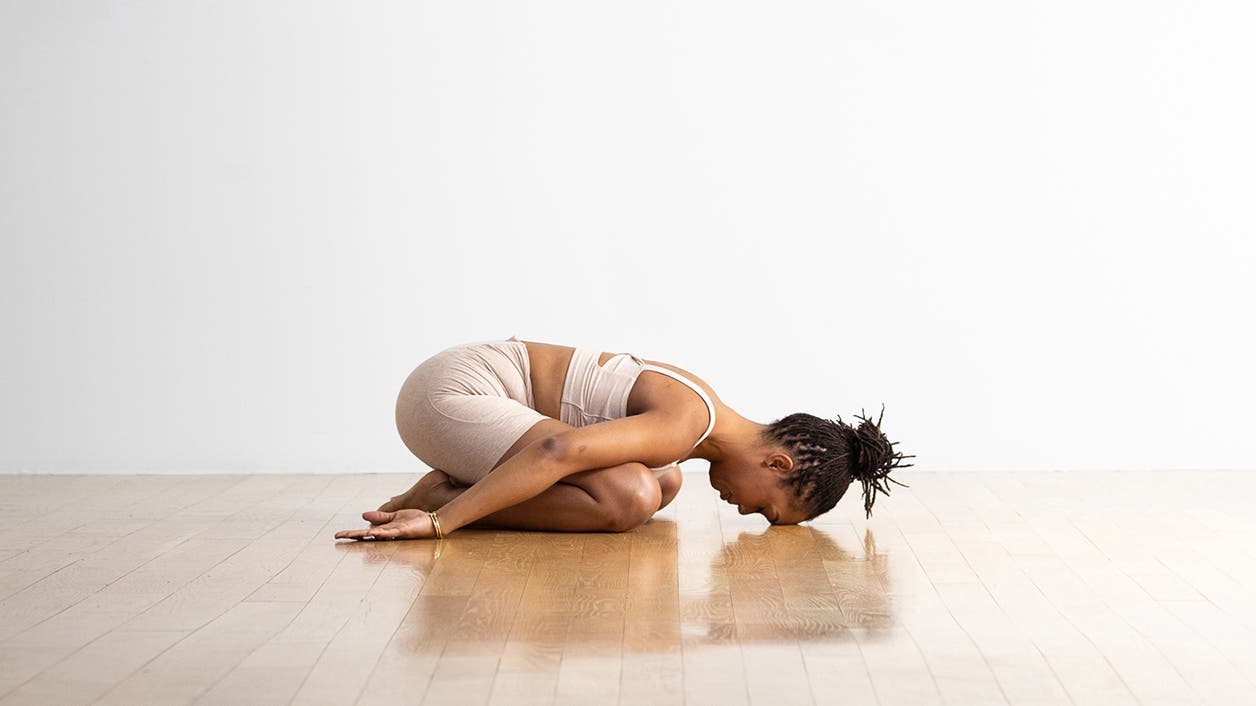
This is one of the best—and simplest—yoga poses yet it stretches the entire spinal column for some welcome relief.
How to: Come to hands and knees, sit your hips back toward your heels, and then lean your chest forward to bring your forehead to the mat, a block, or a folded blanket in Child’s Pose. Reach your arms forward alongside your head, palms facing downward, or rest them alongside your body, palms facing upward. relax your body, and stay here for as long as you can.


