
Published August 6, 2026 10:20AM
Yoga Journal’s archives series is a curated collection of articles originally published in past issues beginning in 1975. This article about yoga for relaxation first appeared in the January-February 1982 issue of Yoga Journal.
When I began teaching yoga in Austin, Texas, in 1971, I had a most unusual student. Each evening a man would enter the class, move quietly to the side, and lie down to relax in Savasana, or Corpse Pose. In itself, this behavior was not so unusual—except that he would remain there for the entire hour of class. At the conclusion of class, he would get up, thank me cordially, and leave. This routine continued for several weeks before he began to participate in the more traditional way, by practicing the postures and saving Savasana for the last 15 minutes.
When questioned about his behavior, the student said that his job was very stressful and that yoga class was the only place he could relax. He reported that lying quietly and listening to the instructions was soothing and that he enjoyed imagining what the other students must look like as they practiced. I noticed that when he finally began moving, he did so with fluidity and ease.
In my youthful exuberance, I dismissed him as an eccentric. Little did I know that he was, in fact, practically prescient. His recognition of his need for deep relaxation predated by years a virtual epidemic of stress and stress-related diseases. Afflicting millions of Americans, stress is now widely studied by medical and mental health researchers.
One of the best-known writers and researchers in the stress-reduction field is Herbert Benson, M.D., chief of the behavioral medicine division at New England Deaconess Hospital. Benson coined the phrase “relaxation response” to describe the physiological and mental responses that occur when we consciously relax. According to Benson’s Wellness Workbook, the relaxation response is “a physiological state characterized by a slower heart rate, metabolism, rate of breathing, lower blood pressure and slower brain wave patterns.”
Regular practitioners of relaxation techniques also report a decrease in anxiety and an increased feeling of well-being. The opposite of these physiological and emotional responses is what we call stress. Even low levels of stress can deplete physical and mental energy.
Another well-known researcher is Dr. Dean Ornish, the developer of a unique life-style program for the reversal of atherosclerotic heart disease. Ornish uses yoga, relaxation, and meditation as an integral part of his Opening the Heart program, which recognizes the importance of daily relaxation periods for preventing future heart deterioration, as well as for helping those already suffering from diagnosed heart disease.
Researchers agree that stress is a phenomenon of the whole organism. A relatively new field in modern medicine is called psychoneuroimmunology. This word reflects the fact that body, mind, and emotions are connected and that the health of the psyche is reflected in, and partly created by, the health of the body. If stress is to be reduced, body and mind cannot be treated separately.
The tension associated with stress is stored mainly in the muscles. Deeply relaxing the muscles releases their “memory” of past situations. When the muscle is helped to let go of tension by massage or relaxation techniques, stress is greatly reduced.
In addition to relaxing the muscles, deep relaxation has profound effects on circulation. When an area is tense, the circulation to that area is decreased. When the tension is released, systemic circulation is improved. Adequate and free circulation is one of the hallmarks of health.
Relaxation is a deep rest that is different from sleep. Deep states of sleep include periods of dreaming, which can involve an increase in muscular tension as well as the other usual physiological signs of stress. In contrast, the relaxation described in this article is a state in which there is no movement and no effort, and the brain is profoundly quiet.
All relaxation techniques begin by putting the body in a comfortable position, usually with attention gently directed toward the breath. It is impossible for the emotions to be calm if the thoughts are raging; likewise, if the body is uncomfortable, the mind will not be at ease. For this reason, to reduce stress you must first learn to relax the body. Although this sounds quite simple, it is a skill that is rarely taught outside of a yoga class or a hypnotherapist’s office.
This article presents 10 asanas that can be practiced sequentially for a session of relaxation. For a shorter relaxation break, try any one of three poses (Savasana, Viparita Karani, and Supported Savasana) by itself. With the exception of Halasana, all 10 poses can be practiced by yoga students and nonstudents alike. Practicing just these poses regularly will enrich your practice of the more active poses and provide a deep and welcome rest.
To enjoy the practice of relaxing poses, you need the proper props. The poses described in this article require five to seven very firm wool blankets and a yoga belt (six feet long and at least two inches wide) with an adjustable buckle. Another excellent tool is a bolster approximately two feet long, 15 inches wide, and six inches high; however, a stack of folded blankets can be used as a substitute. Other useful props are a thin pillow; a towel; and a smooth cloth to cover the eyes.
1. Savasana (Corpse Pose)
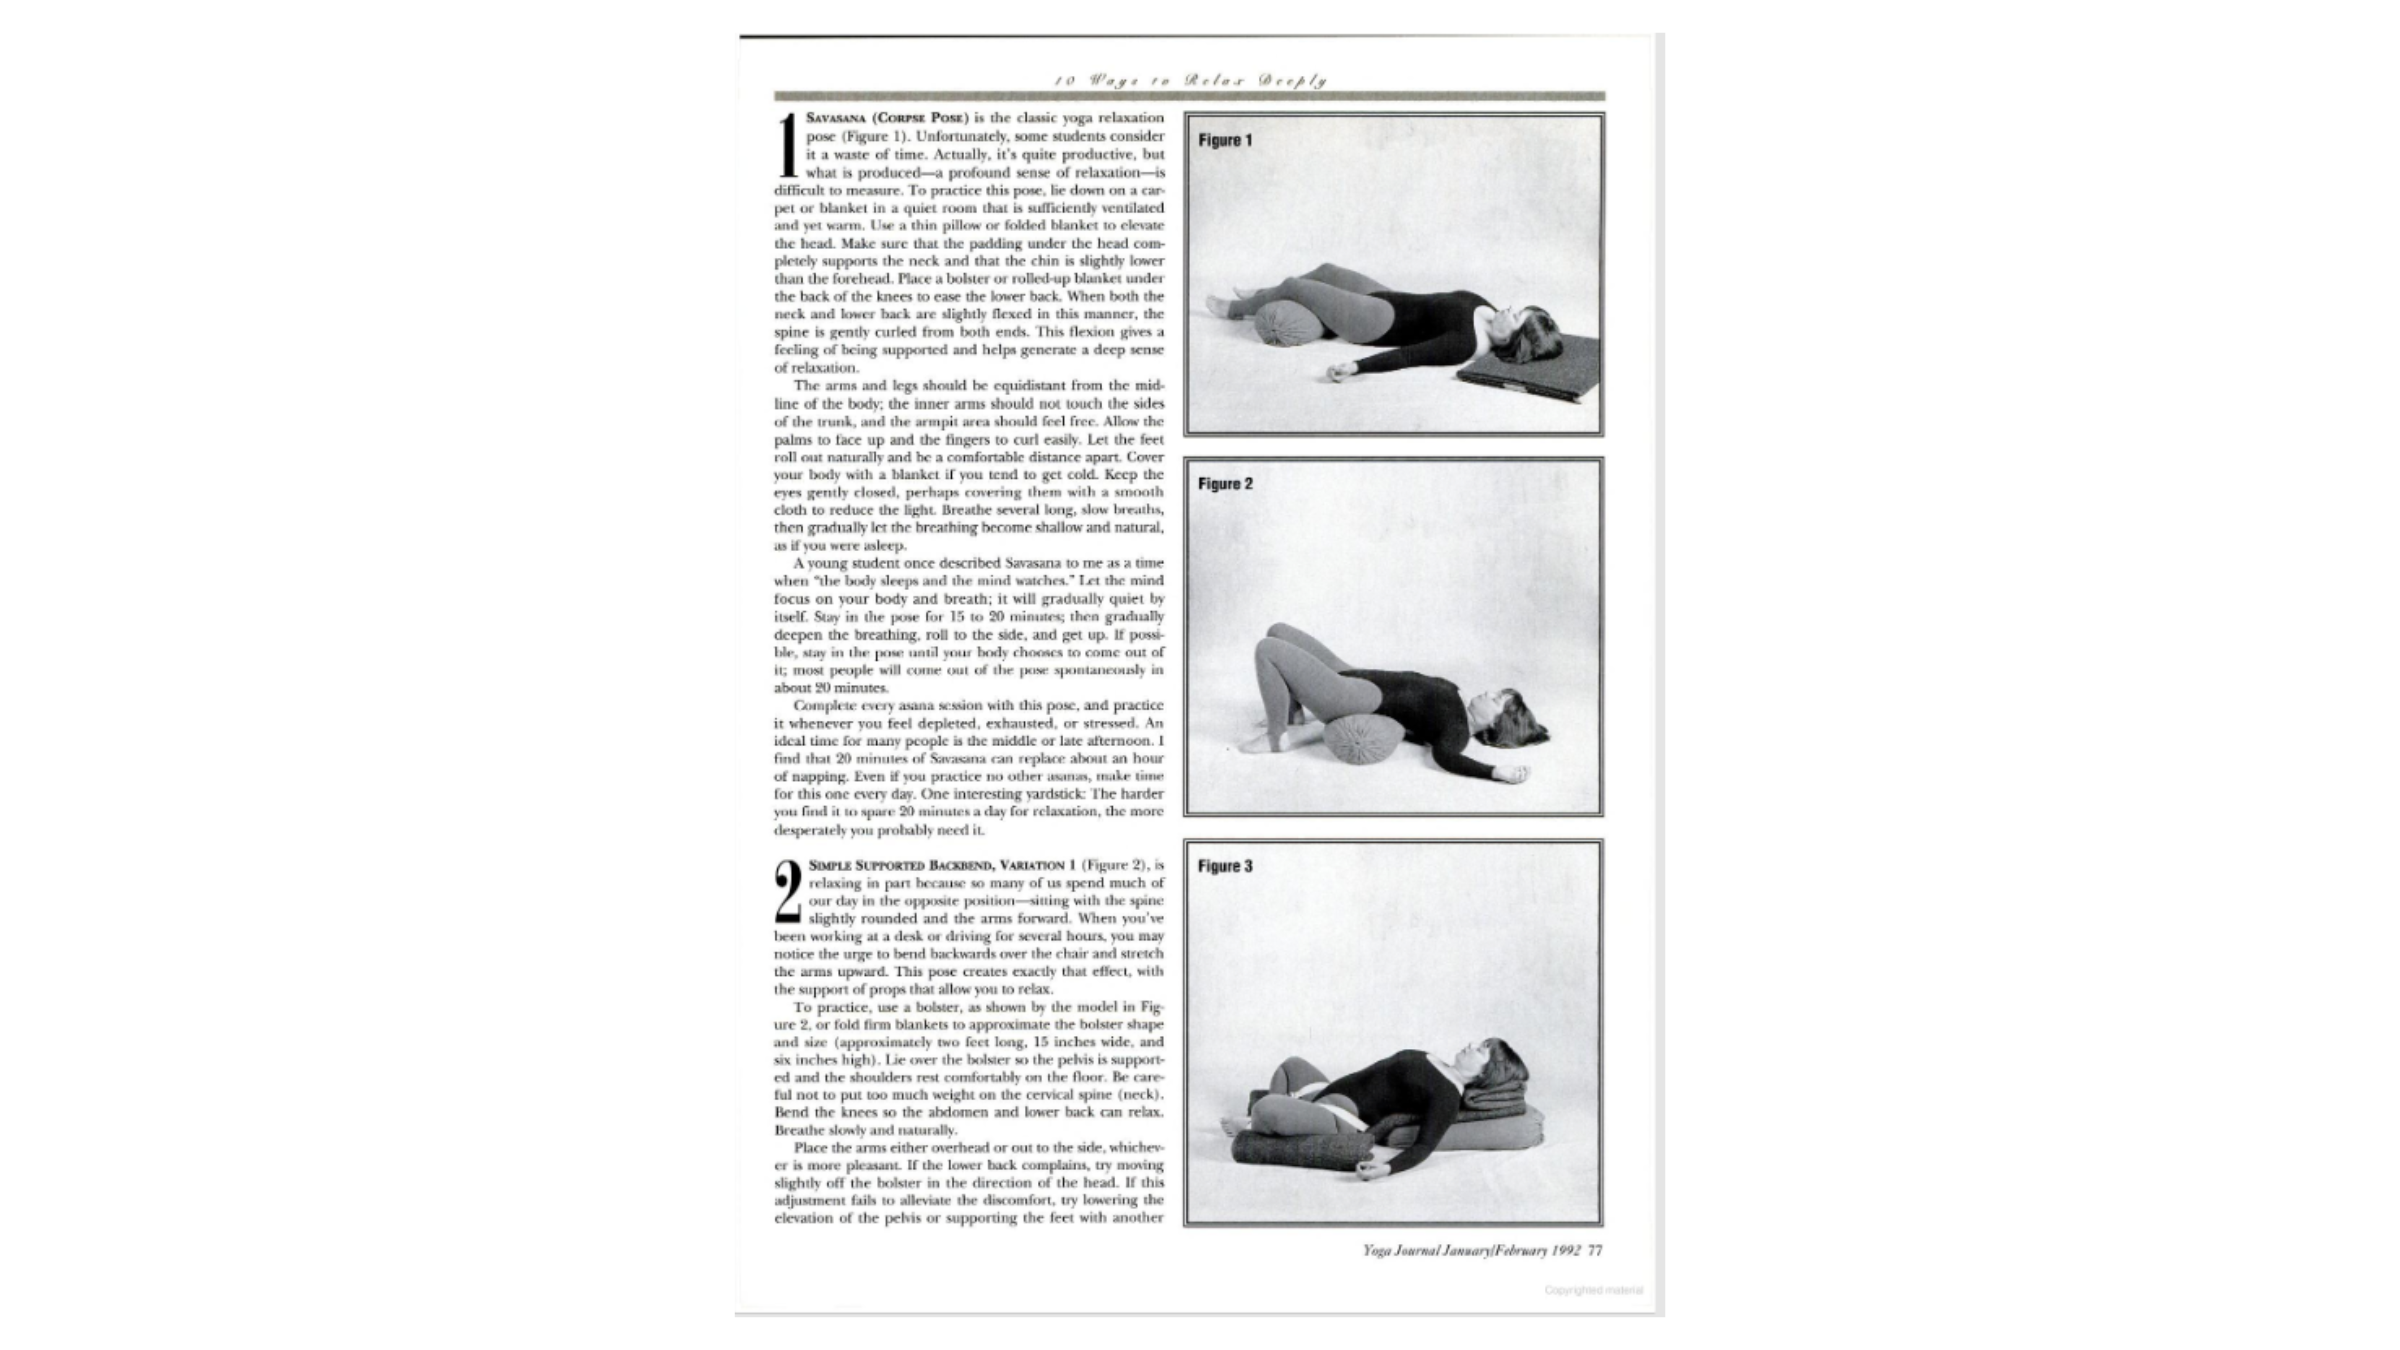
This is the classic yoga relaxation pose (Figure 1). Unfortunately, some students consider it a waste of time. Actually, it’s quite productive, but what is produced—a profound sense of relaxation—is difficult to measure. To practice this pose, lie down on a carpet or blanket in a quiet room that is sufficiently ventilated and yet warm. Use a thin pillow or folded blanket to elevate the head. Make sure that the padding under the head completely supports the neck and that the chin is slightly lower than the forehead. Place a bolster or rolled-up blanket under the back of the knees to ease the lower back.
When both the neck and lower back are slightly flexed in this manner, the spine is gently curled from both ends. This flexion gives a feeling of being supported and helps generate a deep sense of relaxation.
The arms and legs should be equidistant from the midline of the body; the inner arms should not touch the sides of the trunk, and the armpit area should feel free. Allow the palms to face up and the fingers to curl easily. Let the feet roll out naturally and be a comfortable distance apart. Cover your body with a blanket if you tend to get cold. Keep the eyes gently closed, perhaps covering them with a smooth cloth to reduce the light. Breathe several long, slow breaths, then gradually let the breathing become shallow and natural, as if you were asleep.
A young student once described Savasana to me as a time when “the body sleeps and the mind watches.” Let the mind focus on your body and breath; it will gradually quiet by itself. Stay in the pose for 15 to 20 minutes; then gradually deepen the breathing, roll to the side, and get up. If possible, stay in the pose until your body chooses to come out of it; most people will come out of the pose spontaneously in about 20 minutes.
Complete every asana session with this pose, and practice it whenever you feel depleted, exhausted, or stressed. An ideal time for many people is the middle or late afternoon. I find that 20 minutes of Savasana can replace about an hour of napping. Even if you practice no other asanas, make time for this one every day. One interesting yardstick: The harder you find it to spare 20 minutes a day for relaxation, the more desperately you probably need it.
2. Simple Supported Backbend, Variation 1
This pose (Figure 2) is relaxing in part because so many of us spend much of our day in the opposite position—sitting with the spine slightly rounded and the arms forward. When you’ve been working at a desk or driving for several hours, you may notice the urge to bend backwards over the chair and stretch the arms upward. This pose creates exactly that effect, with the support of props that allow you to relax.
To practice, use a bolster, as shown by the model in Figure 2, or fold firm blankets to approximate the bolster shape and size (approximately two feet long, 15 inches wide, and six inches high). Lie over the bolster so the pelvis is supported and the shoulders rest comfortably on the floor. Be careful not to put too much weight on the cervical spine (neck). Bend the knees so the abdomen and lower back can relax. Breathe slowly and naturally.
Place the arms either overhead or out to the side, whichever is more pleasant. If the lower back complains, try moving slightly off the bolster in the direction of the head. If this adjustment fails to alleviate the discomfort, try lowering the elevation of the pelvis or supporting the feet with another blanket. Make sure that the chest is elevated and that the ribs are not flat, but opened up away from the abdominal organs. Stay in the pose from five to 10 minutes. To come out, slide off the bolster in the direction of the head and lie on the back. Leave the legs loosely draped over the blankets or bolster for a few minutes. Roll to the side and sit up slowly.
3. Bound Baddha Konasana (Bound Angle Pose)
One of the most relaxing poses of all is Reclining Bound Baddha Konasana (Bound Angle Pose) (Figure 3). It requires a bit of patience to learn, but it’s well worth it. You must have the proper props for this pose. Ideally, a bolster is used to support the back, but folded blankets can suffice, provided there are enough. Place the bolster or stack of blankets on the floor and lie back to test if it is high enough. Place a rolled blanket under the head. The forehead should be higher than the chin, the chin higher than the breastbone, and the breastbone higher than the pubic bone.
Put the soles of the feet together and drop the knees out to the side. Place two more rolled blankets under the outer buttocks and thighs. Note that these blankets are not intended to support just the knees, but to completely support the weight of the legs so that less traction is placed upon the sacral ligaments of the lower back. The point of the pose is not to stretch the inner thighs, but rather to relax the abdomen and chest.
When the props are in place, sit up and place a belt over your head, drawing it down almost as low as possible in the back. It should not run around the back waist, but rather around the hip joints and upper thighs. Then loop the other end of the belt around the outside of the feet.
Be careful to place the buckle where it will not press against the flesh. Keep the belt somewhat loose. Have the loose end of the belt pointing toward the hand so that it can be tightened slightly once you are in the pose. An additional delight is to support the arms with rolled-up blankets. This support gives the feeling of floating and can relieve any stretch on the nerves of the neck and arms, important if you have neck problems. Cover up if you wish. Lie back for 15 to 20 minutes. This is a very pleasant asana in which to practice deep breathing and is thought to be especially beneficial for women during the menstrual period. Use the arms to come out of the pose, lifting up slowly.
4. Simple Supported Backbend, Variation 2
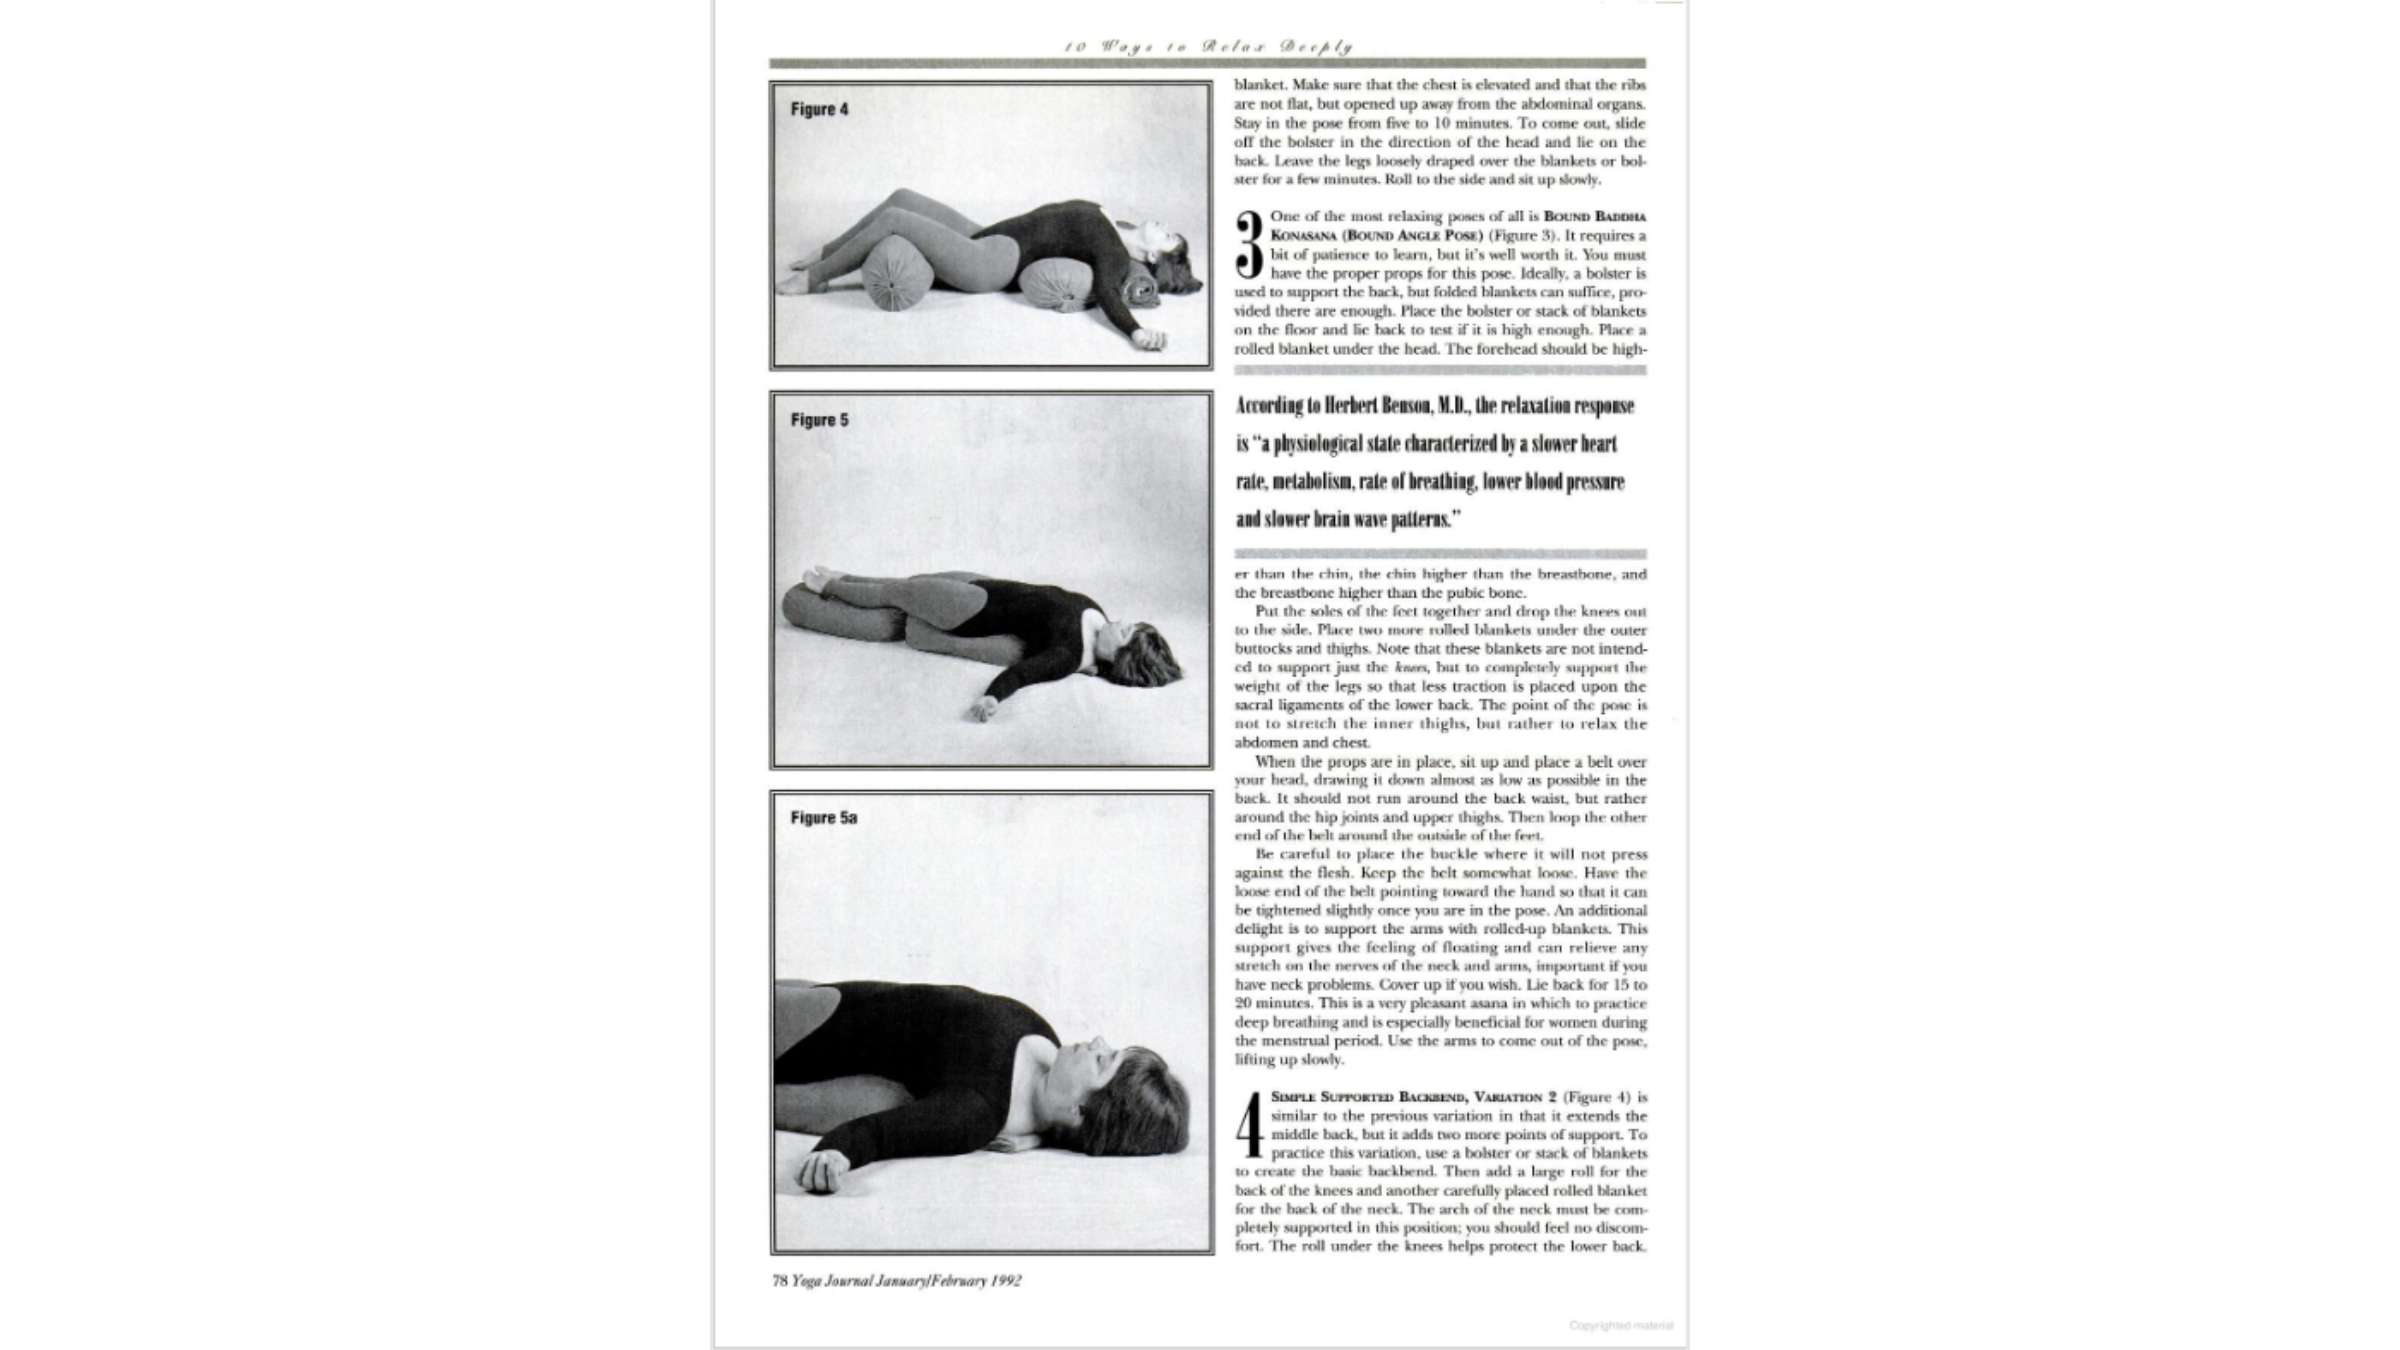
Similar to the previous variation in that it extends the middle back, this backbend adds two more points of support. To practice this variation (Figure 4), use a bolster or stack of blankets to create the basic backbend. Then add a large roll for the back of the knees and another carefully placed rolled blanket for the back of the neck. The arch of the neck must be completely supported in this position; you should feel no discomfort. The roll under the knees helps protect the lower back.
Place the arms out to the side at a comfortable angle (approximately 90 degrees). Note how the model appears draped over the blankets, flowing up and down, up and down over the props like a brook flowing over rocks.
If this variation does not feel positively delicious, try lowering the middle bolster or blankets or increasing the support under the knees. Again, remember that this pose should not be at all uncomfortable for the neck when properly set up. Remain in the pose for approximately five minutes, breathing normally. To come out of the pose, use the hands to slowly and gently lift the head up, then use your arms to slide yourself toward your head. Lie for a few minutes on the floor before rolling to the side and getting up.
5. Setu Bandhasana (Bridge Pose)
A classic yoga asana (Figure 5), Bridge Pose is usually practiced actively as a variation of Shoulderstand. Here bolsters are especially helpful, but sufficient blankets work well too. Place the bolsters or blankets end to end so they are long enough to accommodate the length of the body. Make sure that the props are all the same height (about six inches to begin with; adjust the height for your own comfort). Lie down on the bolsters so the shoulders are lightly touching the ground and the face is parallel to the ceiling.
As in all these relaxation poses, you should feel no discomfort in the neck or lower back. One easy solution to lower back pain in this pose is to bend the knees, placing the feet either on the floor or on the props. Protect the neck by being careful not to jam the chin into the chest and by placing a thin rolled towel under the upper back (not under the neck; Figure 5a). Do not allow the portion of the neck nearest the shoulders to drop toward the floor too much; it should be lifted up by the natural shape of the body or supported by the thinly rolled towel.
If this pose is comfortable, remain as long as 15 minutes. Breathe normally. Come out of the pose by moving toward the head until most of the body is on the floor. Stay for a few minutes, roll to the side, and sit up slowly.
6. Viparita Karani (Supported Inverted Pose)
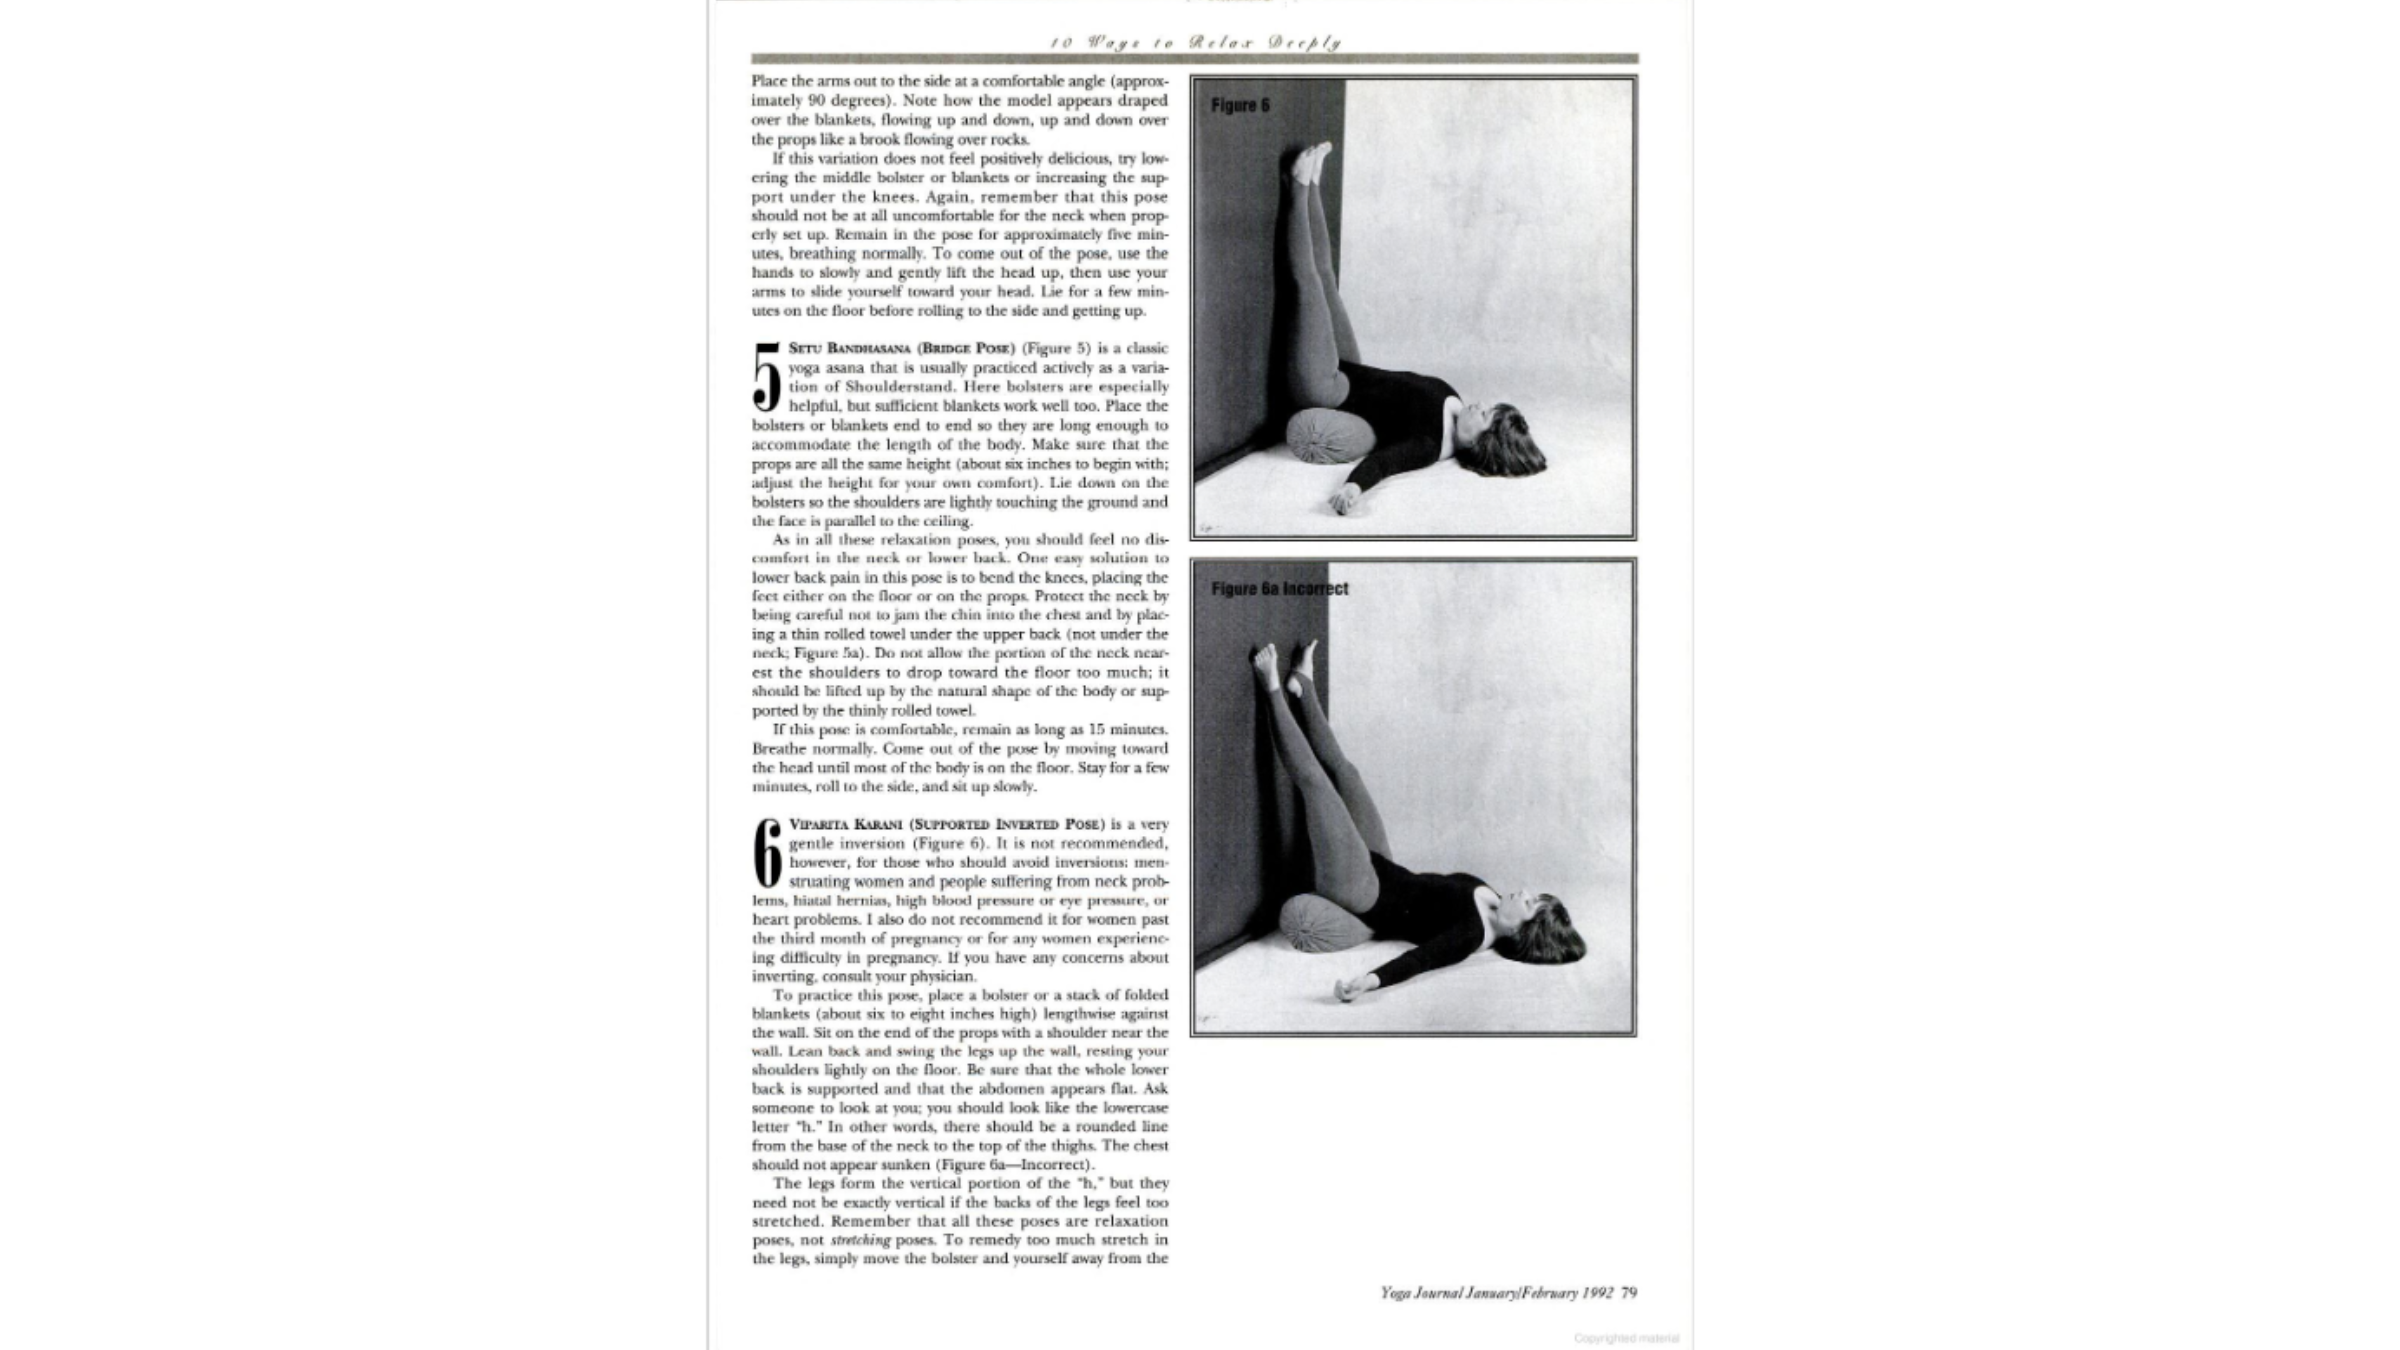
This very gentle inversion (Figure 6) isn’t recommended, however, for those who should avoid inversions: menstruating women and people suffering from neck problems, hiatal hernias, high blood pressure or eye pressure, or heart problems. I also do not recommend it for women past the third month of pregnancy or for any women experiencing difficulty in pregnancy. If you have any concerns about inverting, consult your physician.
To practice this pose, place a bolster or a stack of folded blankets (about six to eight inches high) lengthwise against the wall. Sit on the end of the props with a shoulder near the wall. Lean back and swing the legs up the wall, resting your shoulders lightly on the floor. Be sure that the whole lower back is supported and that the abdomen appears flat. Ask someone to look at you; you should look like the lowercase letter “h.” In other words, there should be a rounded line from the base of the neck to the top of the thighs. The chest should not appear sunken (Figure 6a—Incorrect).
The legs form the vertical portion of the “h,” but they need not be exactly vertical if the backs of the legs feel too stretched. Remember that all these poses are relaxation poses, not stretching poses. To remedy too much stretch in the legs, simply move the bolster and yourself away from the wall a few more inches. Most people feel best in this pose when the last ribs in the back are supported by the props, but there is a great variation in the length of the trunk from student to student.
Therefore, it is essential to pay attention to the width of the blankets; some prefer more narrowly folded blankets while others need a wider base of support. The height of the props is also very individual. You will not enjoy the pose if the props are either too high or too low. Have someone look at your pose the first few times and make sure you are in the “h” position with the chest open, the abdomen flat, and the legs up.
The neck should not be forced down on the floor; rather, the chin should retain a natural relationship with the throat. Insert a thinly folded towel under the upper back if the neck and throat feel compressed. Remain in the pose for as long as 15 minutes. To come out, bend the knees and push the bolster toward the wall and your body away from the wall. Lie on the floor a few moments, roll to the side, and get up slowly.
7. Upavistha Konasana (Seated Angle Pose)
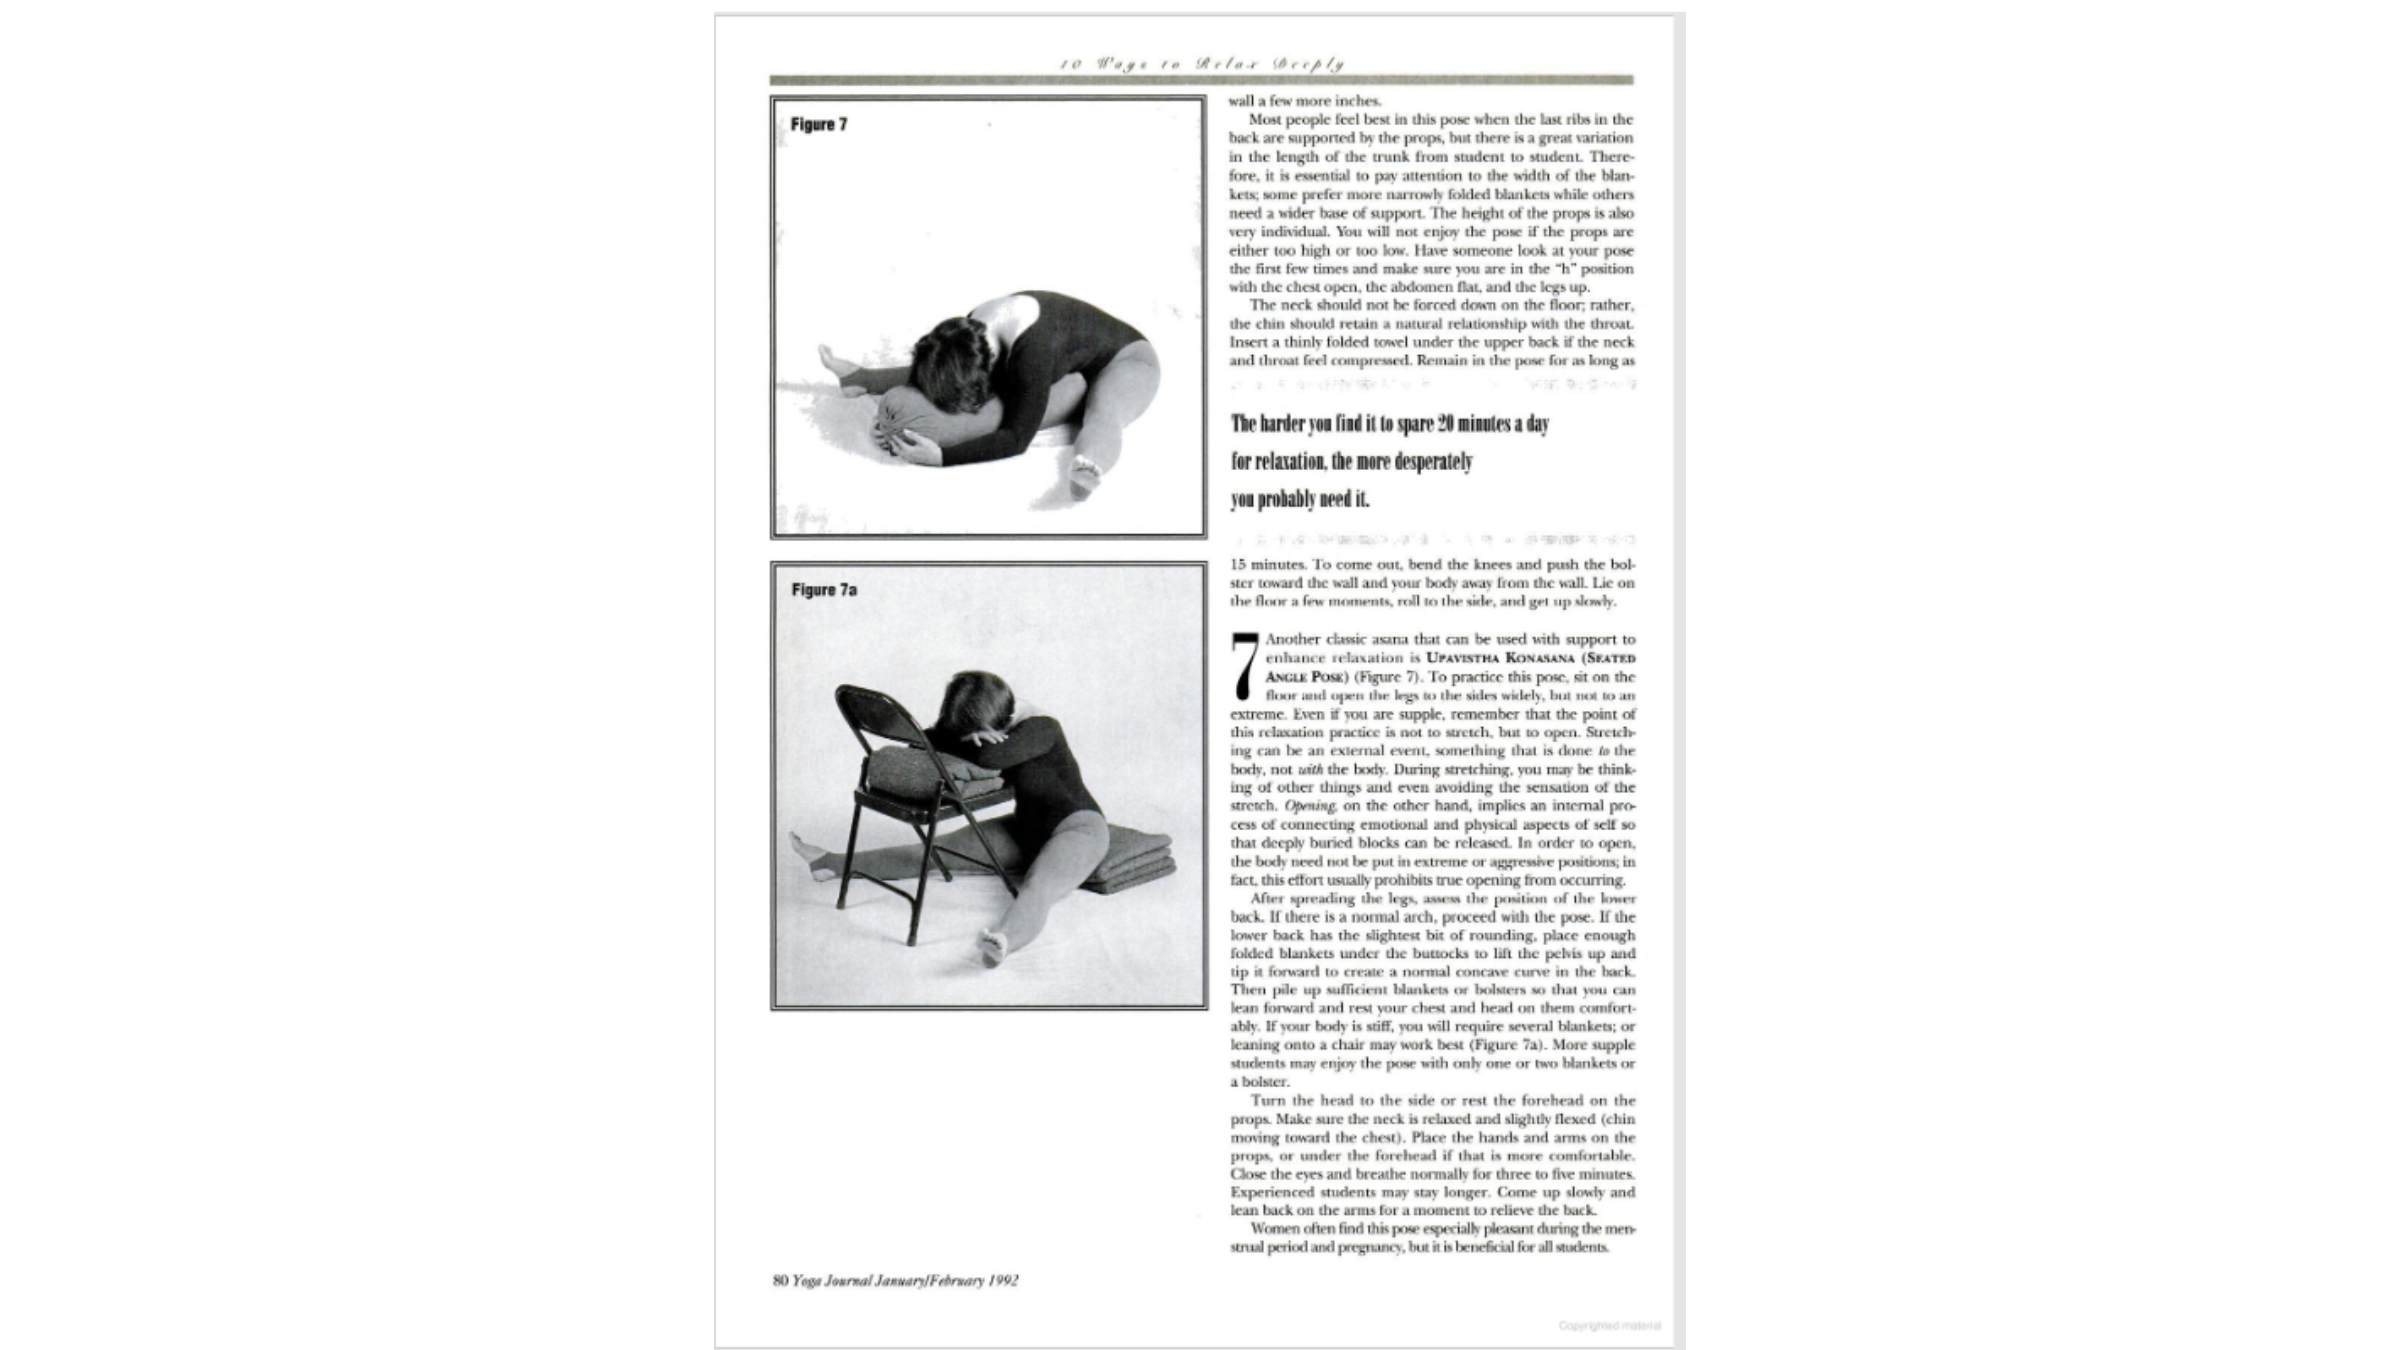
Another classic asana that can be used with support to enhance relaxation is Upavistha Konasana (Seated Angle Pose) (Figure 7). To practice this pose, sit on the floor and open the legs to the sides widely, but not to an extreme. Even if you are supple, remember that the point of this relaxation practice is not to stretch, but to open. Stretching can be an external event, something that is done to the body, not with the body. During stretching, you may be thinking of other things and even avoiding the sensation of the stretch. Opening, on the other hand, implies an internal process of connecting emotional and physical aspects of self so that deeply buried blocks can be released. In order to open, the body need not be put in extreme or aggressive positions; in fact, this effort usually prohibits true opening from occurring.
After spreading the legs, assess the position of the lower back. If there is a normal arch, proceed with the pose. If the lower back has the slightest bit of rounding, place enough folded blankets under the buttocks to lift the pelvis up and tip it forward to create a normal concave curve in the back. Then pile up sufficient blankets or bolsters so that you can lean forward and rest your chest and head on them comfortably. If your body is stiff, you will require several blankets; or leaning onto a chair may work best (Figure 7a). More supple students may enjoy the pose with only one or two blankets or a bolster.
Turn the head to the side or rest the forehead on the props. Make sure the neck is relaxed and slightly flexed (chin moving toward the chest). Place the hands and arms on the props, or under the forehead if that is more comfortable. Close the eyes and breathe normally for three to five minutes. Experienced students may stay longer. Come up slowly and lean back on the arms for a moment to relieve the back.
Women often find this pose especially pleasant during the menstrual period and pregnancy, but it is beneficial for all students.
8. Simple Supported Cross-Legs
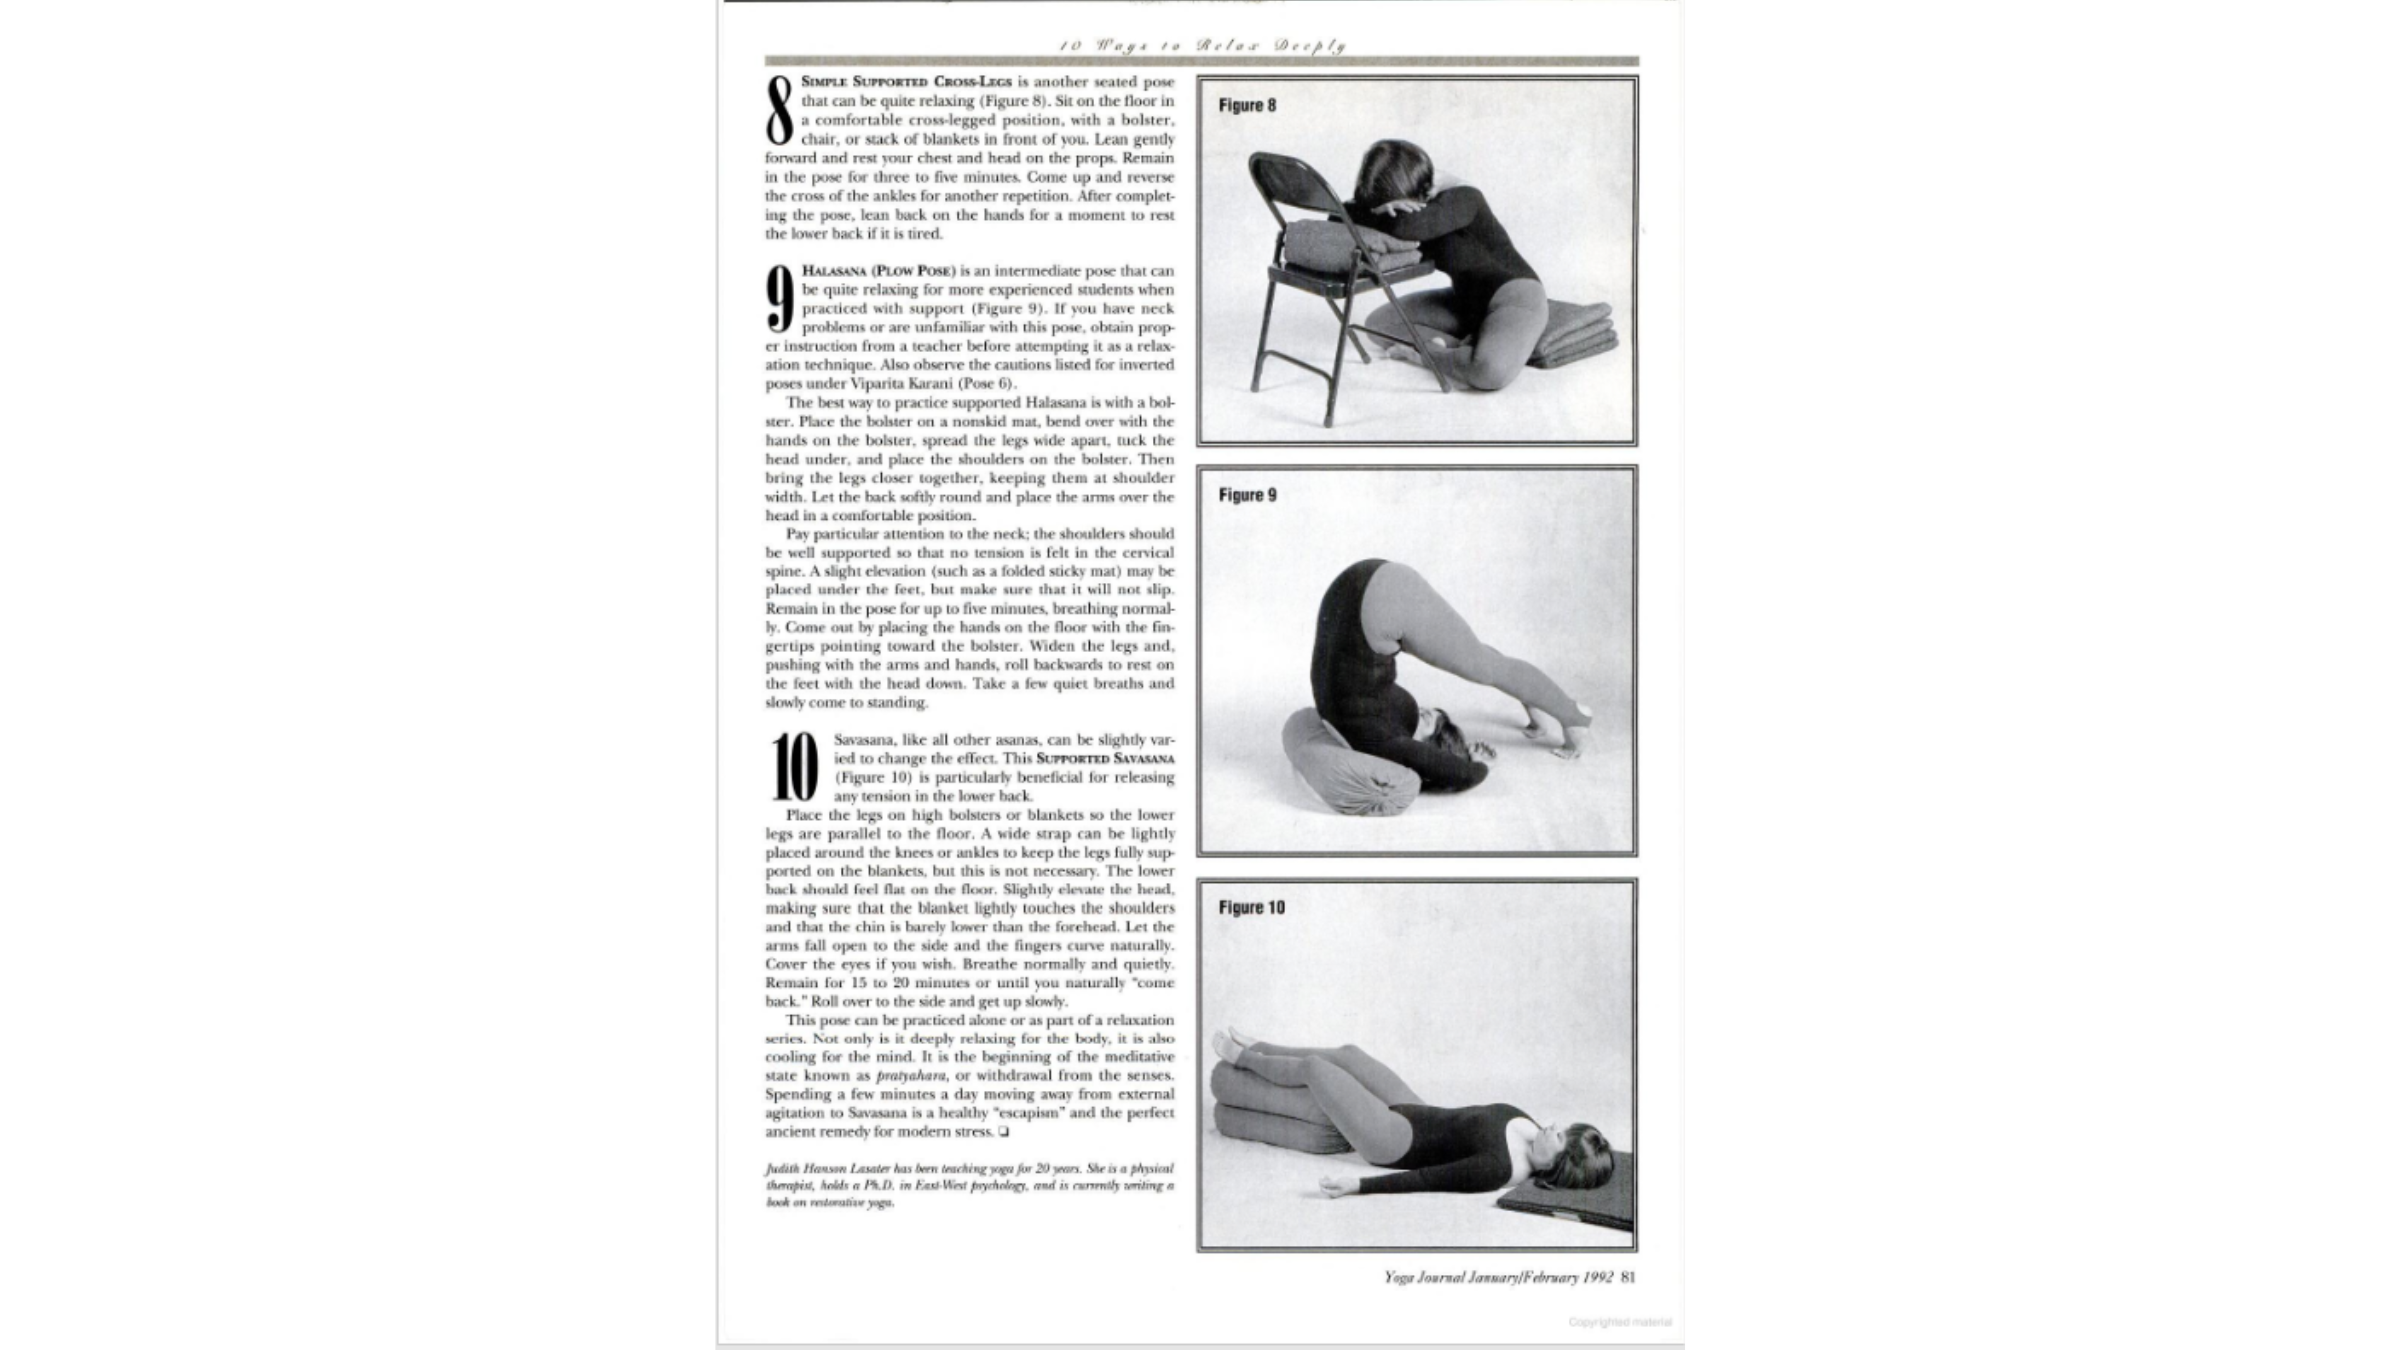
This is another seated pose that can be quite relaxing (Figure 8). Sit on the floor in a comfortable cross-legged position, with a bolster, chair, or stack of blankets in front of you. Lean gently forward and rest your chest and head on the props. Remain in the pose for three to five minutes. Come up and reverse the cross of the ankles for another repetition. After completing the pose, lean back on the hands for a moment to rest the lower back if it is tired.
9. Halasana (Plow Pose)
This is an intermediate pose that can be quite relaxing for more experienced students when practiced with support (Figure 9). If you have neck problems or are unfamiliar with this pose, obtain proper instruction from a teacher before attempting it as a relaxation technique. Also observe the cautions listed for inverted poses under Viparita Karani (Pose 6).
The best way to practice supported Halasana is with a bolster. Place the bolster on a nonskid mat, bend over with the hands on the bolster, spread the legs wide apart, tuck the head under, and place the shoulders on the bolster. Then bring the legs closer together, keeping them at shoulder width. Let the back softly round and place the arms over the head in a comfortable position.
Pay particular attention to the neck; the shoulders should be well supported so that no tension is felt in the cervical spine. A slight elevation (such as a folded sticky mat) may be placed under the feet, but make sure that it will not slip. Remain in the pose for up to five minutes, breathing normally. Come out by placing the hands on the floor with the fingertips pointing toward the bolster. Widen the legs and, pushing with the arms and hands, roll backwards to rest on the feet with the head down. Take a few quiet breaths and slowly come to standing.
10. Supported Savasana
Savasana, like all other asanas, can be slightly varied to change the effect. This Supported Savasana (Figure 10) is particularly beneficial for releasing any tension in the lower back.
Place the legs on high bolsters or blankets so the lower legs are parallel to the floor. A wide strap can be lightly placed around the knees or ankles to keep the legs fully supported on the blankets, but this is not necessary. The lower back should feel flat on the floor. Slightly elevate the head, making sure that the blanket lightly touches the shoulders and that the chin is barely lower than the forehead. Let the arms fall open to the side and the fingers curve naturally. Cover the eyes if you wish. Breathe normally and quietly. Remain for 15 to 20 minutes or until you naturally “come back.” Roll over to the side and get up slowly.
This pose can be practiced alone or as part of a relaxation series. Not only is it deeply relaxing for the body, it is also cooling for the mind. It is the beginning of the meditative state known as pratyahara, or withdrawal from the senses. Spending a few minutes a day moving away from external agitation to Savasana is a healthy “escapism” and the perfect ancient remedy for modern stress.