


Published June 2, 2026 05:55AM
Tight hips are a common complaint. Blame it on your busy, contemporary lifestyle and days spent sitting at a desk, commuting long distances in your car, and generally holding tension in your body and mind pretty much constantly. All of these habitual patterns can leave hips feeling achy and stiff.
Yin yoga can help. The extended holds of yin yoga encourage you to allow your hips plenty of time to truly unwind. They also help you deepen your presence, even amid slightly discomfort. The following yin yoga poses stretch and open your hips in all directions, encouraging flexibility and an overall sense of relief.
5 Yin Yoga Poses to Release Tight Hips
Commit to stillness as you linger in each pose for 3 to 5 minutes. If your hips are feeling particularly tight, you may want have blocks, bolster, a folded blanket, or a pillow close by for extra support.
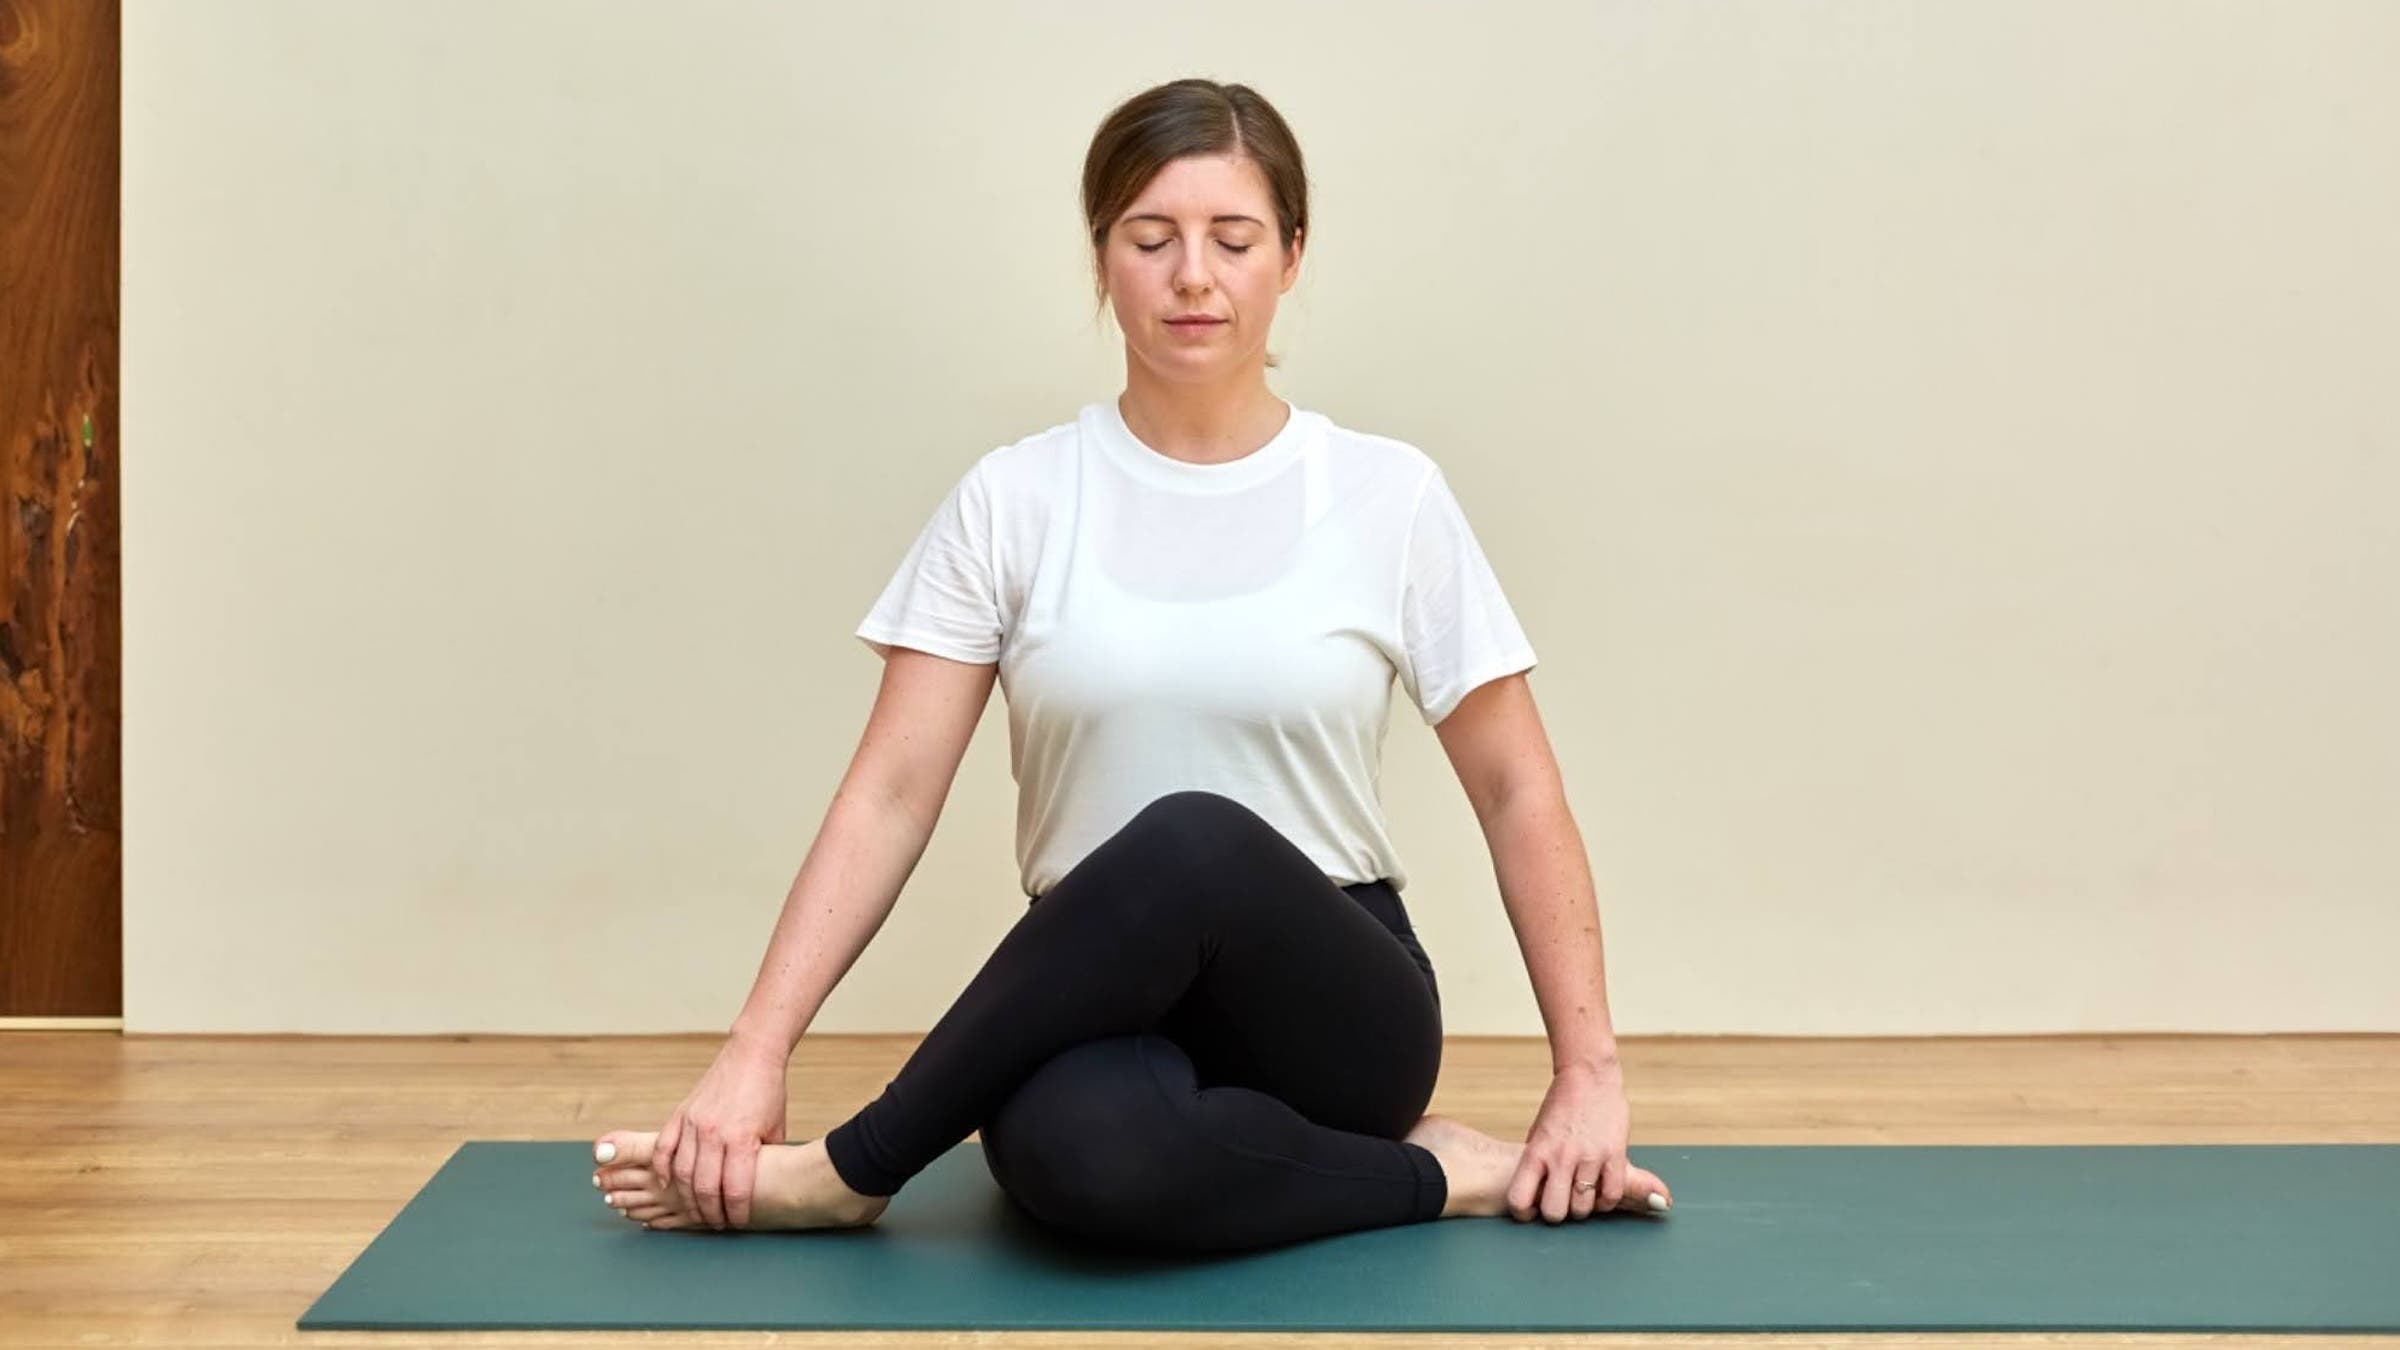
1. Butterfly Pose
A go-to seated shape, Butterfly Pose opens the hips through gentle external rotation, abduction, and flexion.
How to: Sit on your mat and bring the soles of your feet together. The further you have your feet from your body, the less intense this will feel. Choose a distance that allows you to feel sensation in your groin without forcing the stretch or feeling pain. Also, don’t force your knees down toward the mat; they’re fine wherever they are.
Fold forward to the first point of resistance. This is your first edge. Stay here unless your body invites you to go to the next edge by releasing a little further into the forward bend.
Stay in the pose for 3 to 5 minutes.
Counter with Windshield Wipers by sitting upright, bringing your feet to the mat, and gently lowering your knees from side to side.
Modification: Feel free to sit on a cushion or yoga block. Butterfly can also be practiced from a reclined position by lying on your back and bringing the soles of your feet together.
2. Dragonfly Pose
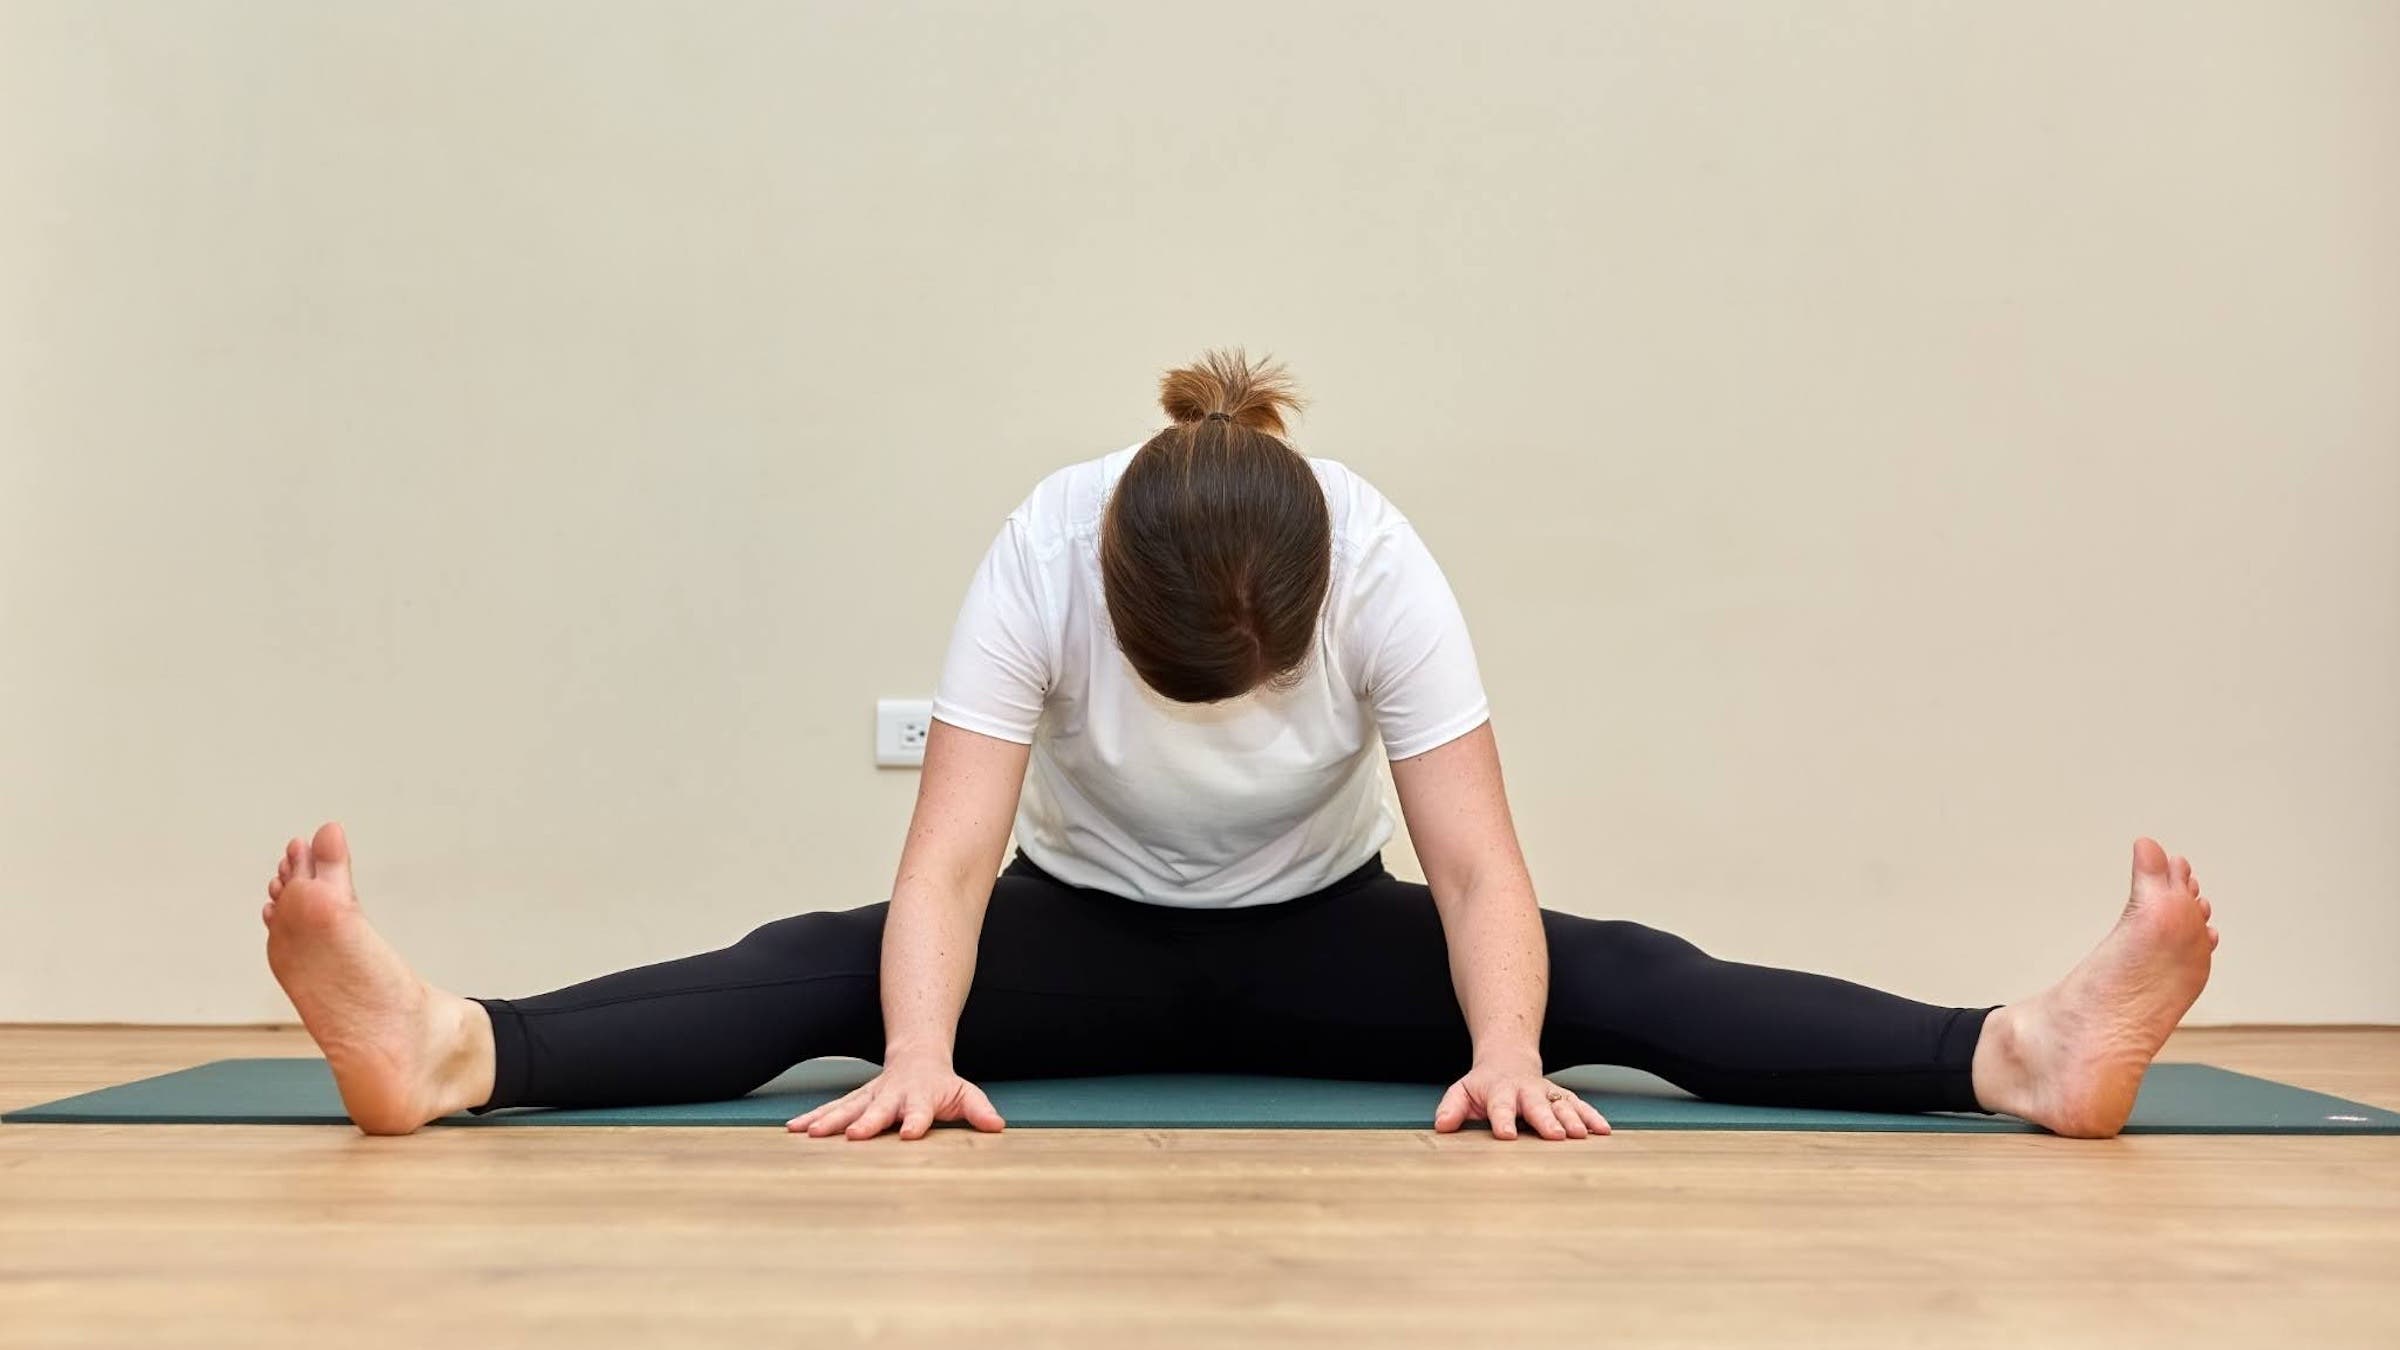
The seated forward bend known in yin yoga as Dragonfly Pose stretches the hips, inner thighs, and hamstrings through abduction.
How to: From a sitting position, spread your legs as far apart as comfortably possible. Fold forward to your first edge, resting your weight in your hands or you can bring your forearms to blocks.
Stay in the pose for 3 to 5 minutes, then counter with Windshield Wipers.
Modification: Sitting on a cushion will help tilt your hips if they feel too tight to fold forward. If your knees are uncomfortable, bring your feet closer together or tighten the quadriceps to lock the knee joint. If hamstrings are very tight you can bend your knees as much as needed, even placing the soles of your feet on the floor, and place a bolster or cushion underneath the knees.
3. Shoelace Pose
A deep, seated hip stretch, Shoelace Pose targets the outer hips and glutes through adduction and external rotation.
How to: Start seated with both legs straight in front of you. Cross your right leg over your left, placing your right foot outside your left hip. For less sensation, extend the bottom leg straight. For more sensation, bend your left knee and take your left foot outside your right hip. Sit as tall as comfortable and avoid sitting on your feet.
Stay in the pose for 3 to 5 minutes, then repeat on the opposite side. Counter with Windshield Wipers.
Modification: Use a cushion or block under your sit bones if the pose feels intense. Shoelace can also be practiced reclined by lying on your back, crossing your legs, and gently drawing your feet toward your body. Don’t forget to switch sides.
4. Dragon Pose
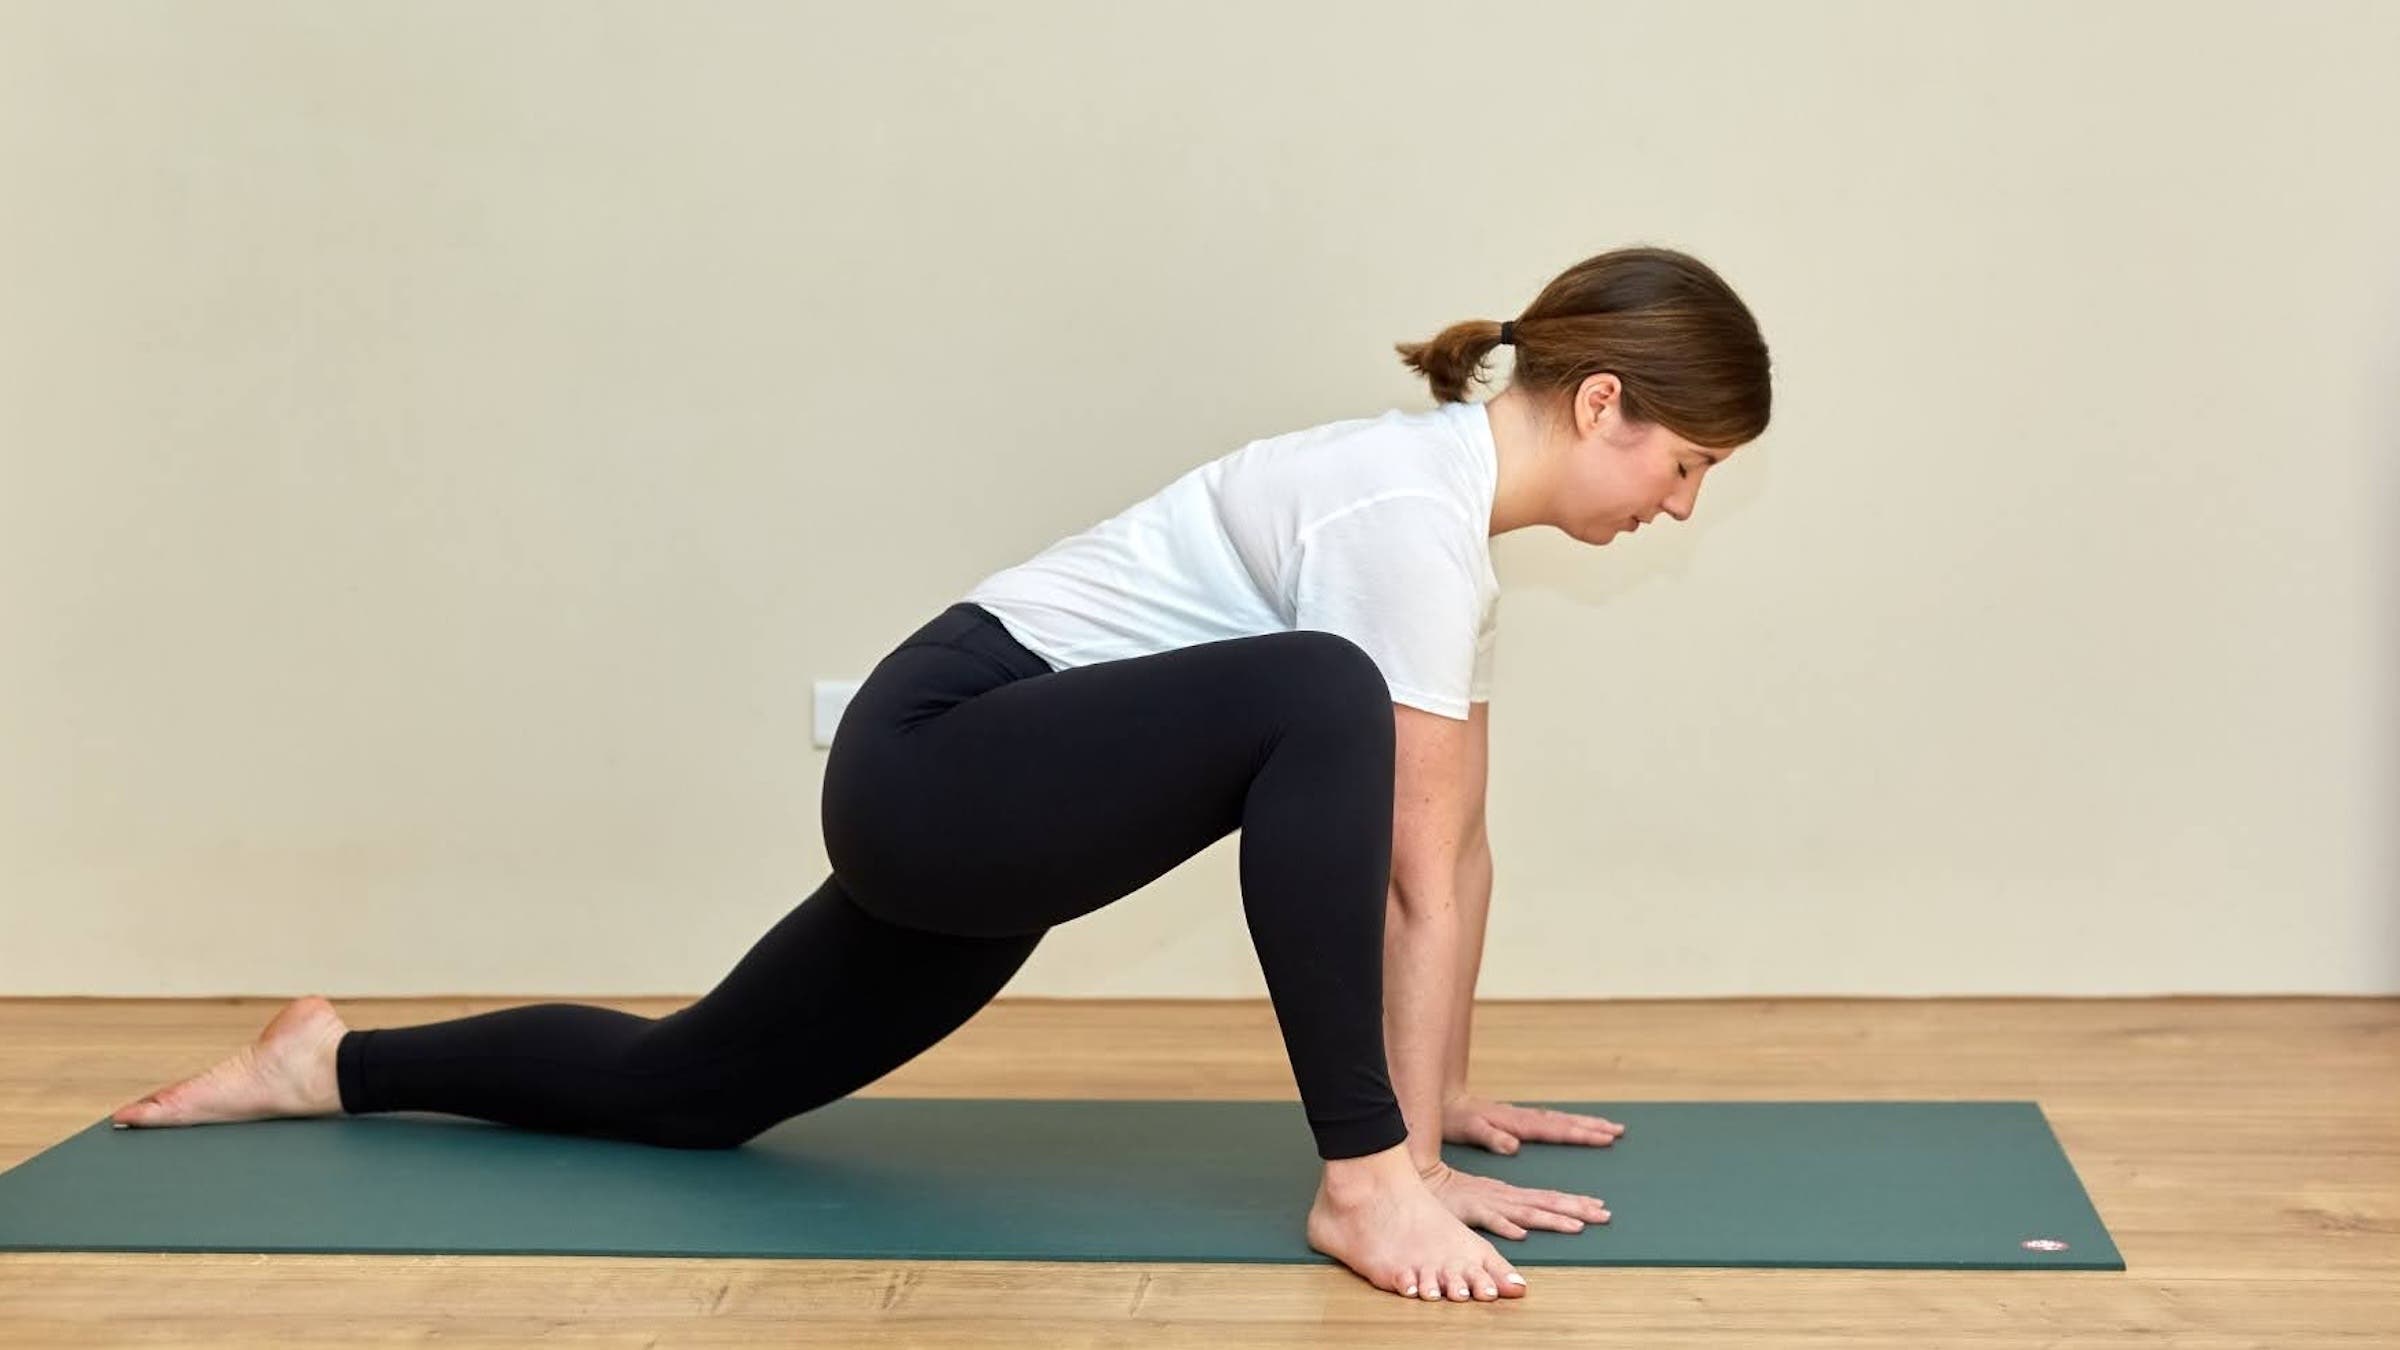
In Dragon Pose, the back hip stretches into extension, targeting the hip flexors, while the front hip sits in deep flexion.
How to: Come to your hands and knees and step your right foot forward to the outside of your right hand. For less intensity, step your foot between your hands. For more intensity, slide your back knee a little farther back.
Stay in the pose for 3 to 5 minutes, then counter with Downward-Facing Dog or simply sit on the mat for a few quiet breaths. Repeat on the opposite side.
Modification: Rest your hands on blocks if you need more support in this pose. If the intensity is too much, flip onto your back and draw your right knee toward your chest. Then repeat on the other side.
5. Twisted Roots
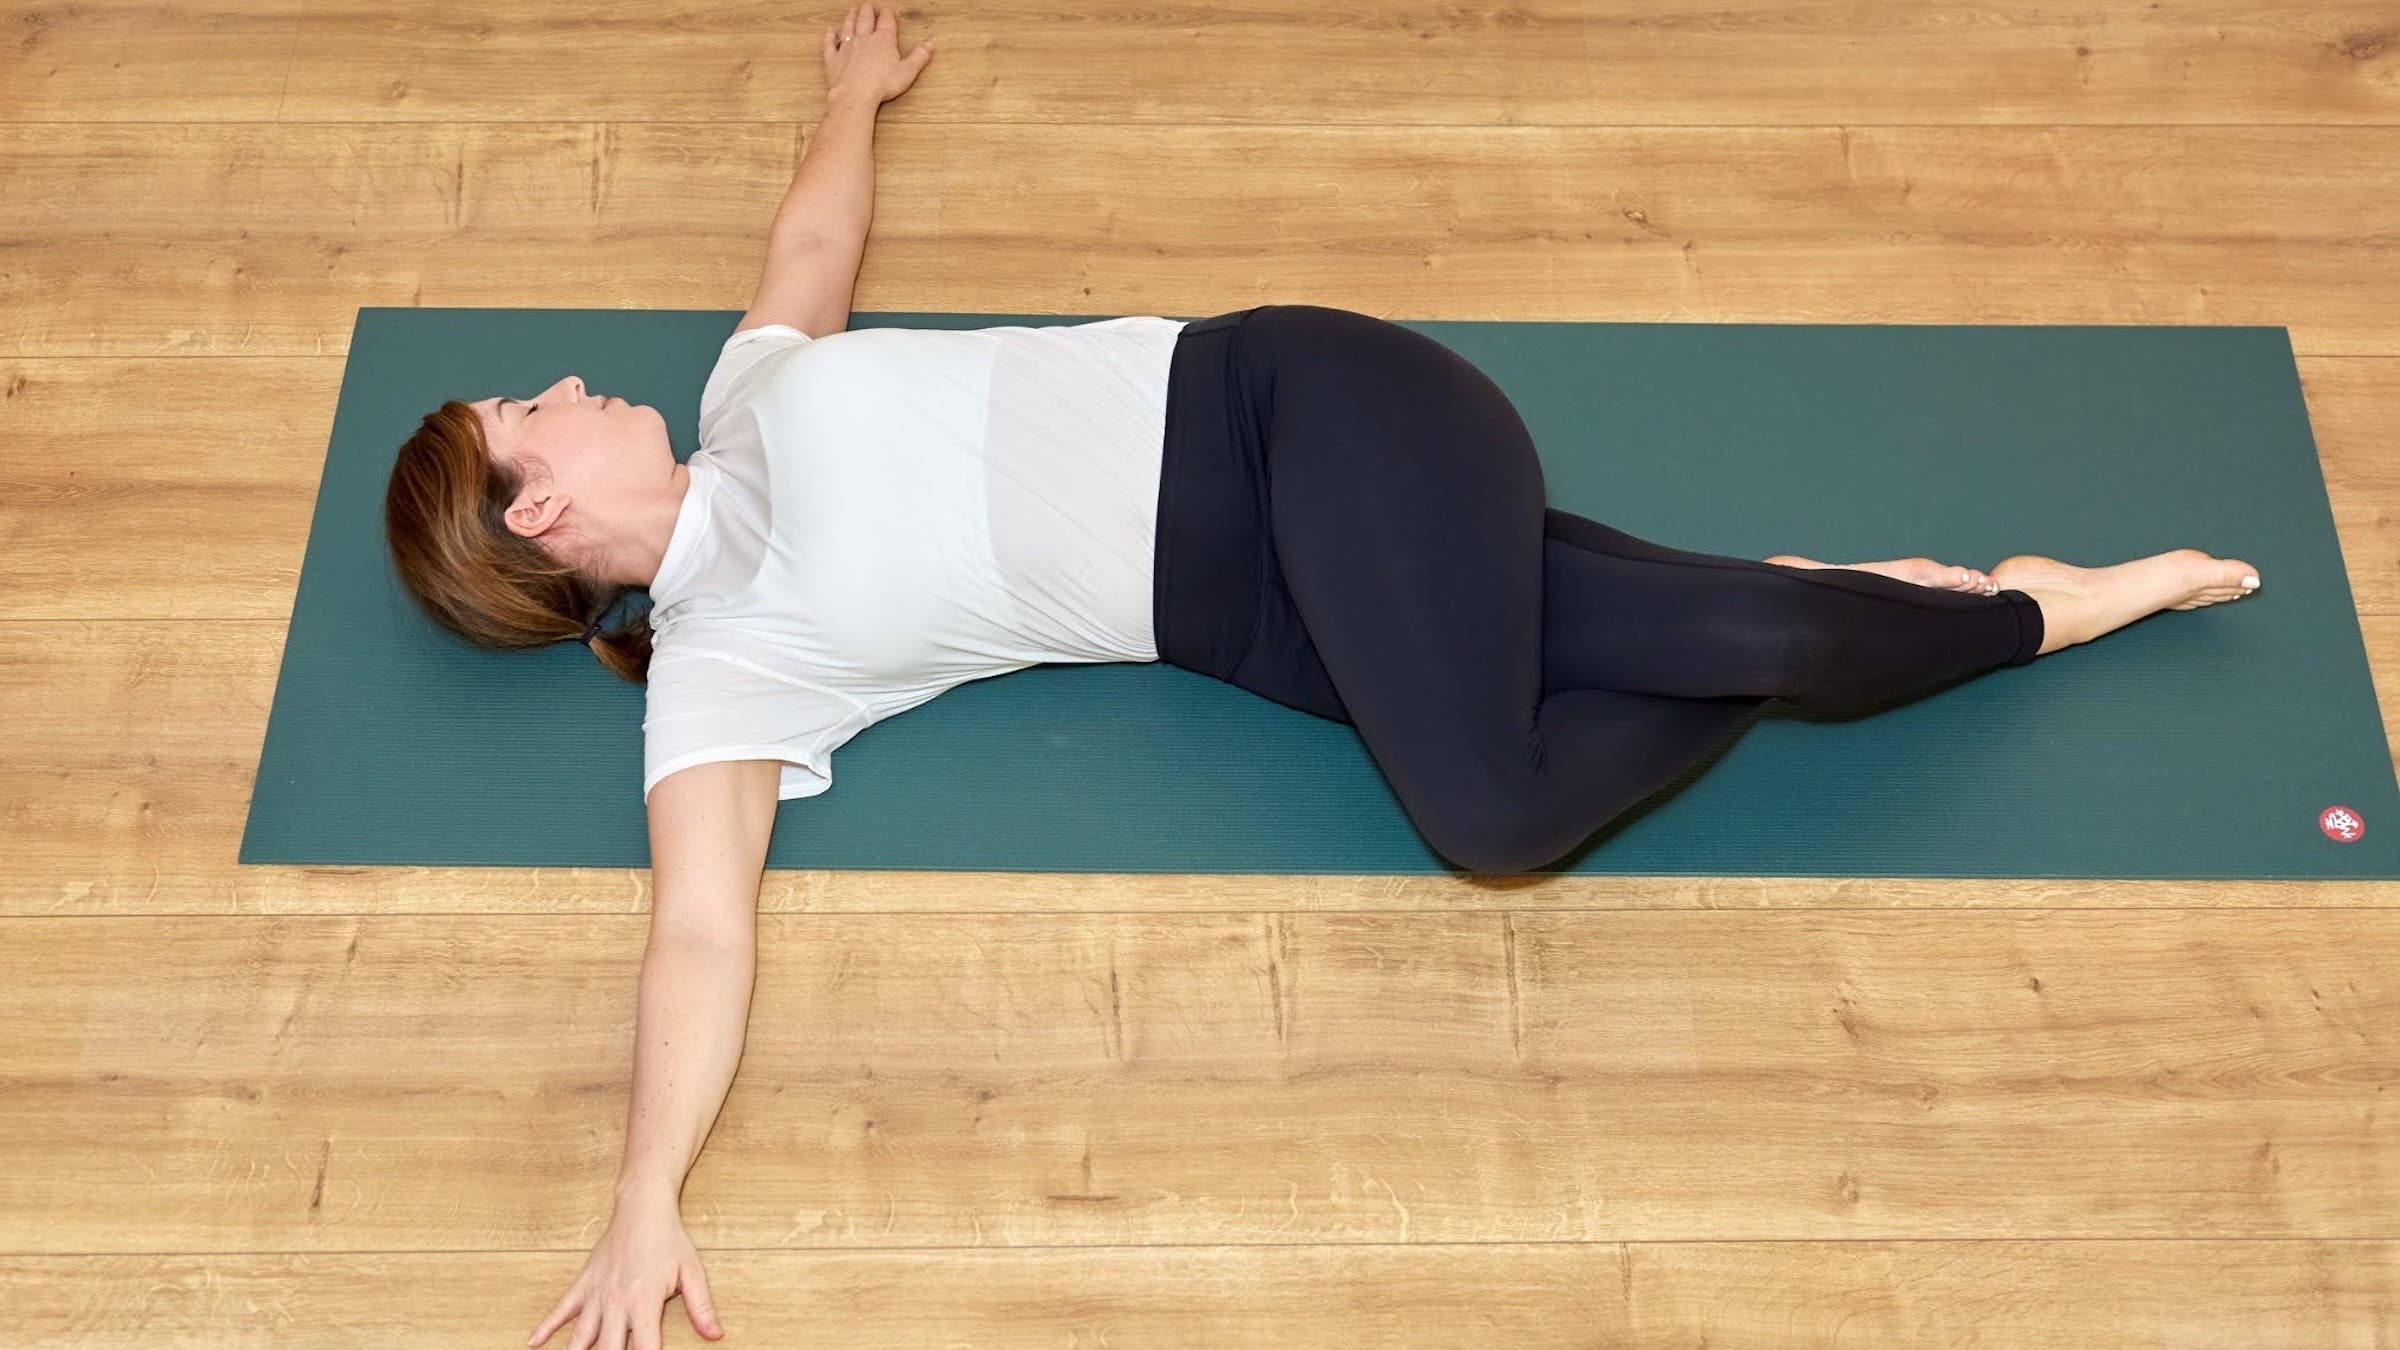
For internal rotation with a little adduction, try Twisted Roots.
How to: Lie on your back and cross your right thigh over your left. Gently lower both knees toward the right to create a twist. Try to stack your right hip over your left hip but keep both shoulders grounded on the mat. Your arms can come straight out to the sides and act as support, keeping you in the twist. To intensify the twist, turn your gaze toward the left and/or create a second twist in your legs by wrapping your right foot around your left leg. To lessen the twist, uncross your legs and simply lower both bent knees to one side, stacked on top of one another.
If you feel tingling or numbness in your hands, bring them closer to your body.
Stay here for 3 to 5 minutes, then repeat on the opposite side. Once you have practiced on both sides, release the twist and hug your knees to your chest.
Modification: If turning your head feels uncomfortable on your neck, keep your gaze toward the ceiling. If your top knee floats high off the mat, rest it on a block or cushion so you can fully relax into the shape. You can also place a cushion or bolster between your knees to ease the intensity and protect the lower back.
Bonus: Corpse Pose
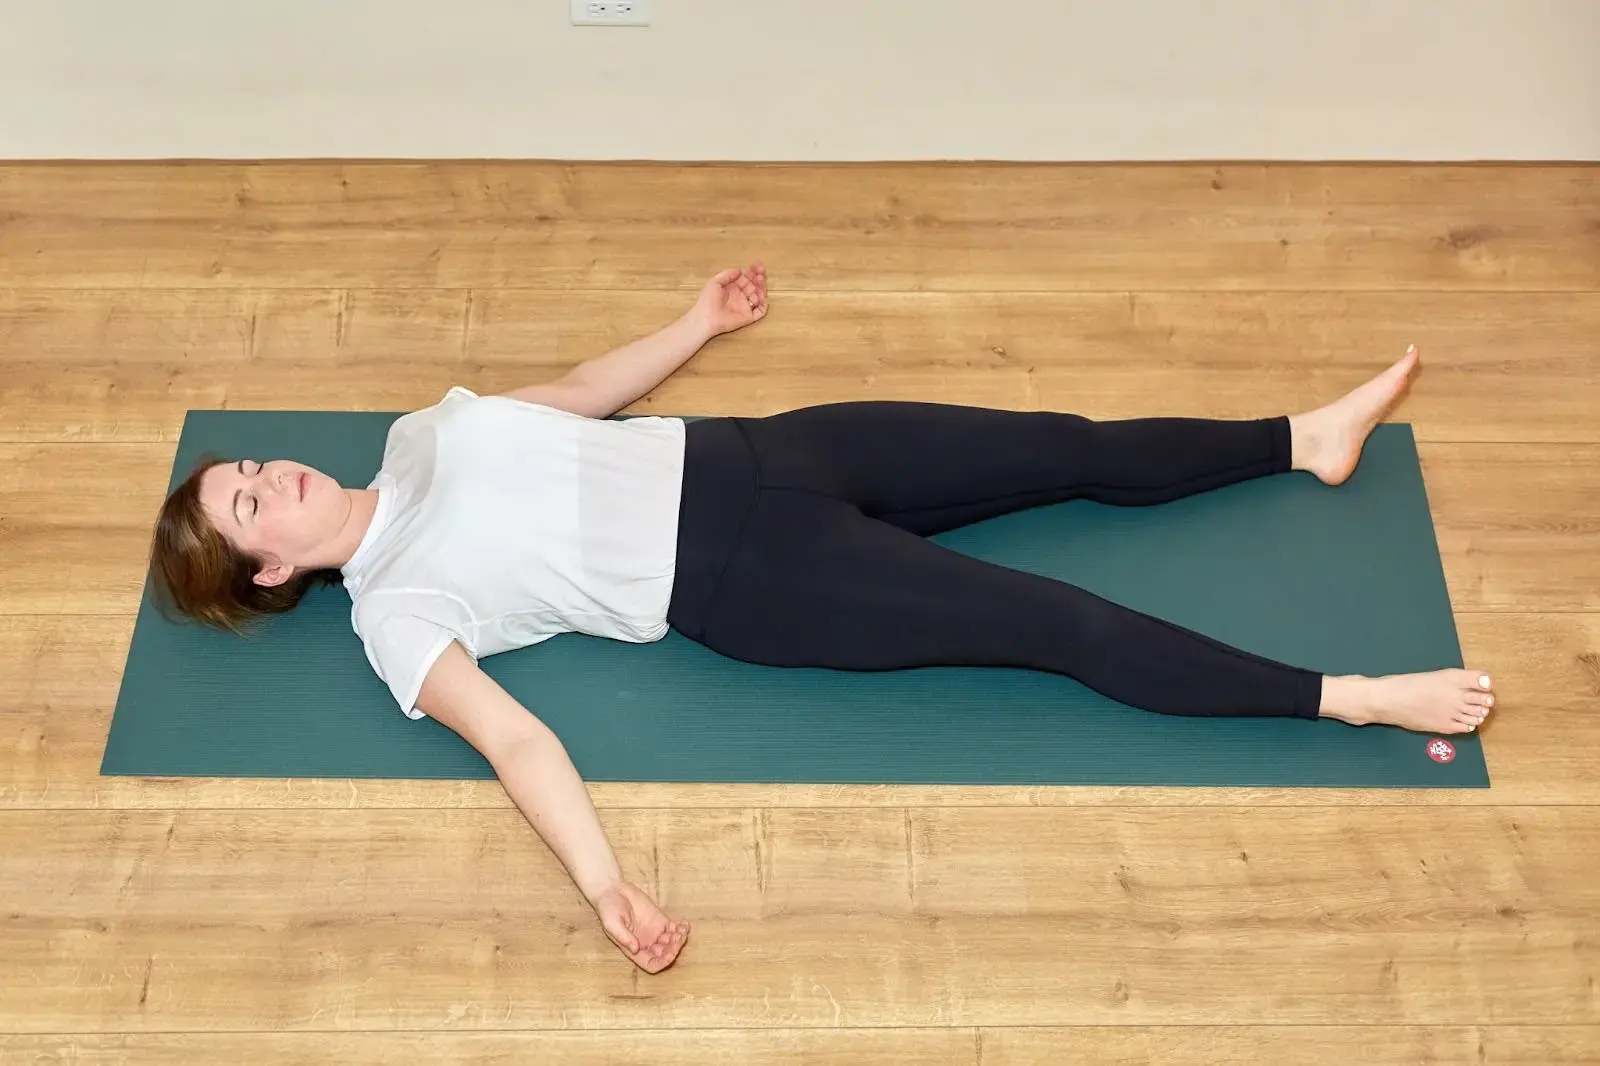
End your practice in Corpse Pose to integrate the practice.
Allow your legs to fall open, rest your arms alongside your body, and release any remaining effort. After having held the deep connective tissues in stretches for an extended time, this final stillness gives the body a chance to absorb the work. Remain here for several minutes.
When you’re ready, close your practice slowly: roll to one side, pause, and press up to a comfortable seat. Thank yourself for making it to your mat today.


")


