
Published October 9, 2026 12:24PM
In Yoga Journal’s Archives series, we share a curated collection of articles originally published in past issues beginning in 1975. This article about Urdhva Prasarita Padasana first appeared in the March-April 1995 issue of Yoga Journal. Find more of our Archives here.
People have made maps of their world for thousands of years. Ancient maps were fairly accurate close to home, but out beyond the fringes of the known world they became vague and unreliable. With the help of satellites and computers, though, modern mapmakers have charted the entire planet with pinpoint accuracy and are now expanding the frontiers of the “known world” to the moon and other bodies of the solar system.
We’re probably most familiar with the torn and rumpled maps stuffed in the glove box of the car and frantically consulted—usually in the dark—after making a wrong turn. But the maps we really use most often are the ones stored in the amazing glove box of our brain, the ones that get us to and from everyday places like the market, the office, or our favorite yoga class. We’re no longer aware that we’re using them, but without them, our routine trips outside the home would take a lot more time and effort.
But these aren’t the only maps we carry in our heads. We also have a map of the surface and interior of our own body, which we’ve been busily drawing since the moment of our birth, and which is commonly called the “body image.” Like old mapmakers, who based their work on existing maps, surveys, astronomical observations, and accounts of travelers and natives, we gather material for our map from a variety of sources: from what we can see and touch; from sensory reports out of what movement therapist Bonnie Bainbridge Cohen calls the “tissue territories,” which include our bones, muscles, organs, and circulating fluids like blood and lymph; and from our own movements and the responses they elicit in ourselves and others.
Ideally the map is carefully drawn to trace the contours of the body. We define and correlate the ever-changing currents of internal and external sensations and locate and integrate different body parts. Moreover, since the body serves to root the Self in physical existence, our body image not only helps us find ourself, but our Self as well. As Morris Berman writes in Coming to Our Senses: Body and Spirit in the Hidden History of the West, “body image and interiority, or self-awareness, are two sides of the same coin—we cannot hope to understand one without the other.” Our map provides us with a solid footing for self-perception and self-identity and allows us to navigate our body-self through the world we live in with assurance, grace, intelligence, and, most importantly, joy.
In our culture, though, where the disuse or misuse of the body is widespread, this ideal is rarely achieved. The average person’s map reflects a rather circumscribed “known world” and even then is drawn rather haphazardly: It’s like a map with a large number of streets incorrectly represented or missing altogether or with a “map scale” that is seriously distorted.
Consequently, the subjective map doesn’t fit the objective terrain, and these people chronically end up, if they dare venture to explore at all, wandering aimlessly in some abandoned corner of their body.
This deficiency (could we call it the “map gap”?) shows up regularly in my beginning yoga classes. The newer students often remind me of bewildered tourists stopping to ask some loitering local—they don’t know that I’ve just moved here lately myself—for directions: “Am I doing it right?” “What am I supposed to be feeling?” “How do I make it move that way?” Significantly, this last “it”—a pronoun that is usually used, as my dictionary notes, “in reference to a lifeless thing” or an “abstract entity”—is their own body. This is the physical manifestation of what the yogis call avidya, the “not seeing” or ignorance of the Self.
But the body image, unlike a map, is fluid, and we all have the capacity to draw, erase, and then redraw the topography of our map over and over, whatever our age or physical condition. This means that however lost we may feel in our body now, we always have the opportunity to find ourselves again. How exactly is this done? One very good method—this should come as no surprise—is yoga. The ancient yogis were intrepid explorers of the physical, mental, and spiritual domains—one and the same to them—and they left behind a sizable number of valuable maps and mapmaking tools, among them an assortment of rather odd positions for the body called asanas.
Such deliberate and directed movement is central to the plotting of a competent body image. Asana practice first stimulates awareness or sensation (beginners frequently label this stimulation “pain”) and so helps us remember our body-self and interests us in traveling beyond what we know; it then brings awareness to our range of familiar movements, adding detail or color to our “known world”; and finally, it broadens the horizons of potential movement and alerts us to the myriad possibilities of a more spacious life.
The pose we’ll look at in this column is called Urdhva Prasarita Padasana. Since the emphasis in the traditional posture is on the lifting of the legs from the floor, the best English translation is “extended leg raises” (although it’s worthwhile to also work with the lowering of the legs to the floor).
This posture serves two purposes as a mapmaking tool. As a reclining posture, the pressure of the back against the floor helps to activate the “forgotten” body, to borrow a term from B.K.S. Iyengar—that side of the body surface that is generally off the beaten track. And though it’s often presented as an exercise that firms a slack belly muscle (rectus abdominus), its primary purpose is to mobilize and strengthen the psoas muscles, a pair of deep abdominal muscles that are the body’s most powerful hip flexors. By searching out these muscles, we can begin to reconnoiter the interior of our body.
The psoas has its origin on the sides of the lower spine, sweeps downward through the pelvis, passes forward over the pubic rim (at the bottom front of the pelvis), and inserts on a small bump on the inner thigh bone (or femur) called the lesser trochanter. This muscle is no doubt well down the list of things most people are routinely concerned about. But Mabel Todd, whose book The Thinking Body is an indispensable mapmaking tool, views the psoas pair as “perhaps the most important of all the muscles in determining the human, or upright, posture, because of their function, relationships, and extent.” The psoas helps us to “stand our ground” as humans and, as it unites the upper body with the pelvis and legs, contributes to a feeling of wholeness in the body-self. A weak and poorly functioning psoas muscle can lead to problems with the lower back, breathing, digestion, and the nervous system.
I’ll describe several variations of Urdhva Prasarita Padasana. Their physical architecture is elementary: The ball-shaped head of the thighbone (femur) rotates in the hip socket, bringing the legs from the floor to perpendicular or vice versa. The principal mover of the legs is the psoas. The challenge is to move the legs through their 90-degree arc without disturbing the pelvis, the spine, or the belly muscle’s participation in the breathing rhythm.
Preliminary Exercises
“Preliminary” literally means “to stand before the threshold,” so imagine that you’re standing in the doorway of your home, map in hand, preparing to “boldly go where no one has gone before.” To start we’ll smooth out the creases in our current map, just to see what we have: Remember that in order to change something about ourselves, we first have to understand it.
Lie on your back with your knees bent, feet on the floor a comfortable distance from the buttocks. Bring awareness to your contact with the floor—particularly the back of the pelvis, the shoulder blades, and the back of the head. Take a few minutes to experience the embrace of gravity and the quality of your contact to the floor, which will give you clues about your day-to-day relationship with the planet. What is it like? Do you feel comfortably “down to earth,” or are there places that seem “up in the air”? How would you describe what you feel, or how might you “map it out”?
Now shift awareness to your inner groins, maybe an inch or two from the base of the pelvis or perineum. If this is difficult for you, remember that the hands are handy mapmaking tools: Press your palms or fingertips lightly against this area on each thigh.
Mark off a line in your imagination from the inner groin on each thigh to the “inner face” of the back of the pelvis, actually the front of the sacrum. You already have a sense of the prominent features on the surface of the back torso; now mentally measure the distance from the inner thighs through the pelvis to the sacrum. How far is it? Can you experience the front-to-back depth of the pelvis and the vital link between the inner groins and the front sacrum, or is the path faint or altogether faded?
Next bring your fingertips to rest on the lower front abdomen, below the navel, and literally get in touch with your breathing rhythm. When you inhale, the abdomen puffs, and when you exhale it sinks. Steer your breath toward the lower abdomen. Remember that the “abdomen” includes everything between the top rim of the pelvis and the lower ribs: This means that the sides and lower back also should expand on the inhale, like a balloon being blown up; on the exhale, imagine that you’re being slowly cinched at the waist with a wide belt, like a cummerbund.
For the remainder of this preliminary exercise, and the postures that follow, only move the legs on an exhalation, pausing at whatever angle of the legs you’ve reached whenever an inhale is needed.
Now come back to those lines I asked you to mark between the inner groins and the sacrum. Are they still there? Find the one on the right side, and imagine that you’re standing on the front sacrum and pulling on the bottom of this line, like a rope. As you feel the tug on the inner groin, lightly lift the right foot off the floor and the knee toward the chest. What happened? Did the belly still sink toward the floor as you exhaled, or did it harden and mound? If the former, your psoas seems for now at least, to be in good working order. If the latter, recognize that your belly muscle was exploited to “make happen” a movement that it should “let happen.”
Continue to play with this movement, consciously initiating from the front of the sacrum and tugging on the inner groin, swinging the bent leg up and down at a leisurely tempo, until you can complete a few cycles without tensing the belly. Then repeat with the left leg.
Next “scissor” the legs: Start with the right leg up, and as you bring the foot to the floor, raise the left leg. Finally, move both legs at the same time. This may challenge the lower back a bit more than the previous exercises. So before you begin, draw the knees up, flatten the lower back, and uncurl the tailbone (coccyx) like a monkey tail along the floor. When you can move the legs without arching the lower back and tensing the belly, according to Ida Rolf, “your psoas muscles have passed their Ph.D. examination.”
Beginning Practice
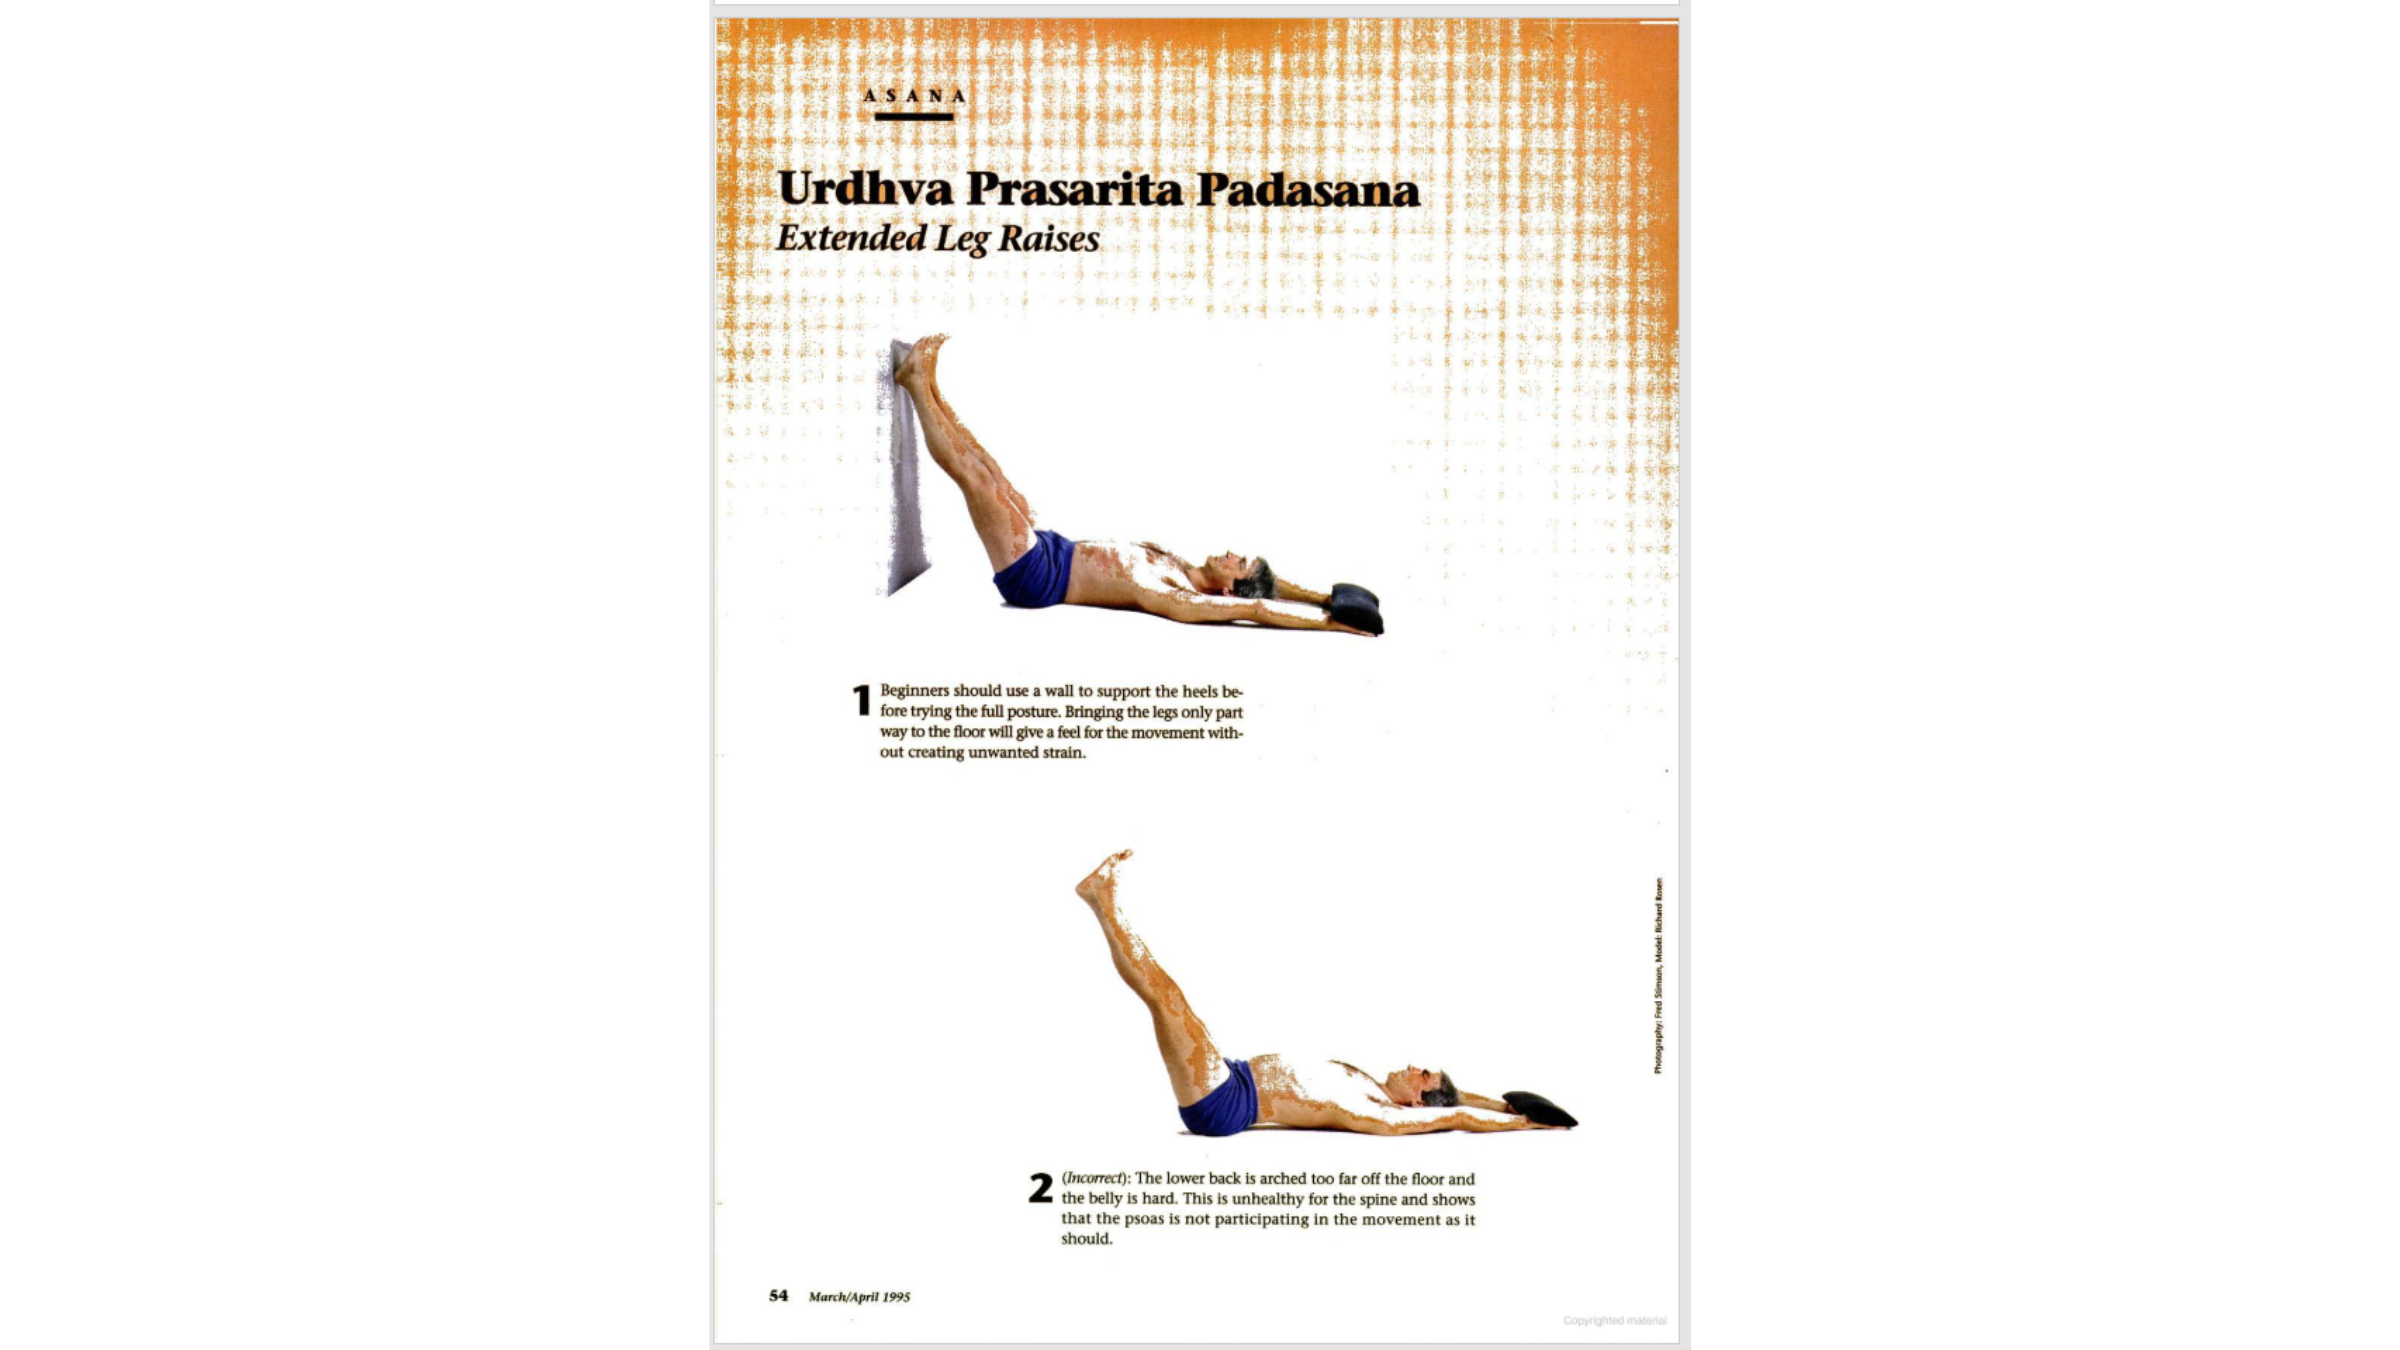
If you’re new to yoga, you might want to start your practice of this pose at a wall. Lie on your back and bring your heels up on the wall, with the legs at a 45-degree angle to the floor (Figure 1). In the traditional position, the arms are stretched on the floor overhead. I like to rest a 10-pound sandbag on my upturned palms, but this is optional. If this arm position poses a problem, especially for your lower back or your shoulders, press your palms flat on the floor beside your hips.
Bend the knees into the chest, then on the next exhalation straighten the legs perpendicular to the floor, imagining that you’re pushing up through the heels from the back of the pelvis. As you did in the last part of the preliminary exercise, release the lower back and uncurl the tailbone out toward the wall.
If you’re tighter in the hamstrings (the muscles in the back of the thighs), you may have difficulty keeping the legs both straight and perpendicular. Let the legs, then, come a little below perpendicular and straighten them as much as possible. They might begin to quiver after a bit—don’t worry, it’s just their way of protesting. They won’t run off.
If it’s just too shaky holding the legs upright, then you’ll need a long strap. Put it across the balls of the feet and hold it taut with hands separated, elbows bent, and the backs of the upper arms on the floor beside your ribs. When you bring the heels to the wall, slowly straighten the elbows until, as the heels touch the wall, the arms are extended. When you’re ready to lift the legs again, bend the elbows again and gently pull on the strap—rely on your psoas and not on the strap to lift the legs as much as possible. Then spend some time every day stretching out those hamstrings, which will benefit you not only in this posture but in many of the others you’ll work on in your daily practice.
Lower the legs with control until the heels just barely kiss the wall, hold for a few seconds, and then lift the legs to perpendicular again. If this seemed like an interesting challenge, stay where you are. But if it was relatively easy, you might slide back from the wall and decrease the angle of the legs with the floor to 30 or so degrees. On the other hand, if your abdomen mounded, your throat hardened, and your eyes were ready to pop out of their sockets, you’ll want to slither in closer to the wall and increase the angle to work within safe limits.
As a caution, if you have any serious back problems, it’s best to do this pose with bent knees only, heels high on the wall. If you have access to a competent teacher, consult him or her before progressing to any of the more intermediate positions.
The number of cycles you do depends on the level of your practice. Most beginners will be satisfied with three to five cycles, but an intermediate won’t want to stop with fewer than eight to 10.
Intermediate Practice
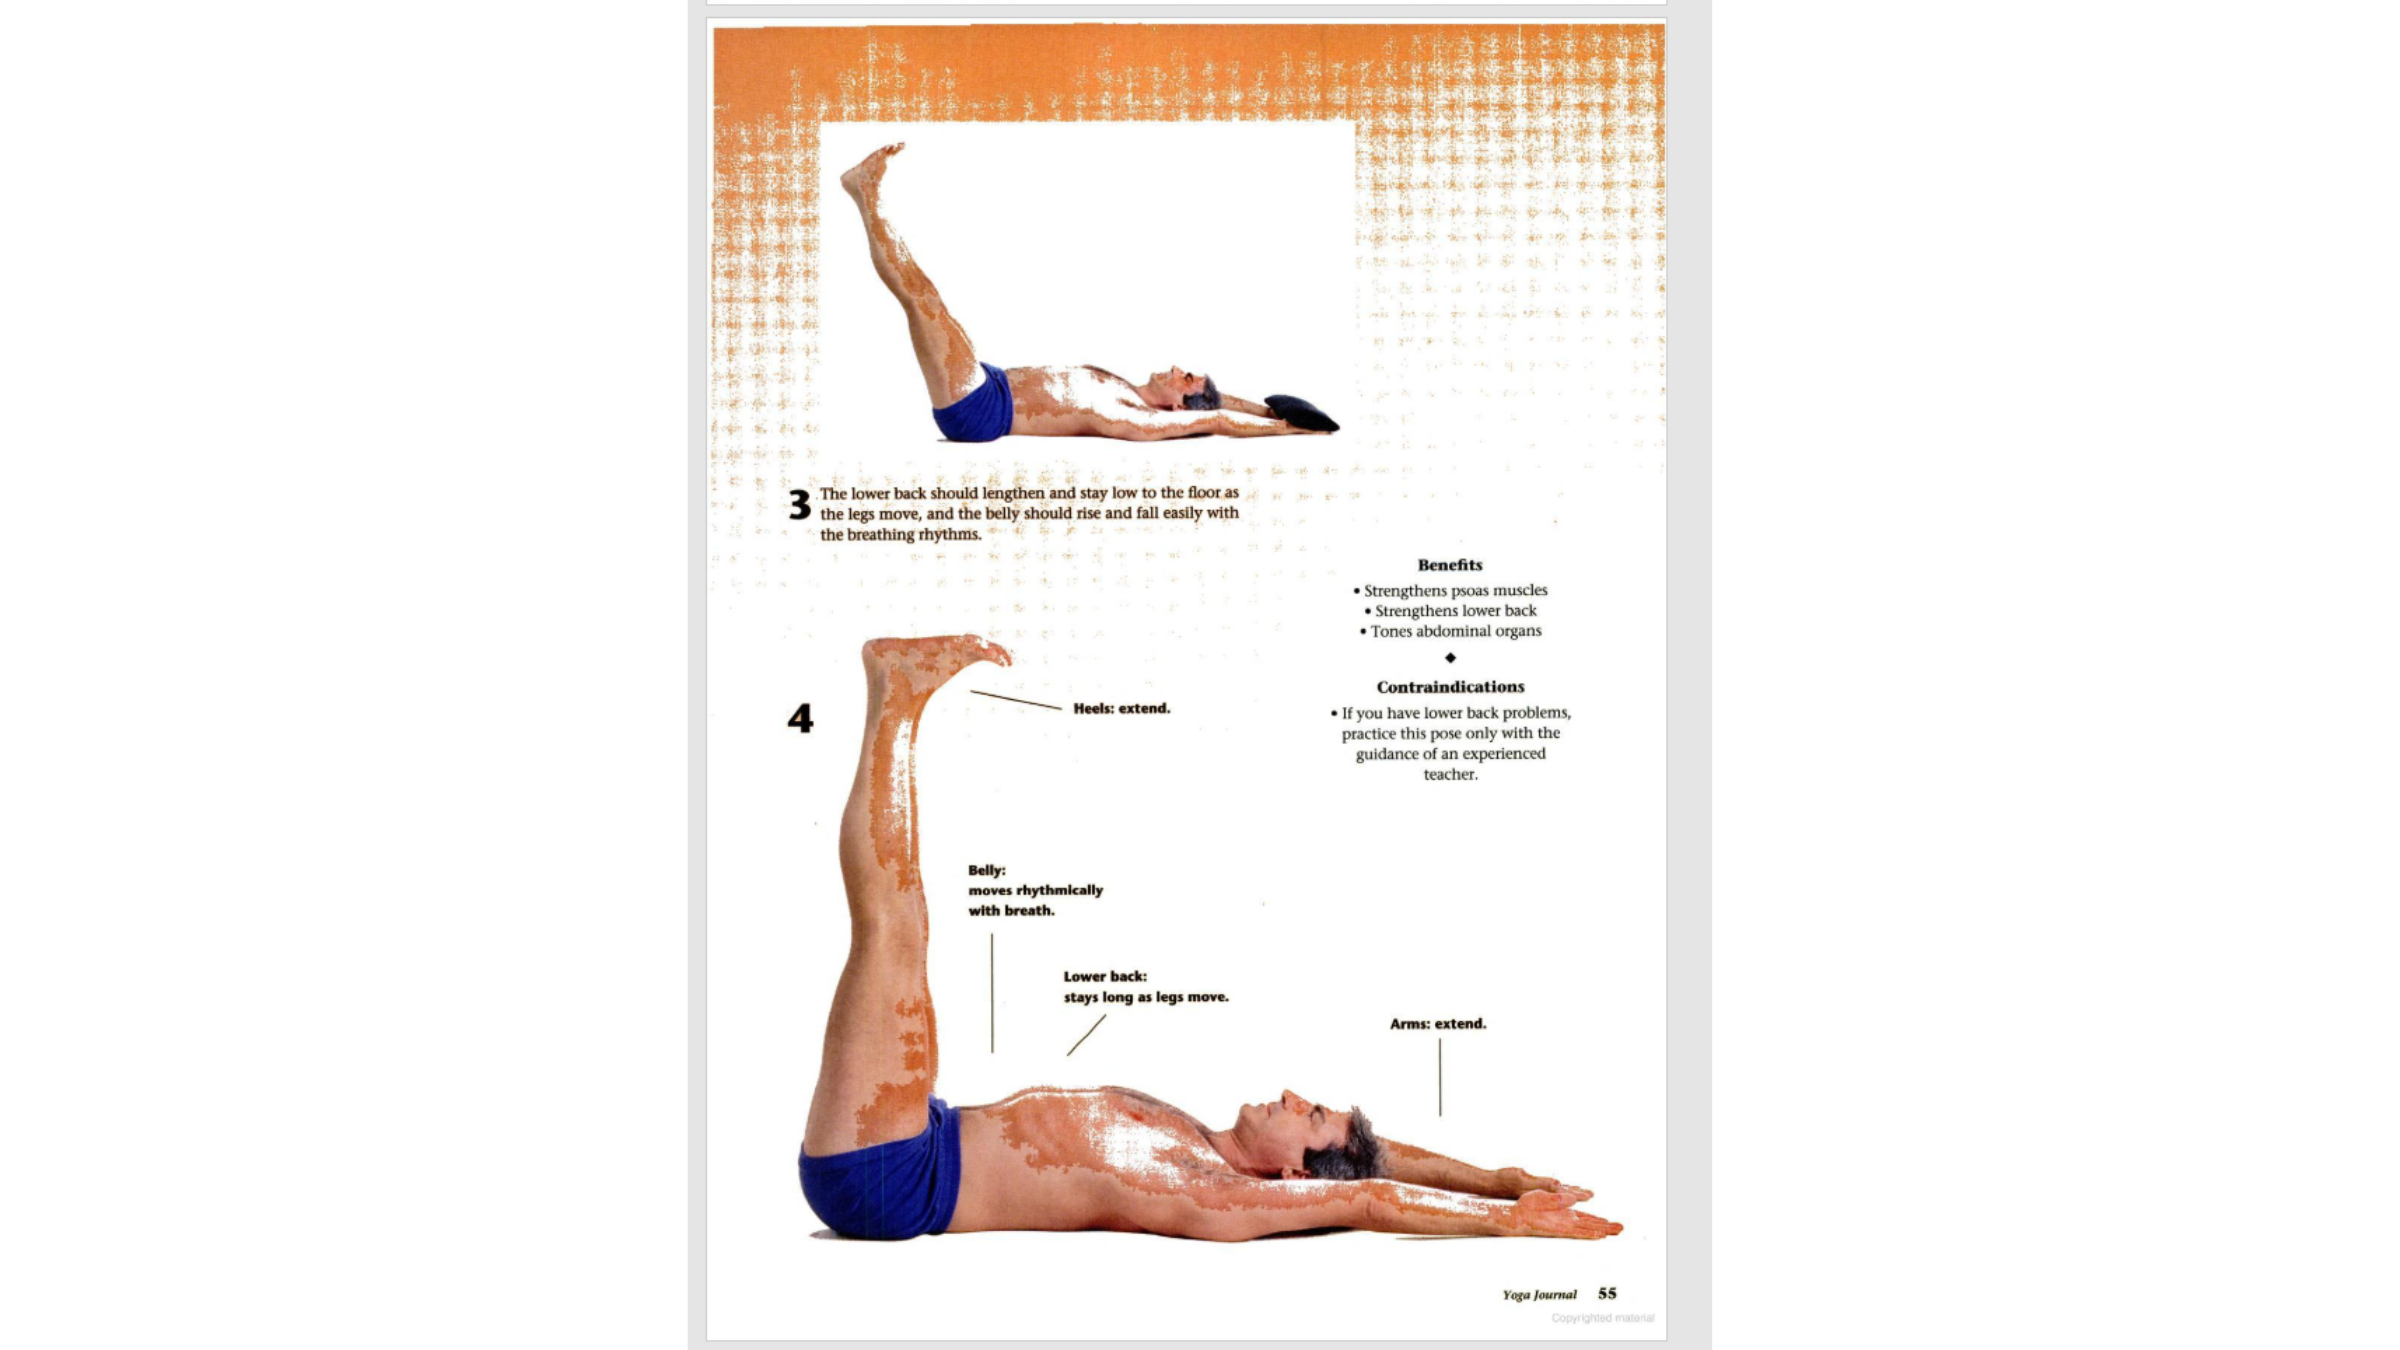
The traditional posture emphasizes raising the legs from the floor, first to a 30-degree angle, then to a 60-degree angle, and finally perpendicular to the floor, holding at each stage 30 to 60 seconds. Be careful not to let the lower back arch away from the floor (Figure 2: Incorrect). The lower back should lengthen and stay low to the floor as the legs move, and the belly should rise and fall easily with the breathing rhythm. These are signs that the psoas is playing its proper role in the posture (Figure 3).
As a variation, you can “scissor” the legs or, instead of holding them at various angles, wave them smoothly through the entire 90-degree arc, from an inch above the floor to perpendicular and down again. There are lots of other entertaining variations on this theme—if you think of any good ones, write to me.
In the final pose, the arms and legs should extend strongly out of the hips, and the abdomen should remain relaxed, letting the psoas do the work (Figure 4).
The Yogic Map
The yogis have a map of the body that’s a peculiar one, at least from the standpoint of traditional Western medical science, which acknowledges only the anatomical body. The yogis scouted this body, which they call the “coarse body,” and discovered two more besides—the “subtle” and the “causal.” All three, they claim, represent the shining forth of the Absolute through its active feminine power, the goddess Shakti, so that each of us is enlightened with the presence and knowledge of the divine.
The subtle body includes the life force, the “lower mind” of everyday occupations like thinking and willing, and the “higher mind” of spiritual insight. The causal body, whose nature is pure bliss, is the matrix of our embodied existence: The yogis realized that “beings here are born from bliss, when born they live in bliss, on deceasing they enter into bliss.” It is the essence of our beingness, the ultimate destination of all our journeys.