
Published September 27, 2026 05:51AM
In Yoga Journal’s Archives series, we share a curated collection of articles originally published in past issues beginning in 1975. This article about how to do yoga inversions first appeared in the January-February 2004 issue of Yoga Journal. Find more of our Archives here.
When I announced that it was time for Sirsasana (Headstand) during a workshop I was teaching in Philadelphia a few years ago, an elderly woman slunk out of the room, quickly followed by her yoga teacher. Moments later, they both came back. Later, I learned that the student had left the room because she had never been upside down in her life and was frightened to try; her yoga teacher had gently persuaded her to return, telling her that this was the perfect opportunity. Hesitantly, the student had agreed.
I helped her up, kept her there for about 15 seconds, and carefully brought her down. She stood up, smiled, and gave me a big hug. The next day, the first thing she said to me was, “Can you take me upside down again today?” I’ve been told that she has been up during every single class since. At a spry 82, this woman had faced her fears, empowered herself, and made herself more able in old age than in youth.
Since we rarely, if ever, purposefully turn ourselves upside down, an aversion to inversions is natural. But it’s a shame to let fear keep us from so many benefits and delights. Ralph Waldo Emerson once wrote, “He has not learned the lessons of life who does not every day surmount a fear.” What better time to discard an old fear than in yoga class?
Role Reversal
A yoga practice without inversions is like a marriage without a spouse, lemonade without lemons, or a body without a heart—the essence is missing. Inversions set yoga apart from other physical disciplines: Psychologically, they allow us to see things from an alternate perspective. Emotionally, they guide the energy of the pelvis (the energy of creation and personal power) toward the heart center, enabling self-exploration and inner growth. Physically, they are believed to stimulate the immune and endocrine systems, thereby invigorating and nourishing the brain and the organs. When done correctly, inversions also release tension in the neck and the spine.
Because of their myriad benefits, Sirsasana (Headstand, pronounced shir-SHA-sa-nuh) and Sarvangasana (Shoulderstand, pronounced sar-vaan-GAH-sa-nuh) are considered to be the king and queen of asanas, respectively. Sirsasana develops our capacity for action (fire element) and enhances our ability to create (air element). Sarvangasana nurtures our capacity to stop doing and get grounded (earth element) and fosters our ability to be still and reflect (water element). Sirsasana makes us more alert and focused, while Sarvangasana makes us calm and receptive.
To receive these palpable benefits—and to prevent injury, especially to the neck—it’s essential to learn the correct setup and alignment for each pose. Also, I recommend that women forgo inversions during their menstrual period. Other contraindications include neck injuries, epilepsy, high blood pressure, heart conditions, and eye problems. So be mindful about your body as you approach these poses, but give them a try.
After 36 years of yoga, I practice both poses every day and recommend the same to my students. It takes a while to build up a practice of Sarvangasana and Sirsasana, however. Be patient with yourself and take the time to master them; if you do, you will reap their benefits for the rest of your life.
Shoulderstand Basics
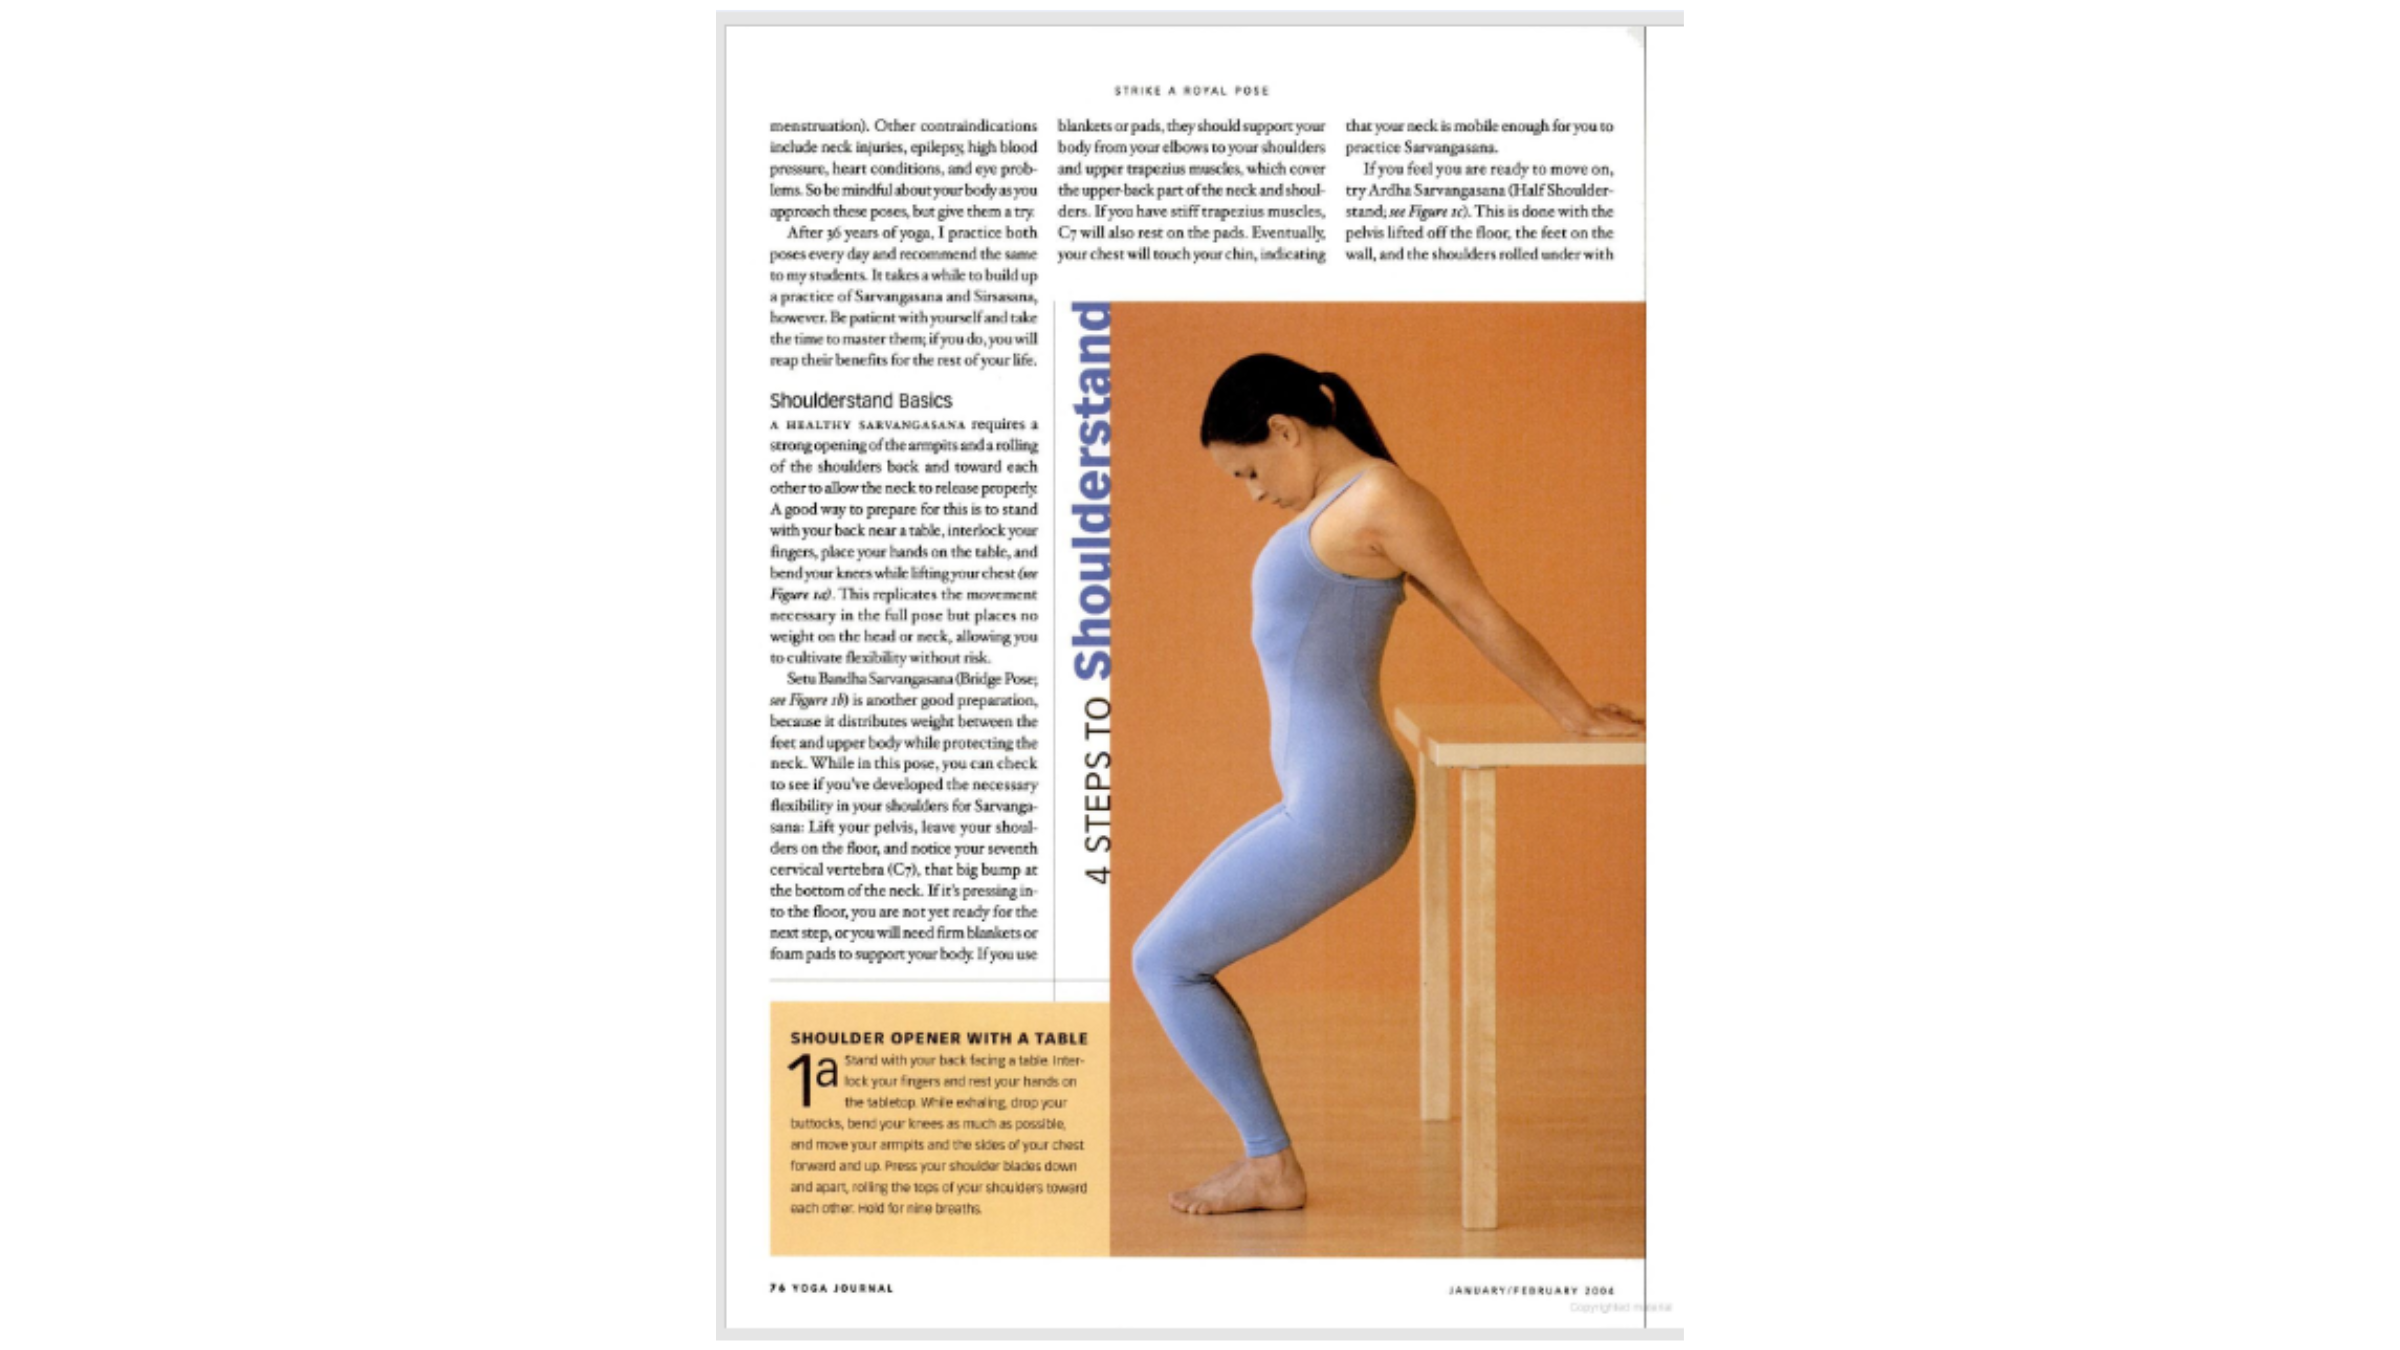
A healthy Sarvangasana requires a strong opening of the armpits and a rolling of the shoulders back and toward each other to allow the neck to release properly. A good way to prepare for this is to stand with your back near a table, interlock your fingers, place your hands on the table, and bend your knees while lifting your chest (see Figure 1a). This replicates the movement necessary in the full pose but places no weight on the head or neck, allowing you to cultivate flexibility without risk.
Setu Bandha Sarvangasana (Bridge Pose; see Figure 1b) is another good preparation, because it distributes weight between the feet and upper body while protecting the neck. While in this pose, you can check to see if you’ve developed the necessary flexibility in your shoulders for Sarvangasana: Lift your pelvis, leave your shoulders on the floor, and notice your seventh cervical vertebra (C7), that big bump at the bottom of the neck. If it’s pressing into the floor, you are not yet ready for the next step, or you will need firm blankets or foam pads to support your body. If you use blankets or pads, they should support your body from your elbows to your shoulders and upper trapezius muscles, which cover the upper-back part of the neck and shoulders. If you have stiff trapezius muscles, C7 will also rest on the pads. Eventually, your chest will touch your chin, indicating that your neck is mobile enough for you to practice Sarvangasana.
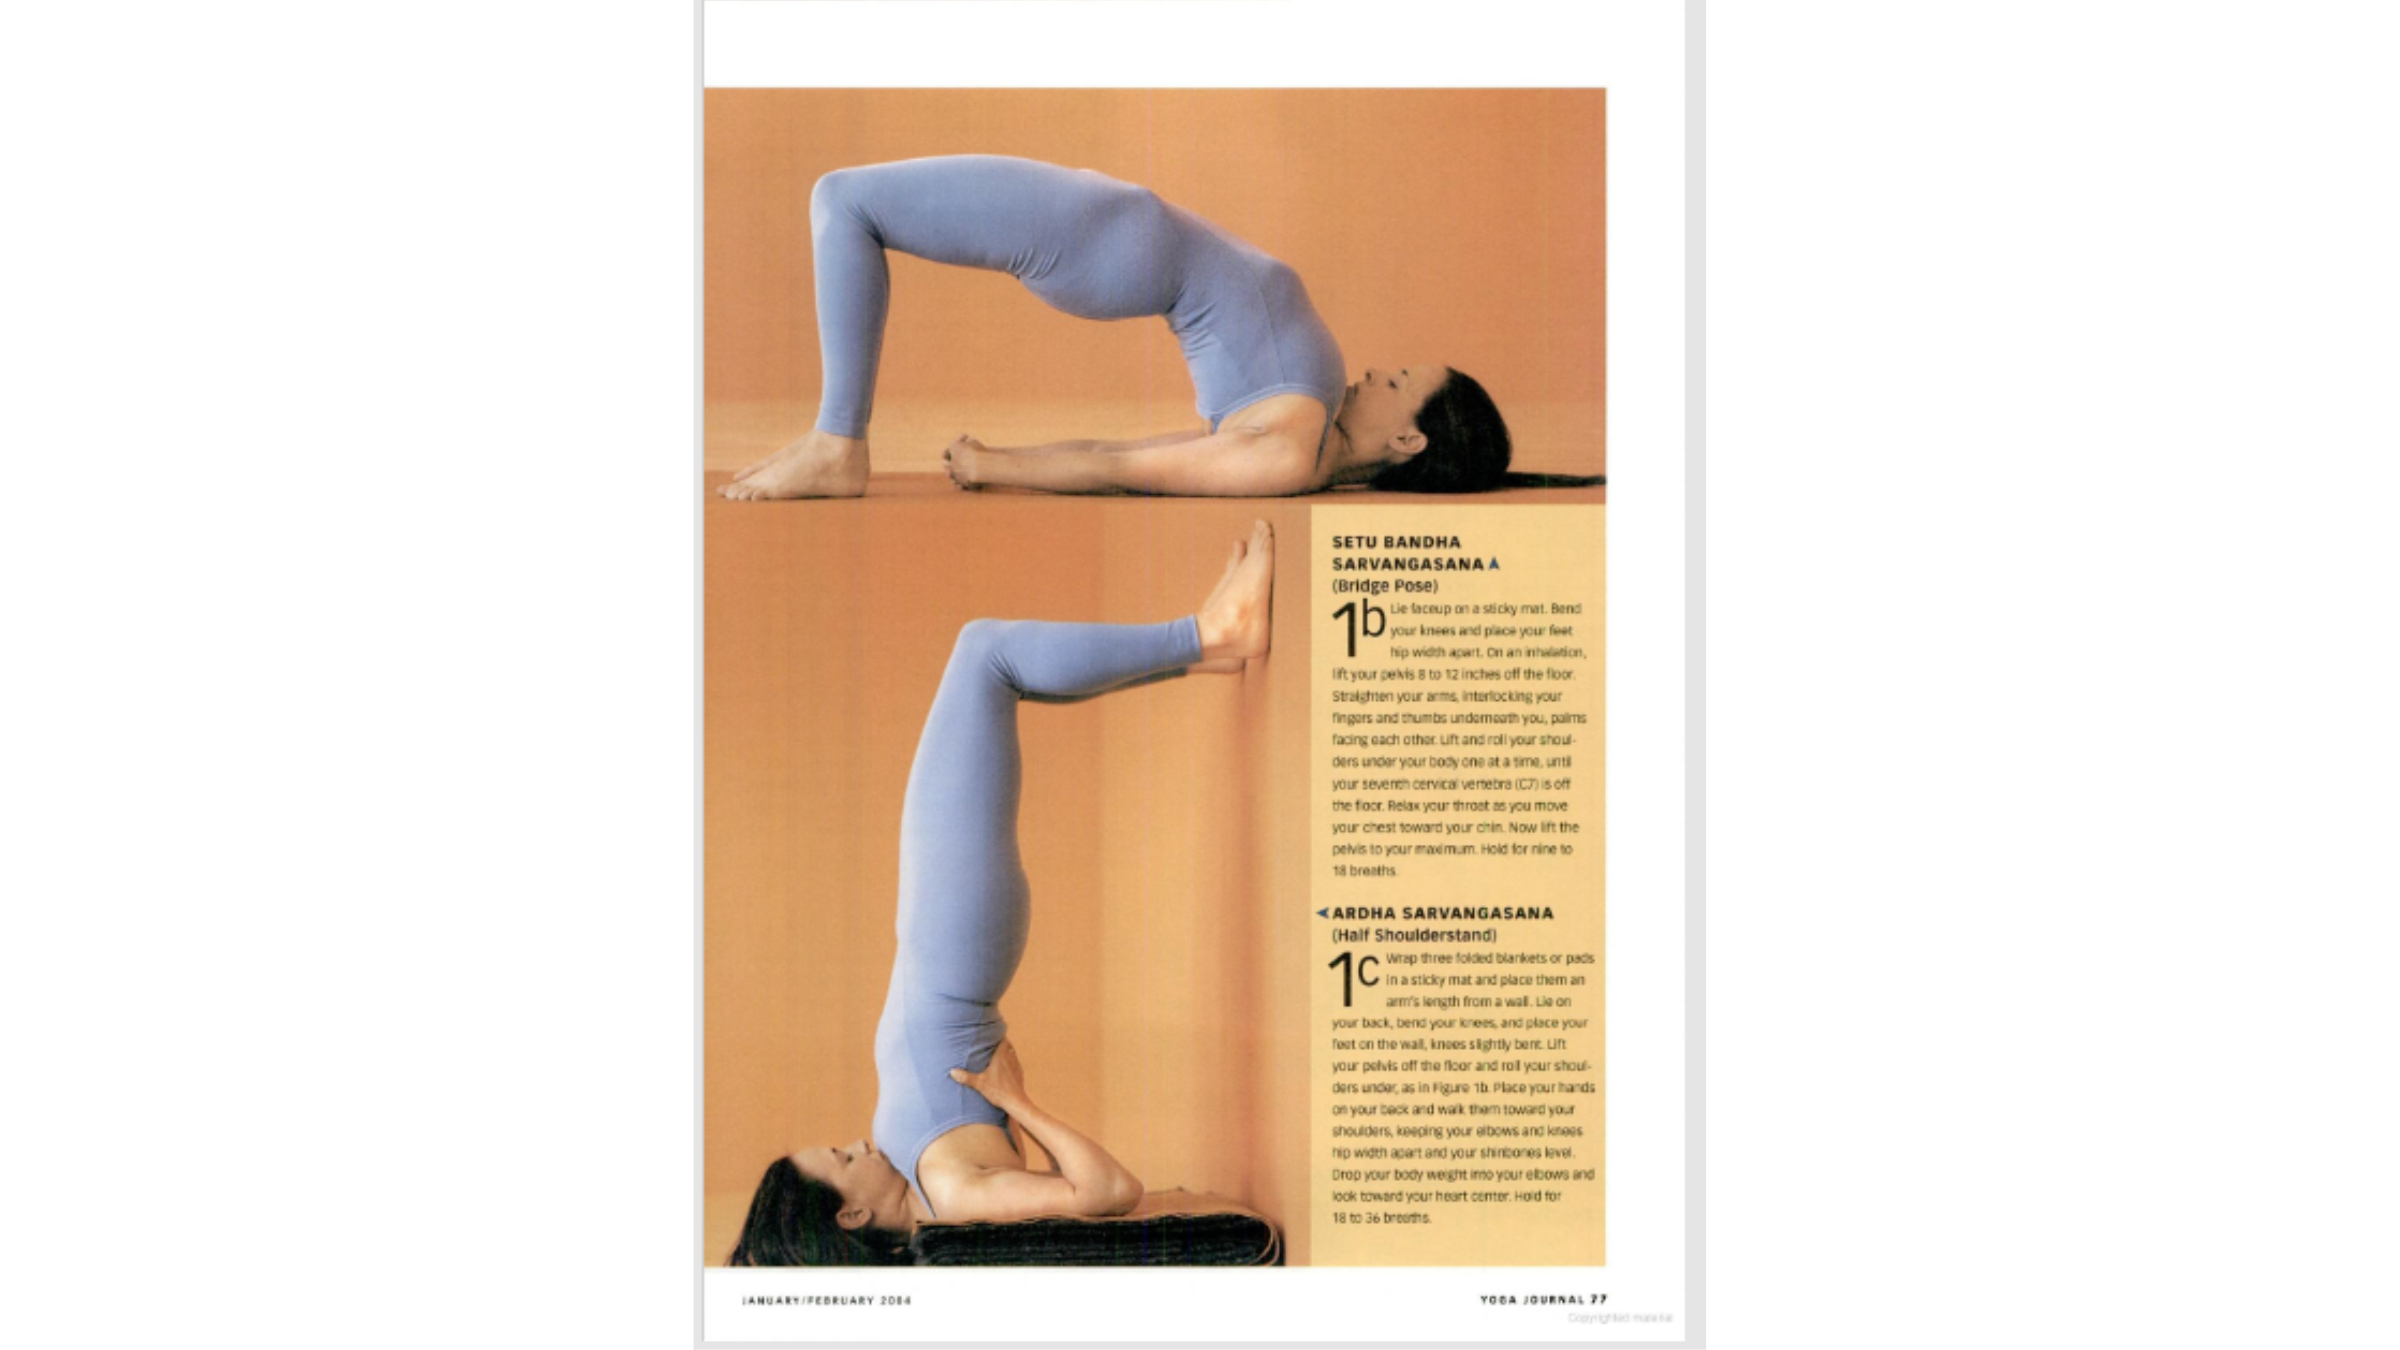
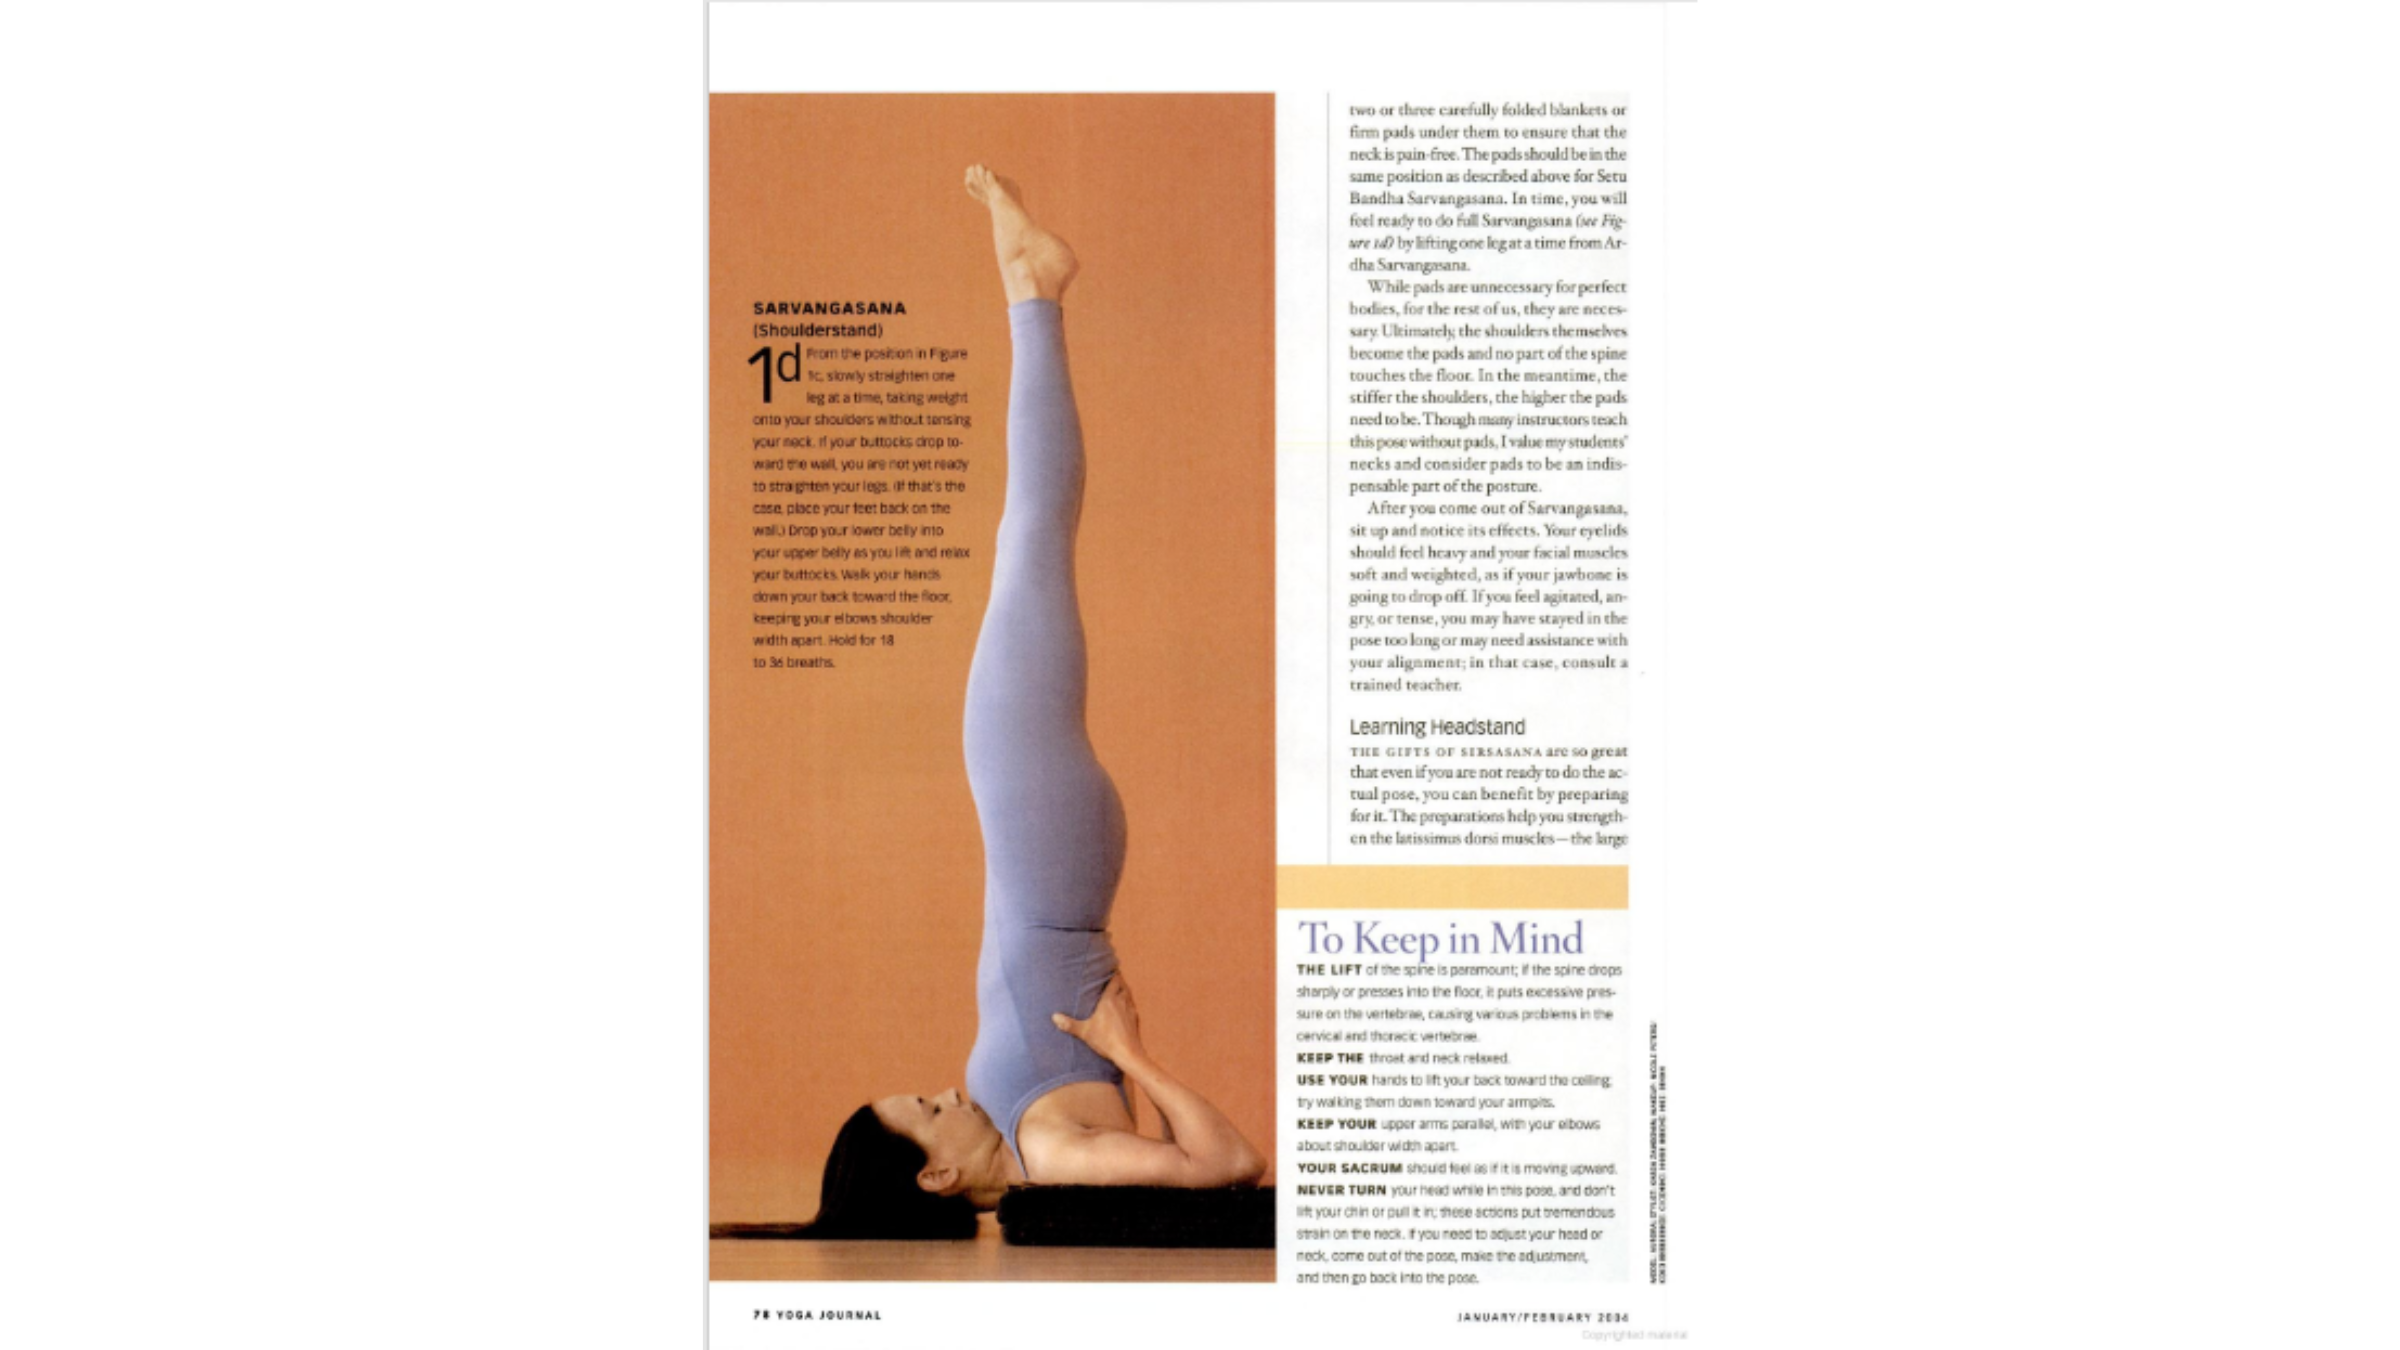
If you feel you are ready to move on, try Ardha Sarvangasana (Half Shoulderstand; see Figure 1c). This is done with the pelvis lifted off the floor, the feet on the wall, and the shoulders rolled under with two or three carefully folded blankets or firm pads under them to ensure that the neck is pain-free. The pads should be in the same position as described above for Setu Bandha Sarvangasana. In time, you will feel ready to do full Sarvangasana (see Figure 1d) by lifting one leg at a time from Ardha Sarvangasana.
Ultimately, the shoulders themselves become the pads and no part of the spine touches the floor. In the meantime, the stiffer the shoulders, the higher the pads need to be. Though many instructors teach this pose without pads, I value my students’ necks and consider pads to be an indispensable part of the posture.
After you come out of Sarvangasana, sit up and notice its effects. Your eyelids should feel heavy and your facial muscles soft and weighted, as if your jawbone is going to drop off. If you feel agitated, angry, or tense, you may have stayed in the pose too long or may need assistance with your alignment; in that case, consult a trained teacher.
4 Steps to Shoulderstand
- 1a: Shoulder Opener With a Table: Stand with your back facing a table. Interlock your fingers and rest your hands on the tabletop. While exhaling, drop your buttocks, bend your knees as much as possible, and move your armpits and the sides of your chest forward and up. Press your shoulder blades down and apart, rolling the tops of your shoulders toward each other. Hold for nine breaths.
-
1b: Setu Bandha Sarvangasana (Bridge Pose) Lie faceup on a sticky mat. Bend your knees and place your feet hip width apart. On an inhalation, lift your pelvis 8 to 12 inches off the floor. Straighten your arms, interlocking your fingers and thumbs underneath you, palms facing each other. Lift and roll your shoulders under your body one at a time, until your seventh cervical vertebra (C7) is off the floor. Relax your throat as you move your chest toward your chin. Now lift the pelvis to your maximum. Hold for nine to 18 breaths.
-
1c: Ardha Sarvangasana (Half Shoulderstand) Wrap three folded blankets or pads in a sticky mat and place them an arm’s length from a wall. Lie on your back, bend your knees, and place your feet on the wall, knees slightly bent. Lift your pelvis off the floor and roll your shoulders under, as in Figure 1b. Place your hands on your back and walk them toward your shoulders, keeping your elbows and knees hip width apart and your shinbones level. Drop your body weight into your elbows and look toward your heart center. Hold for 18 to 36 breaths.
-
1d: Sarvangasana (Shoulderstand) From the position in Figure 1c, slowly straighten one leg at a time, taking weight onto your shoulders without tensing your neck. If your buttocks drop toward the wall, you are not yet ready to straighten your legs. (If that’s the case, place your feet back on the wall.) Drop your lower belly into your upper belly as you lift and relax your buttocks. Walk your hands down your back toward the floor, keeping your elbows shoulder width apart. Hold for 18 to 36 breaths.
To Keep in Mind in Shoulderstand
- The lift of the spine is paramount; if the spine drops sharply or presses into the floor, it puts excessive pressure on the vertebrae, causing various problems in the cervical and thoracic vertebrae.
- Keep the throat and neck relaxed.
- Use your hands to lift your back toward the ceiling; try walking them down toward your armpits.
- Keep your upper arms parallel, with your elbows about shoulder width apart.
- Your sacrum should feel as if it is moving upward.
- Never turn your head while in this pose, and don’t lift your chin or pull it in; these actions put tremendous strain on the neck. If you need to adjust your head or neck, come out of the pose, make the adjustment, and then go back into the pose.
Learning Headstand
The gifts of Sirsasana are so great that even if you are not ready to do the actual pose, you can benefit by preparing for it. The preparations help you strengthen the latissimus dorsi muscles—the large muscles that attach the upper arms to the back—as well as help create the awareness required to spread, lift, and strengthen the muscles around the shoulder blades so that the neck is protected.
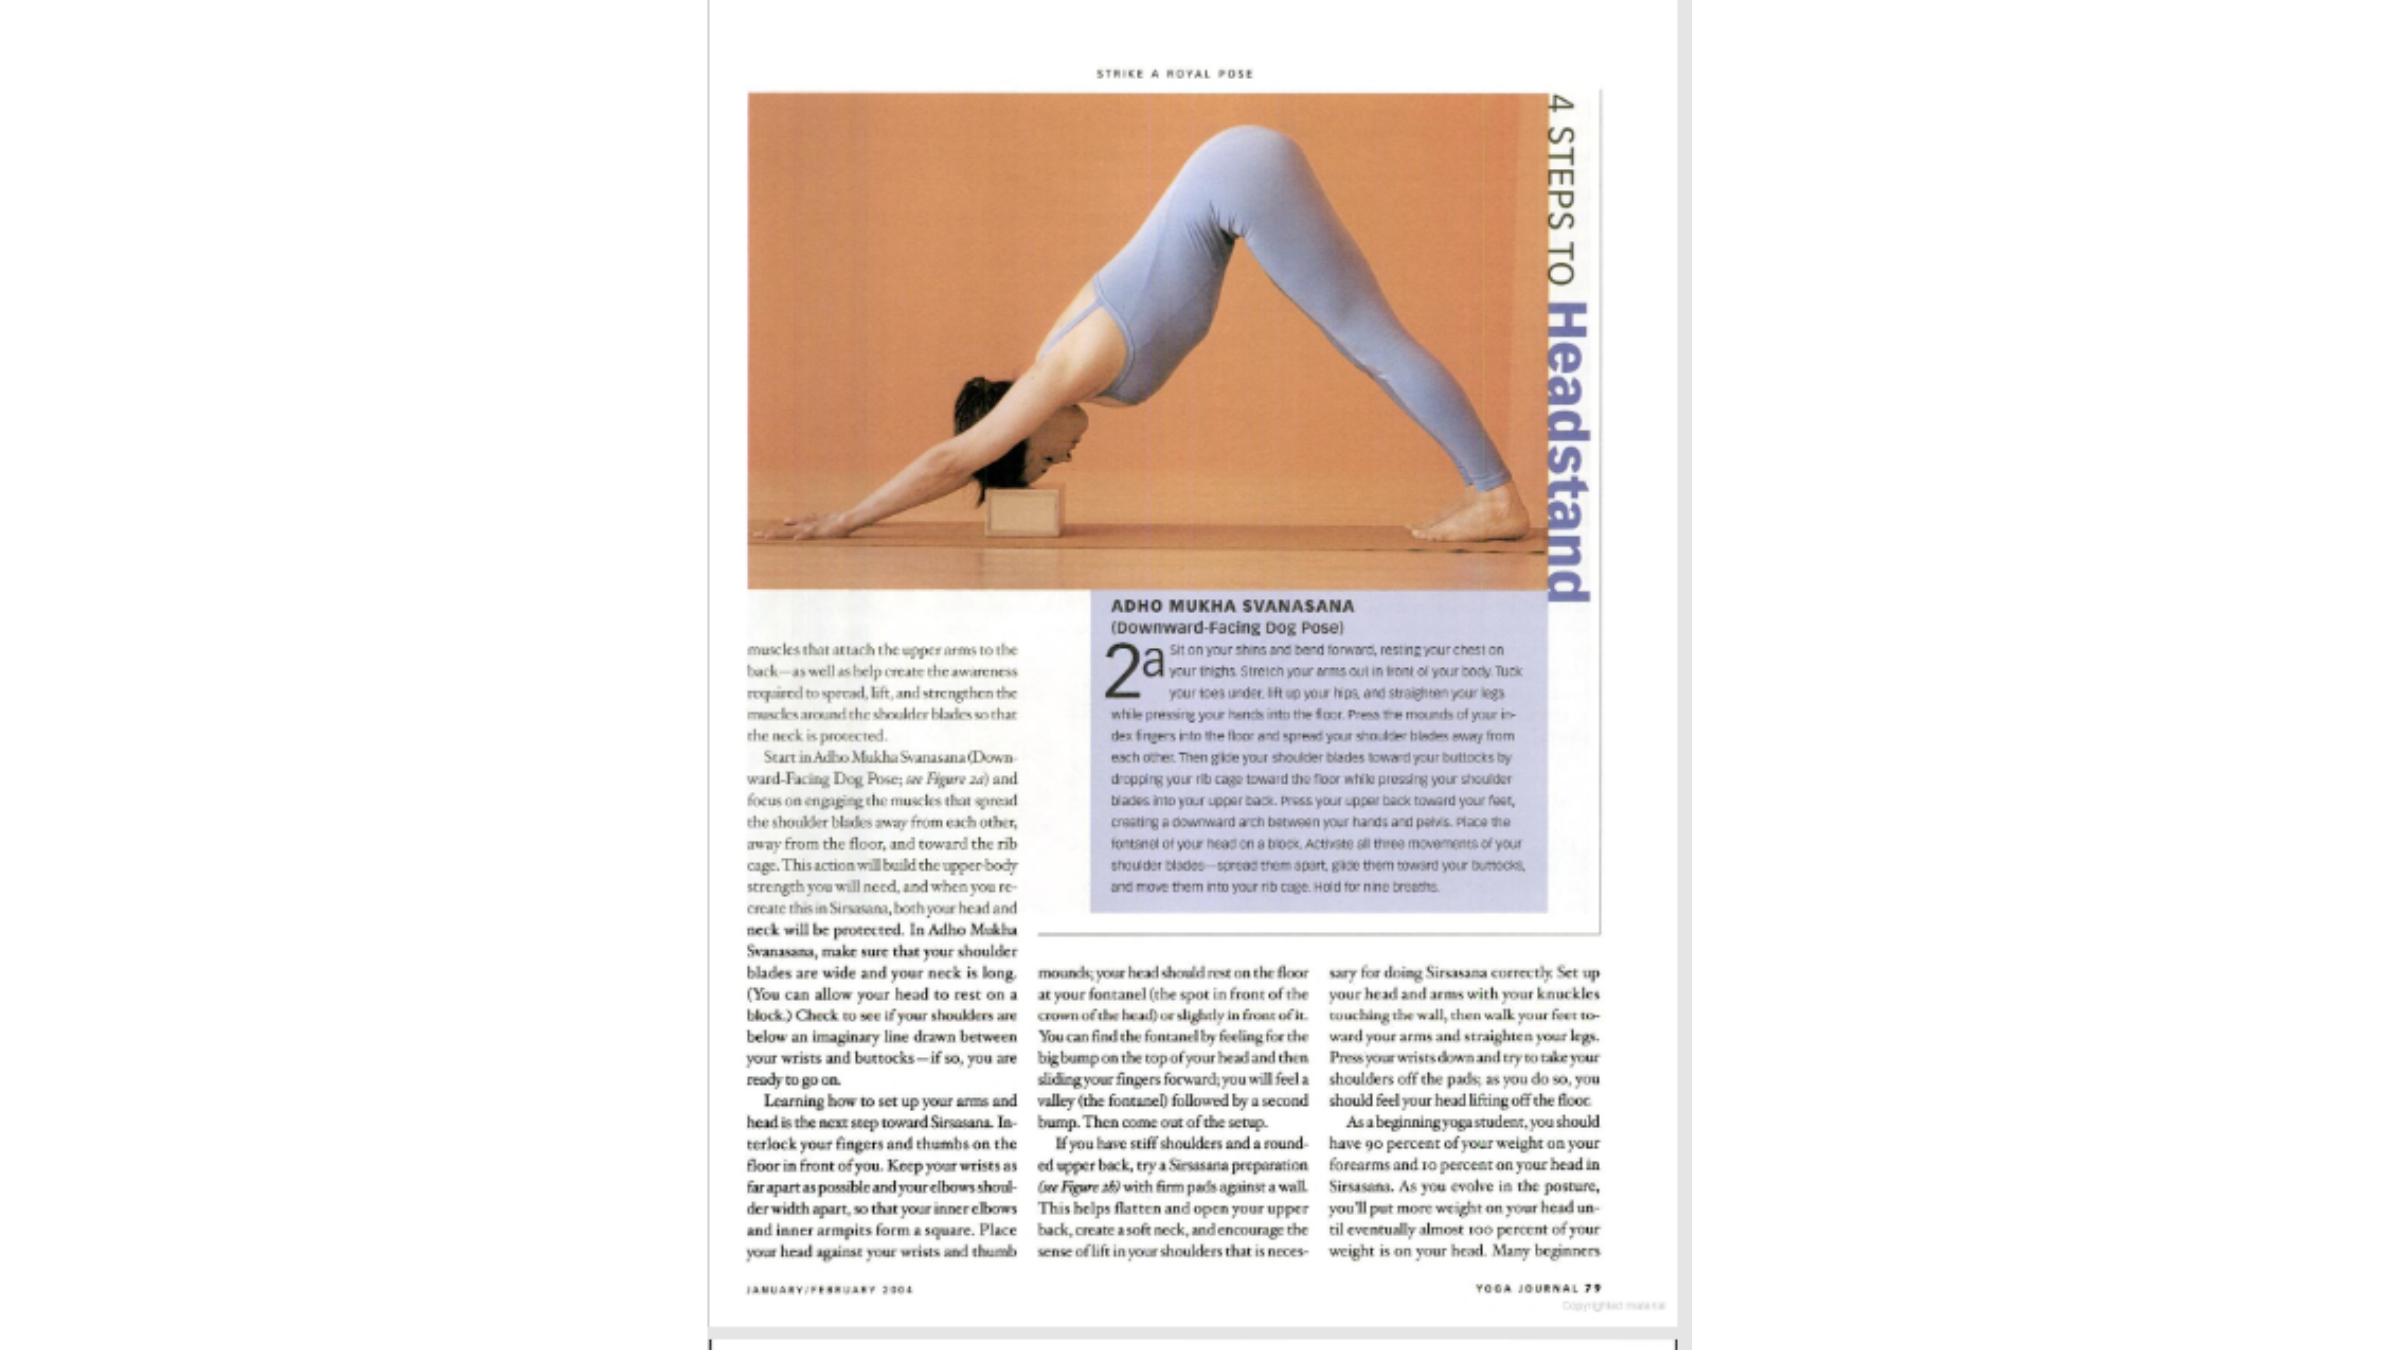
Start in Adho Mukha Svanasana (Downward-Facing Dog Pose; see Figure 2a) and focus on engaging the muscles that spread the shoulder blades away from each other, away from the floor, and toward the rib cage. This action will build the upper-body strength you will need, and when you recreate this in Sirsasana, both your head and neck will be protected. In Adho Mukha Svanasana, make sure that your shoulder blades are wide and your neck is long. (You can allow your head to rest on a block.) Check to see if your shoulders are below an imaginary line drawn between your wrists and buttocks—if so, you are ready to go on.
Learning how to set up your arms and head is the next step toward Sirsasana. Interlock your fingers and thumbs on the floor in front of you. Keep your wrists as far apart as possible and your elbows shoulder width apart, so that your inner elbows and inner armpits form a square. Place your head against your wrists and thumb mounds; your head should rest on the floor at your fontanel (the spot in front of the crown of the head) or slightly in front of it. You can find the fontanel by feeling for the big bump on the top of your head and then sliding your fingers forward; you will feel a valley (the fontanel) followed by a second bump. Then come out of the setup.
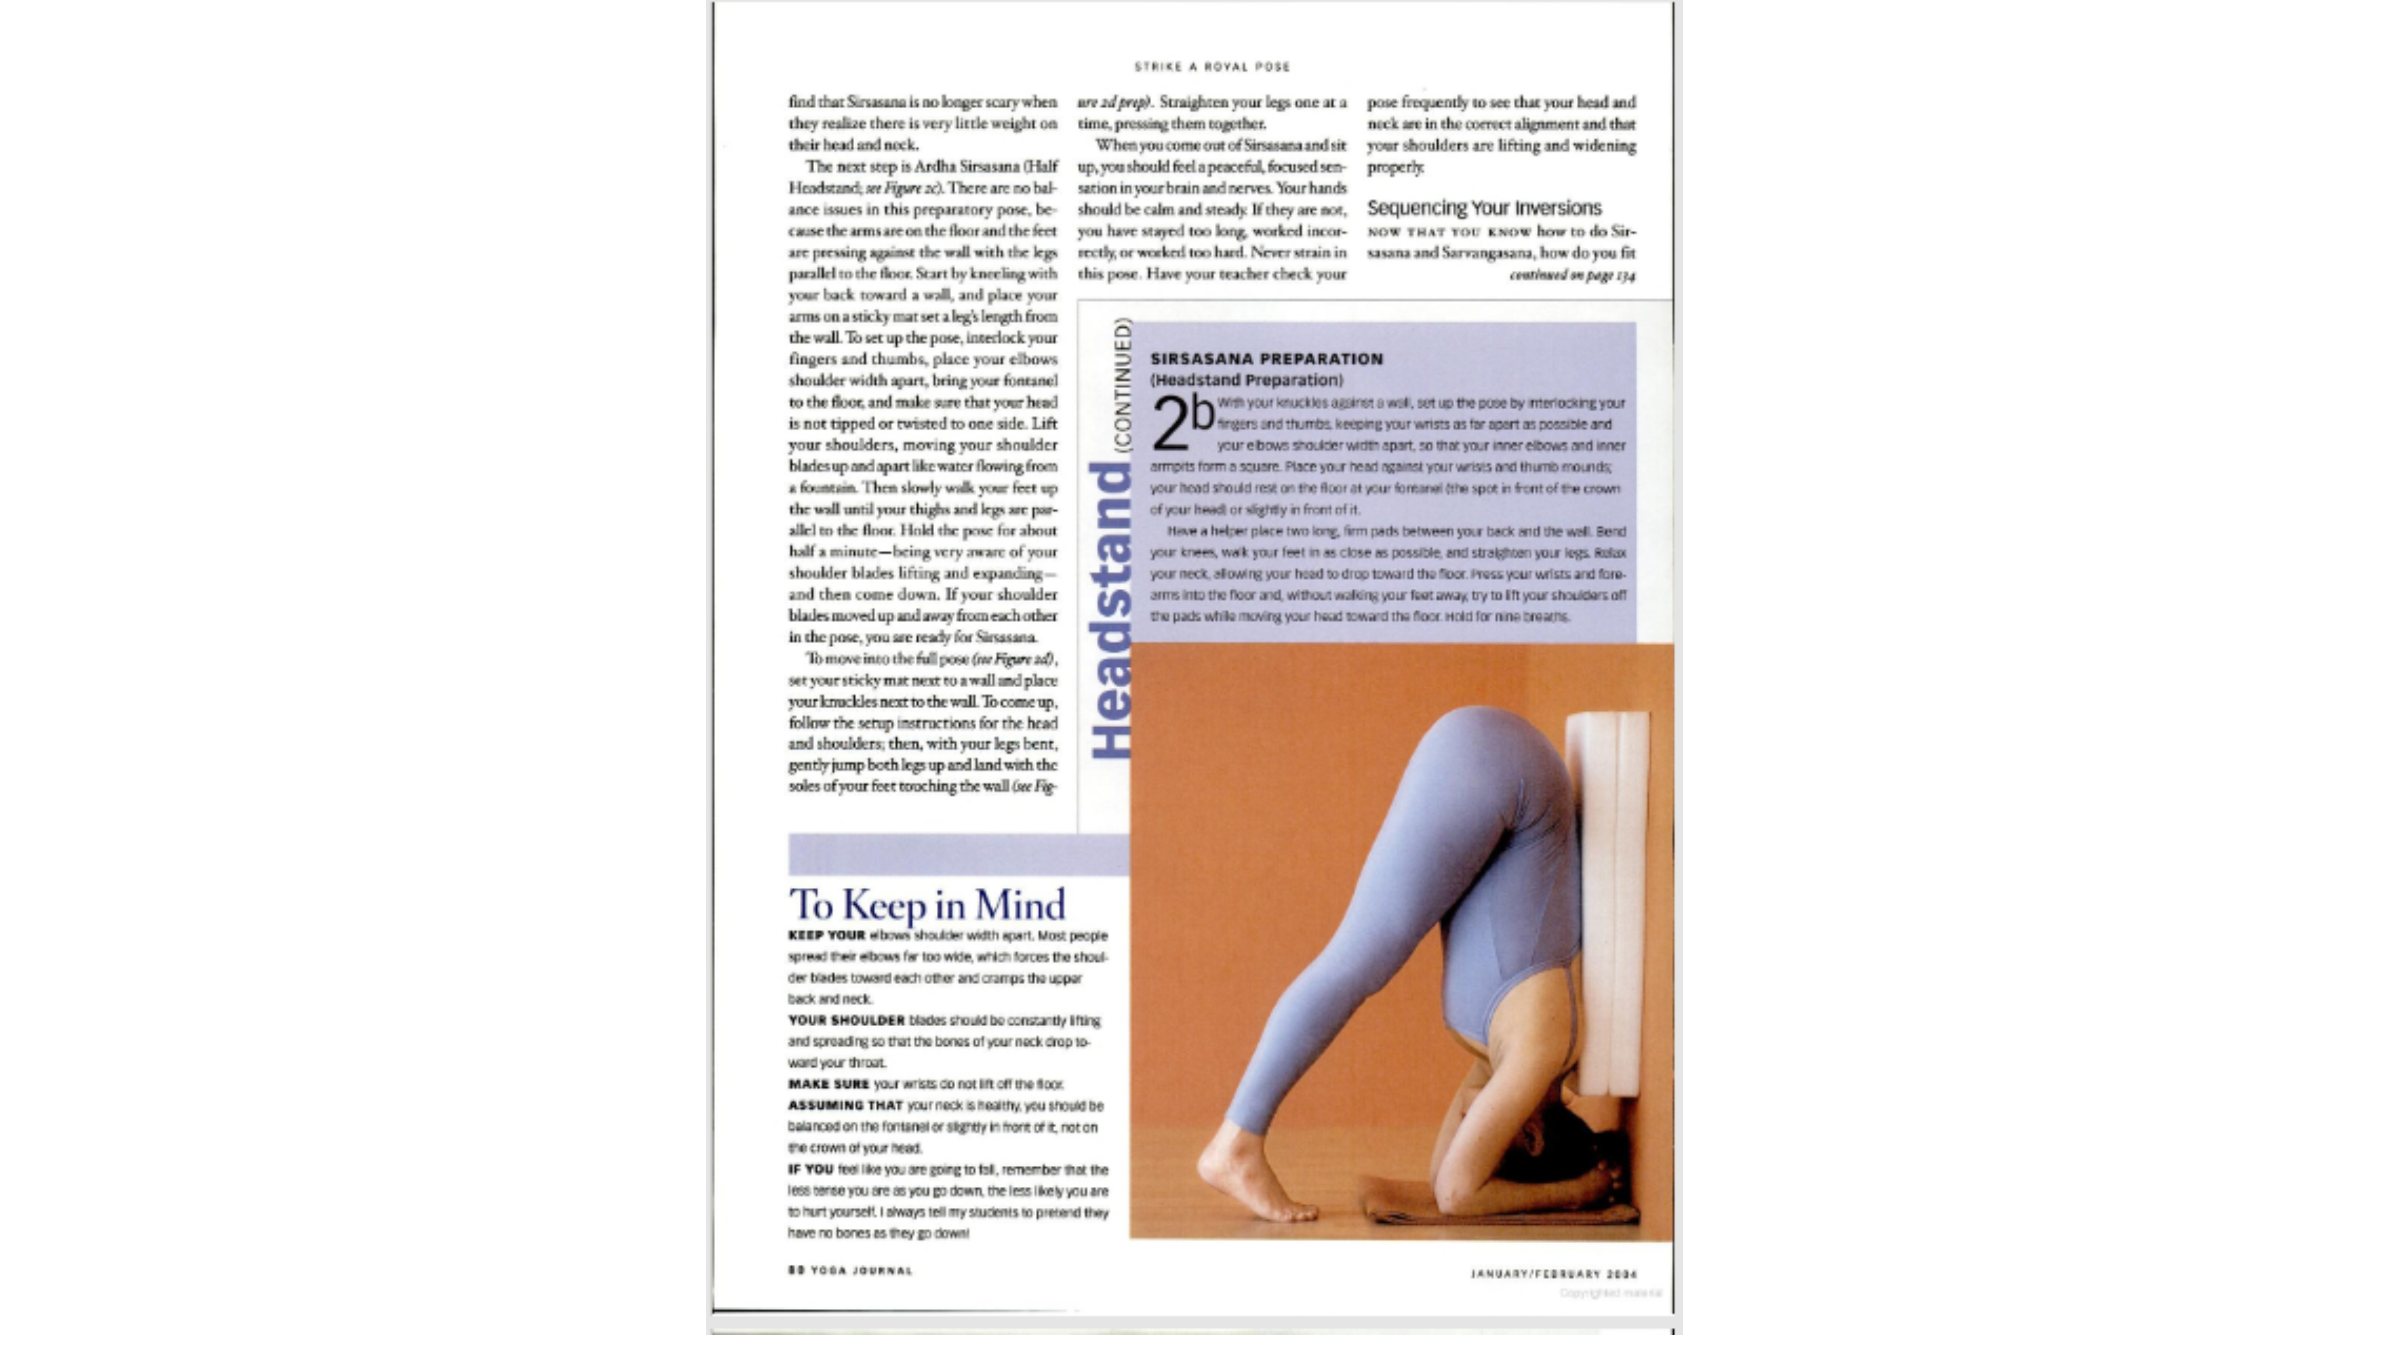
If you have stiff shoulders and a rounded upper back, try a Sirsasana preparation (see Figure 2b) with firm pads against a wall. This helps flatten and open your upper back, create a soft neck, and encourage the sense of lift in your shoulders that is necessary for doing Sirsasana correctly. Set up your head and arms with your knuckles touching the wall, then walk your feet toward your arms and straighten your legs. Press your wrists down and try to take your shoulders off the pads; as you do so, you should feel your head lifting off the floor.
As a beginning yoga student, you should have 90 percent of your weight on your forearms and 10 percent on your head in Sirsasana. Many beginners find that Sirsasana is no longer scary when they realize there is very little weight on their head and neck.
The next step is Ardha Sirsasana (Half Headstand; see Figure 2c). There are no balance issues in this preparatory pose, because the arms are on the floor and the feet are pressing against the wall with the legs parallel to the floor. Start by kneeling with your back toward a wall, and place your arms on a sticky mat set a leg’s length from the wall. To set up the pose, interlock your fingers and thumbs, place your elbows shoulder width apart, bring your fontanel to the floor, and make sure that your head is not tipped or twisted to one side. Lift your shoulders, moving your shoulder blades up and apart like water flowing from a fountain. Then slowly walk your feet up the wall until your thighs and legs are parallel to the floor. Hold the pose for about half a minute—being very aware of your shoulder blades lifting and expanding—and then come down. If your shoulder blades moved up and away from each other in the pose, you are ready for Sirsasana.
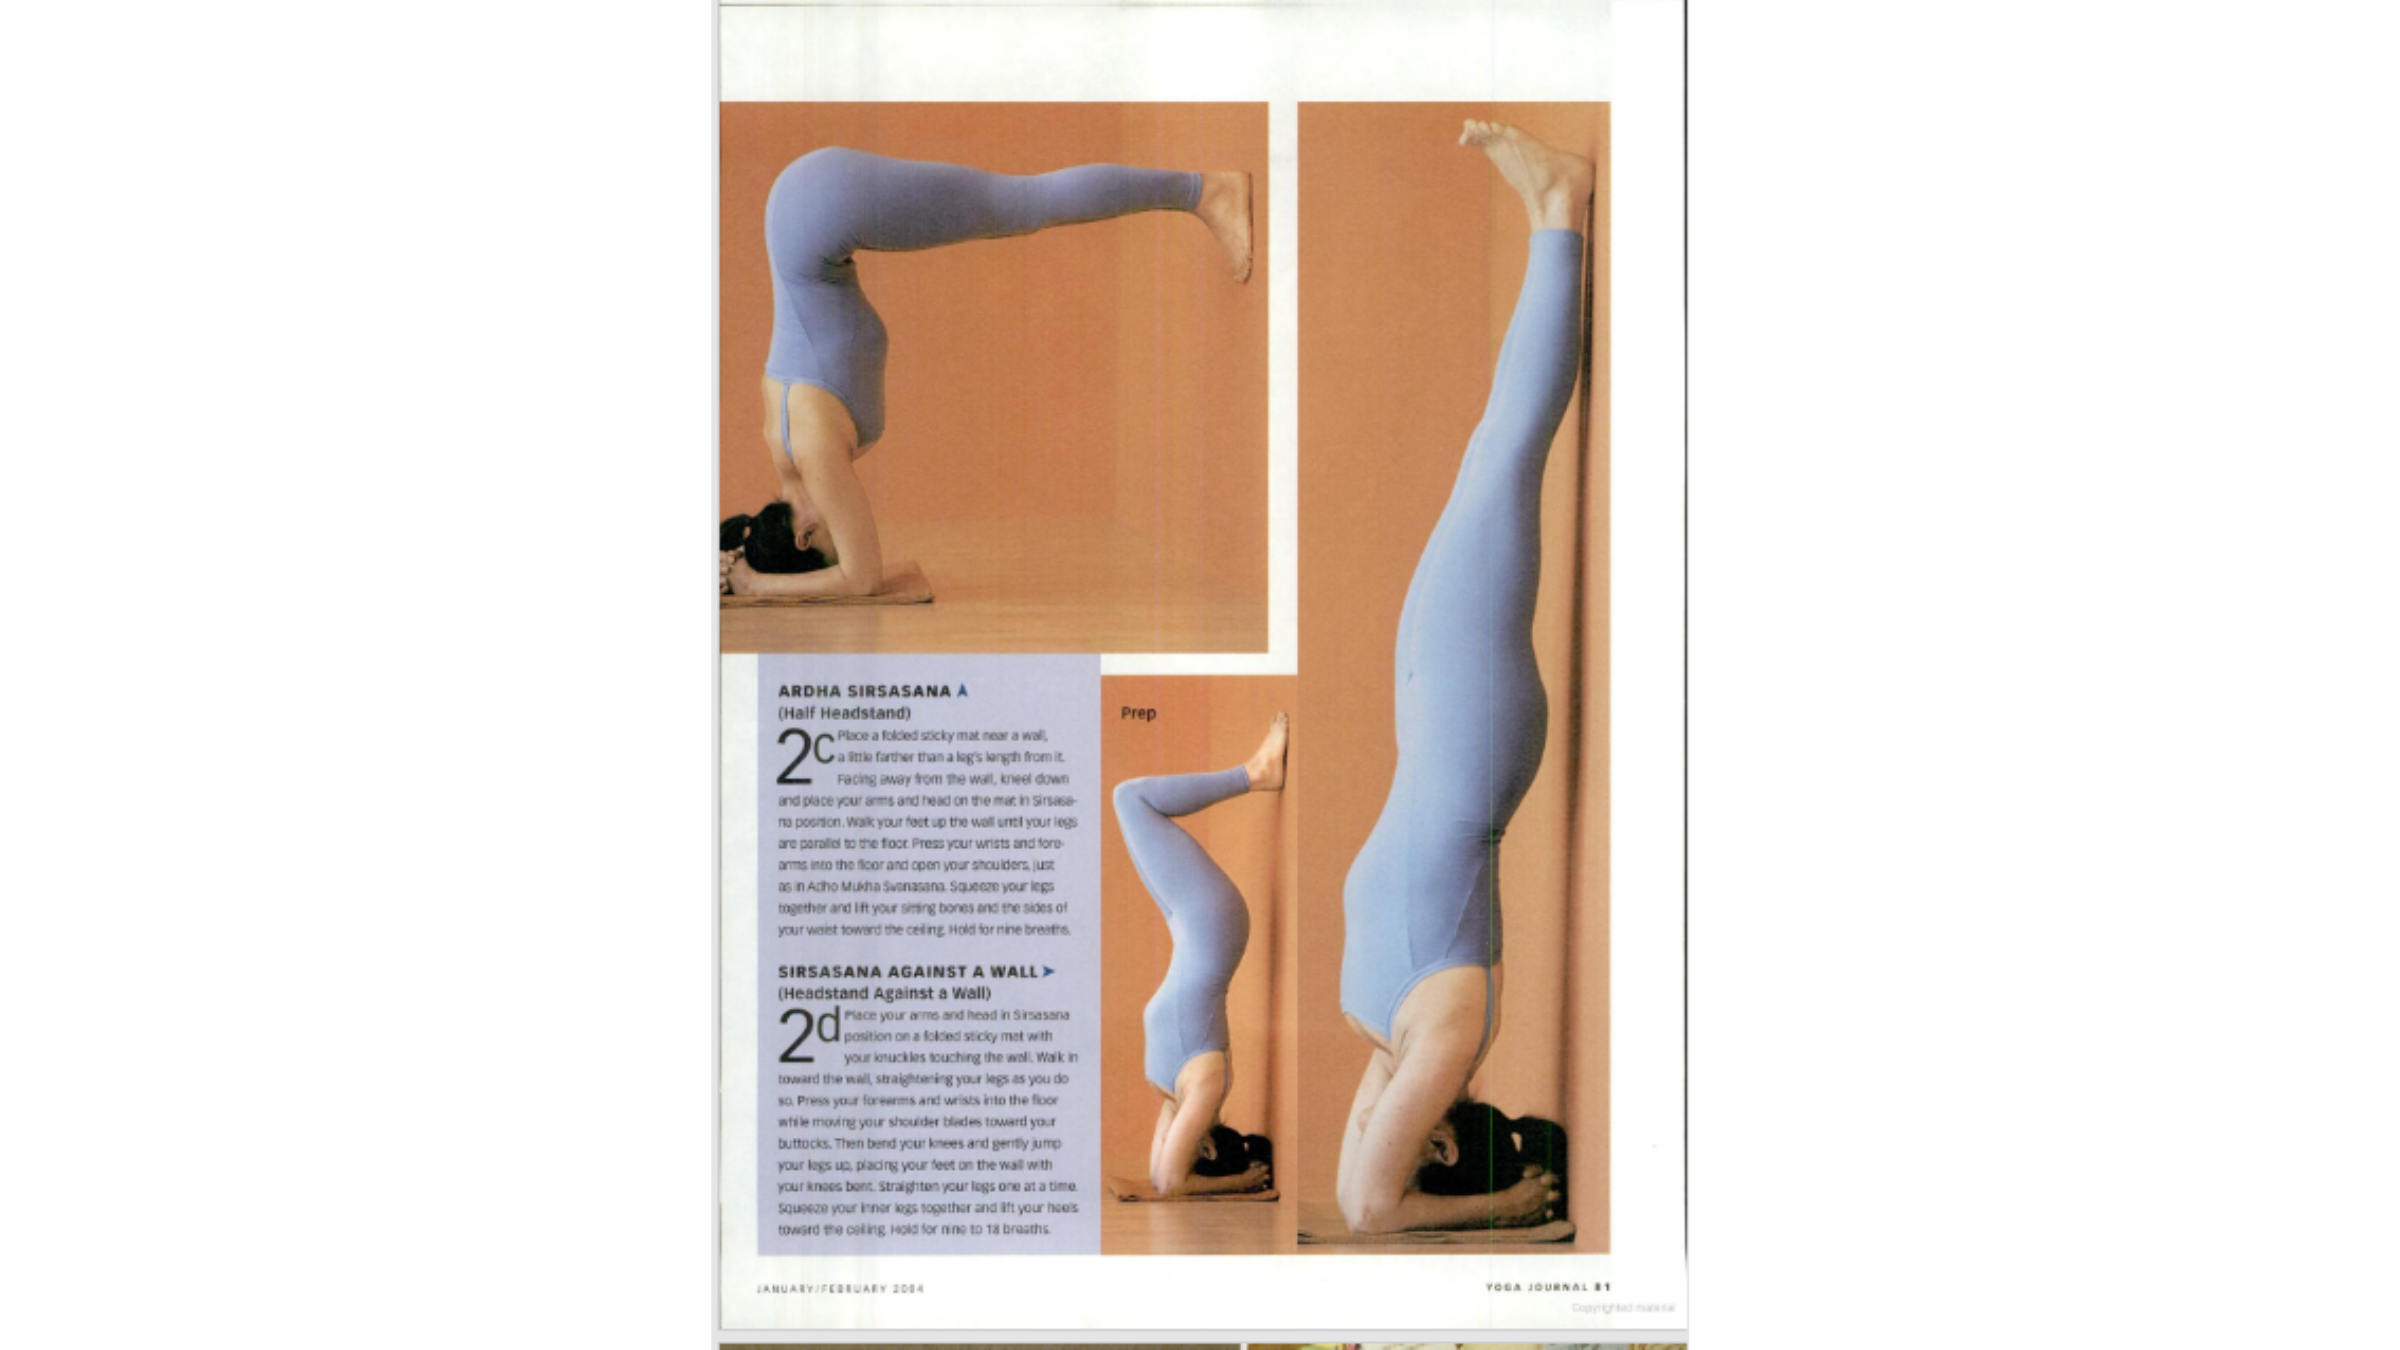
To move into the full pose (see Figure 2d), set your sticky mat next to a wall and place your knuckles next to the wall. To come up, follow the setup instructions for the head and shoulders; then, with your legs bent, gently jump both legs up and land with the soles of your feet touching the wall (see Figure 2d prep). Straighten your legs one at a time, pressing them together.
When you come out of Sirsasana and sit up, you should feel a peaceful, focused sensation in your brain and nerves. Your hands should be calm and steady. If they are not, you have stayed too long, worked incorrectly, or worked too hard. Never strain in this pose. Have your teacher check your pose frequently to see that your head and neck are in the correct alignment and that your shoulders are lifting and widening properly.
4 Steps to Headstand
-
2a: Adho Mukha Svanasana (Downward-Facing Dog Pose) Sit on your shins and bend forward, resting your chest on your thighs. Stretch your arms out in front of your body. Tuck your toes under, lift up your hips, and straighten your legs while pressing your hands into the floor. Press the mounds of your index fingers into the floor and spread your shoulder blades away from each other. Then glide your shoulder blades toward your buttocks by dropping your rib cage toward the floor while pressing your shoulder blades into your upper back. Press your upper back toward your feet, creating a downward arch between your hands and pelvis. Place the fontanel of your head on a block. Activate all three movements of your shoulder blades—spread them apart, glide them toward your buttocks, and move them into your rib cage. Hold for nine breaths.
-
2b: Sirasana Preparation (Headstand Preparation) With your knuckles against a wall, set up the pose by interlocking your fingers and thumbs, keeping your wrists as far apart as possible and your elbows shoulder width apart, so that your inner elbows and inner armpits form a square. Place your head against your wrists and thumb mounds; your head should rest on the floor at your fontanel (the spot in front of the crown of your head) or slightly in front of it.
Have a helper place two long, firm pads between your back and the wall. Bend your knees, walk your feet in as close as possible, and straighten your legs. Relax your neck, allowing your head to drop toward the floor. Press your wrists and forearms into the floor and, without walking your feet away, try to lift your shoulders off the pads while moving your head toward the floor. Hold for nine breaths.
-
2c: Ardha Sirasana (Half Headstand) Place a folded sticky mat near a wall, a little farther than a leg’s length from it. Facing away from the wall, kneel down and place your arms and head on the mat in Sirsasana position. Walk your feet up the wall until your legs are parallel to the floor. Press your wrists and forearms into the floor and open your shoulders, just as in Adho Mukha Svanasana. Squeeze your legs together and lift your sitting bones and the sides of your waist toward the ceiling. Hold for nine breaths.
-
2d: Sirasana Against a Wall (Headstand Against a Wall) Place your arms and head in Sirsasana position on a folded sticky mat with your knuckles touching the wall. Walk in toward the wall, straightening your legs as you do so. Press your forearms and wrists into the floor while moving your shoulder blades toward your buttocks. Then bend your knees and gently jump your legs up, placing your feet on the wall with your knees bent (Prep). Straighten your legs one at a time. Squeeze your inner legs together and lift your heels toward the ceiling. Hold for nine to 18 breaths.
To Keep in Mind in Headstand
- Keep your elbows shoulder width apart. Most people spread their elbows far too wide, which forces the shoulder blades toward each other and cramps the upper back and neck.
- Your shoulder blades should be constantly lifting and spreading so that the bones of your neck drop toward your throat.
- Make sure your wrists do not lift off the floor.
- Assuming that your neck is healthy, you should be balanced on the fontanel or slightly in front of it, not on the crown of your head.
- If you feel like you are going to fall, remember that the less tense you are as you go down, the less likely you are to hurt yourself. I always tell my students to pretend they have no bones as they go down!