
Published June 29, 2026 08:08AM
If you’re new to yin yoga, you’re about to experience just how simple it can be and how incredible it can feel. These are fairly simple shapes that deliver a significant stretch, yet none of the poses require any pre-existing level of flexibility and they don’t place a lot of pressure on the joints. You can practice each of these yin yoga poses for beginners at home with nothing more than just you and your mat.
You’ll also learn the three basic principles of yin yoga—find your edge without overexerting yourself, be still, and stay in the pose for a length of time. You will feel some sensation in each stretch, but not so much that you feel yourself tensing or that it becomes challenging to hold the shape or to breathe. Once you find the shape of the pose, you want to remain still and let gravity do the work, although sometimes you’ll find that you sink into the stretch a little more. And you’ll hold each yin yoga pose for a few minutes in order for it to do its work.
This collection of yin yoga for beginners poses was requested by students and it’s become one of my most clicked-on classes.
6 Yin Yoga for Beginners Poses
You’re going to try to linger, motionless, in each pose for at least three minutes. The stretches I’m going to be taking you through today don’t require any props or experience with yoga. You can still get a really good stretch with just you and your mat. I’m cheating a little and using a blanket beneath my knees because I prefer some cushioning, and you’re welcome to do the same, although you really don’t need anything other than yourself in order to do this practice.
Child’s Pose
The pose you’re going to start off in is Child’s Pose. Bring your big toes together and take your knees as wide as you would like. The wider you have your knees, the more intensely you’re going to feel this pose. If you’re not feeling very flexible today, or if you’re a beginner to yin yoga, you might want to have your knees only about hip-distance apart.
You’re trying to sit your hips back toward your heels as much as possible, and then walk your hands out in front of you and lower your chest and forward toward the mat. If your head is not touching the mat, you could stack your hands beneath your forehead or, if you happen to have a block or a folded blanket nearby, you can place that underneath you. Try to find a position that works for your body. Settle into this shape and let the weighty of your body settle into the mat. Breathe here.
When you’re ready, push into your palms and slowly walk your hands back toward you, inch by inch, until you can lift your chest.
Toe Squat
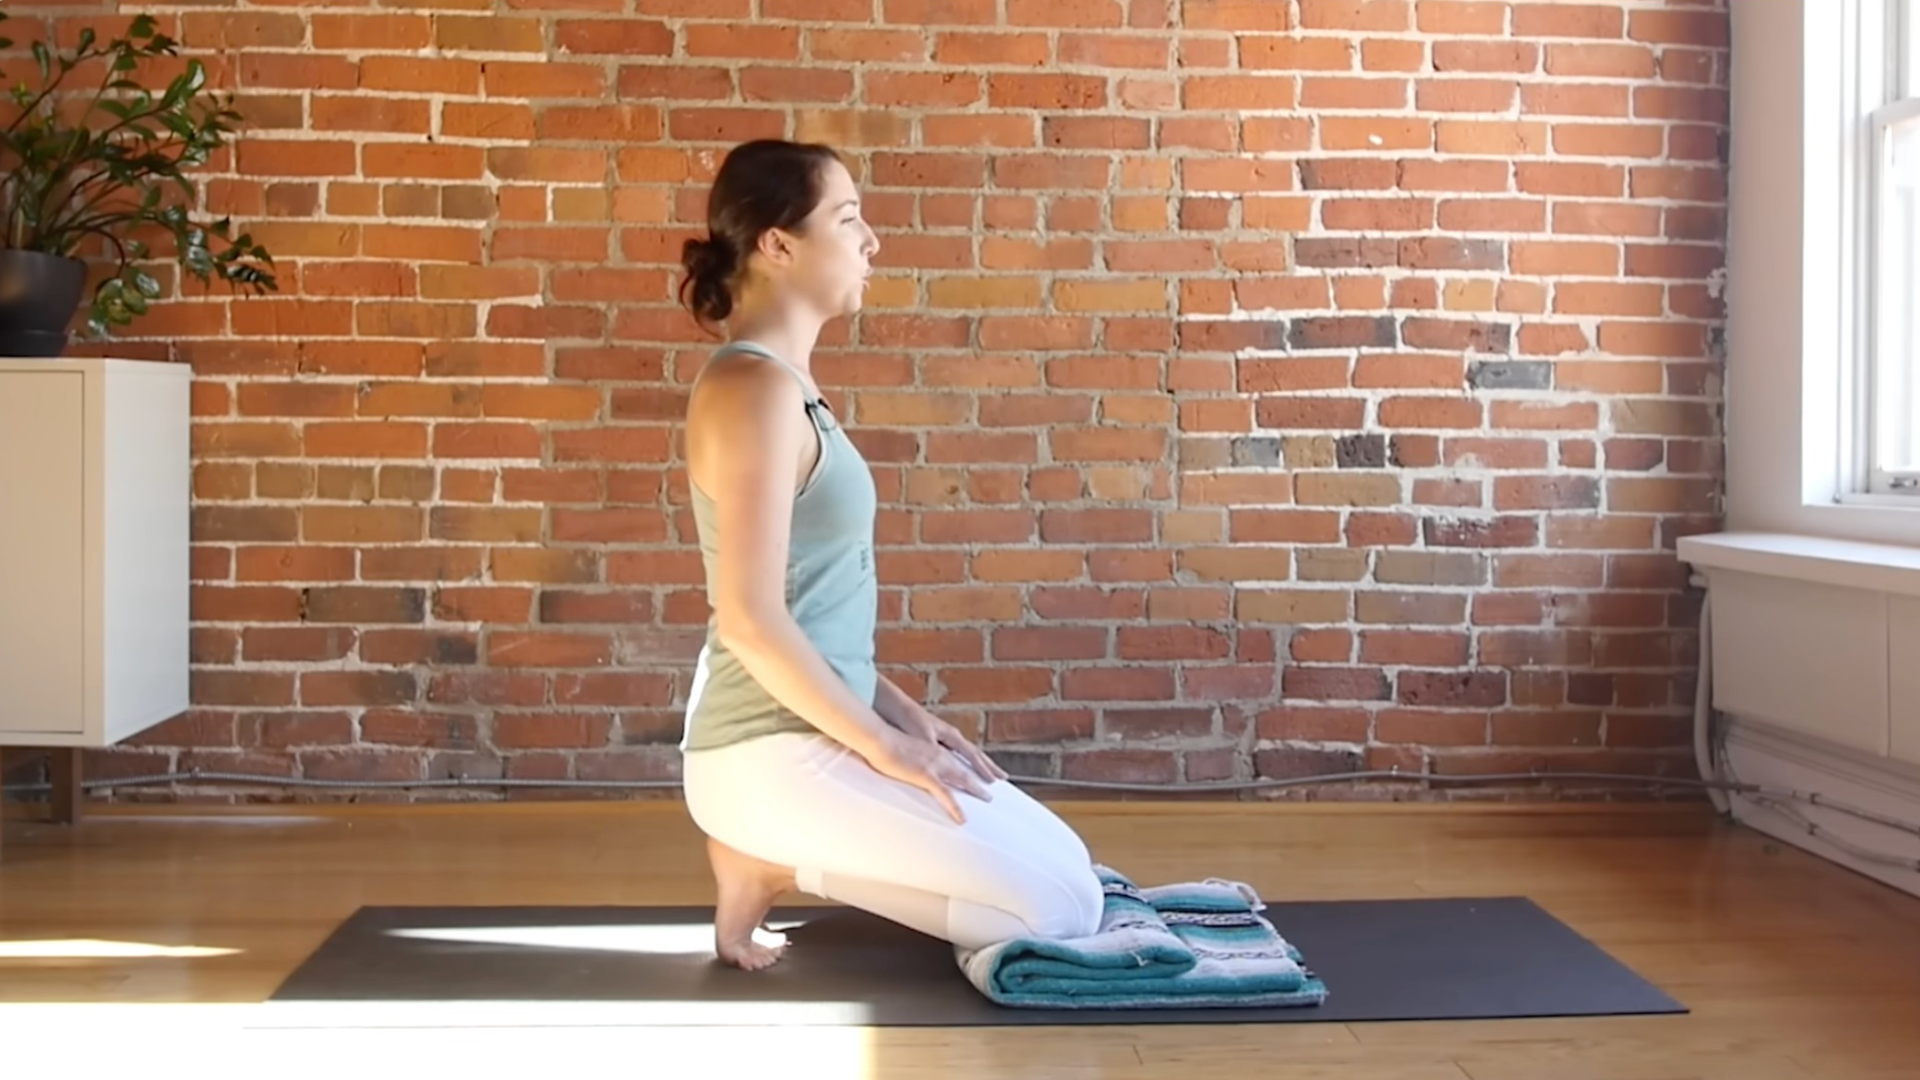
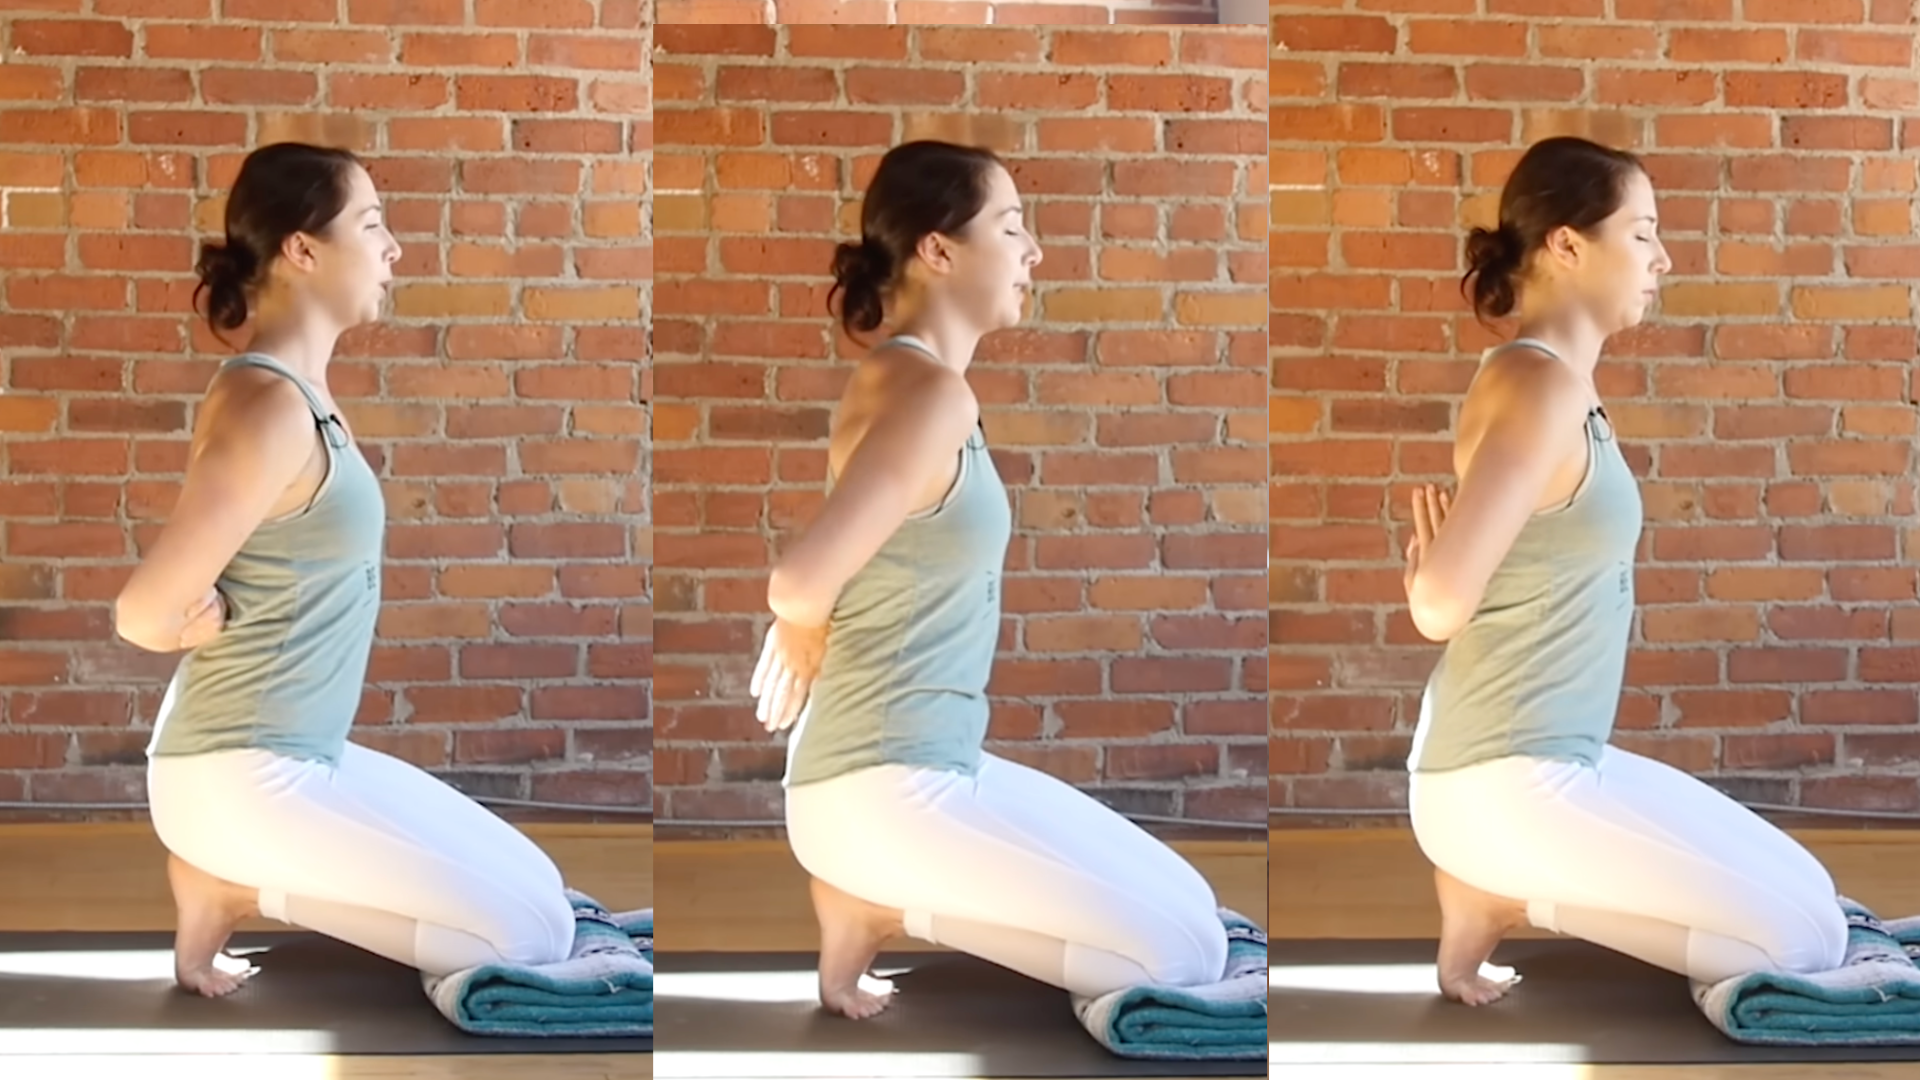
If you’ve never done this stretch before, be warned that it’s quite an intense yin yoga pose for the bottoms of your feet, especially if you wear high heels or any kind of constricting shoe. So come to your hands and knees, and then curl your toes underneath so you can sit back onto your heels. This is a pretty intense stretch, and you can choose to either rest your hands on your thighs or bring them to the mat as you lean slightly forward to help offload a little of the pressure. Just try to breathe into the intensity, we have about two and a half minutes here.
If you’re feeling okay and would like to stretch your chest and shoulders a little more, you can take your hands in reverse prayer. Option one is to hold onto your elbows behind you. Option two is to bring your palms together with your fingertips pointing down, and option three is to flip it and make the shoulder and wrist stretch more intense by pointing your fingers upward. Try to draw your shoulder blades down and push your elbows back, and as much as possible keep pressing your palms together.
Bring your palms forward to the mat, untuck your toes, and stretch them back, maybe take a few ankle rolls, whatever helps you release from this pose.
Half Butterfly Pose
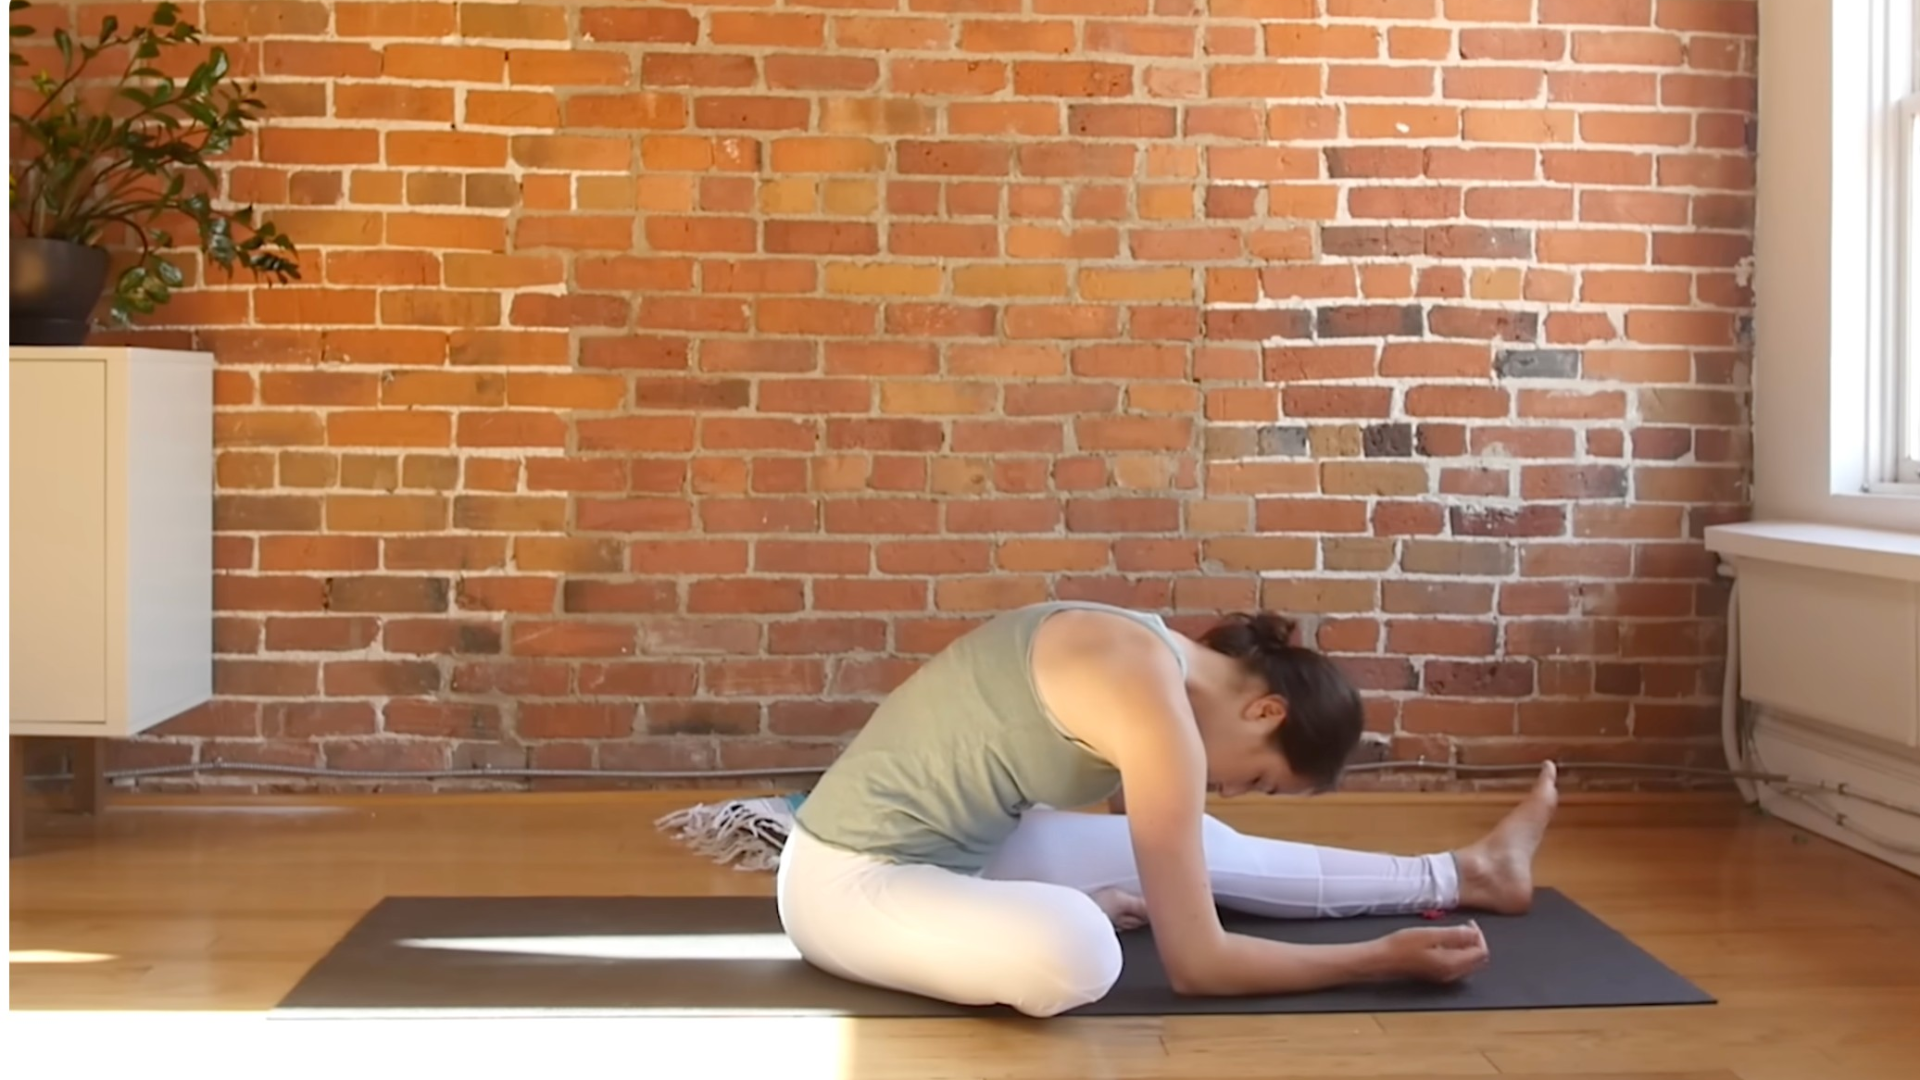
This is similar to the pose known as Head to Knee Pose in regular yoga. Extend your left leg straight in front of you and bring your right foot to the inside of your left thigh. Keeping a little bend in the knee of your straight leg is always a good idea. You’re coming into a forward fold, which means first you want to lift and lengthen the spine and, at the same time, try to ground your sit bones into the mat. Then let your chest lean forward.
This is a passive fold, which means you’re not pushing and pulling your way into the stretch. Just let gravity do the work for you. So let your head dangle and be heavy. Maybe turn your palms to face upward. You might find that you end up folding a little further during the time you stay in the pose. Yin yoga is a great way to practice softening and not engaging the body. Breathe here.
When you’re ready, bring your hands to the mat and slowly lift yourself, inch by inch, not rushing your transition and staying mindful.
Then switch sides. So your right leg goes straight and you’ll bring your left foot to the inside edge of your right thigh. Sit up nice and tall, and then exhale as you fold forward, letting gravity do the work for you. You might find that one side is a little tighter than the other. Try to soften.
Ease your way out of the stretch nice and slow.
Sphinx Pose
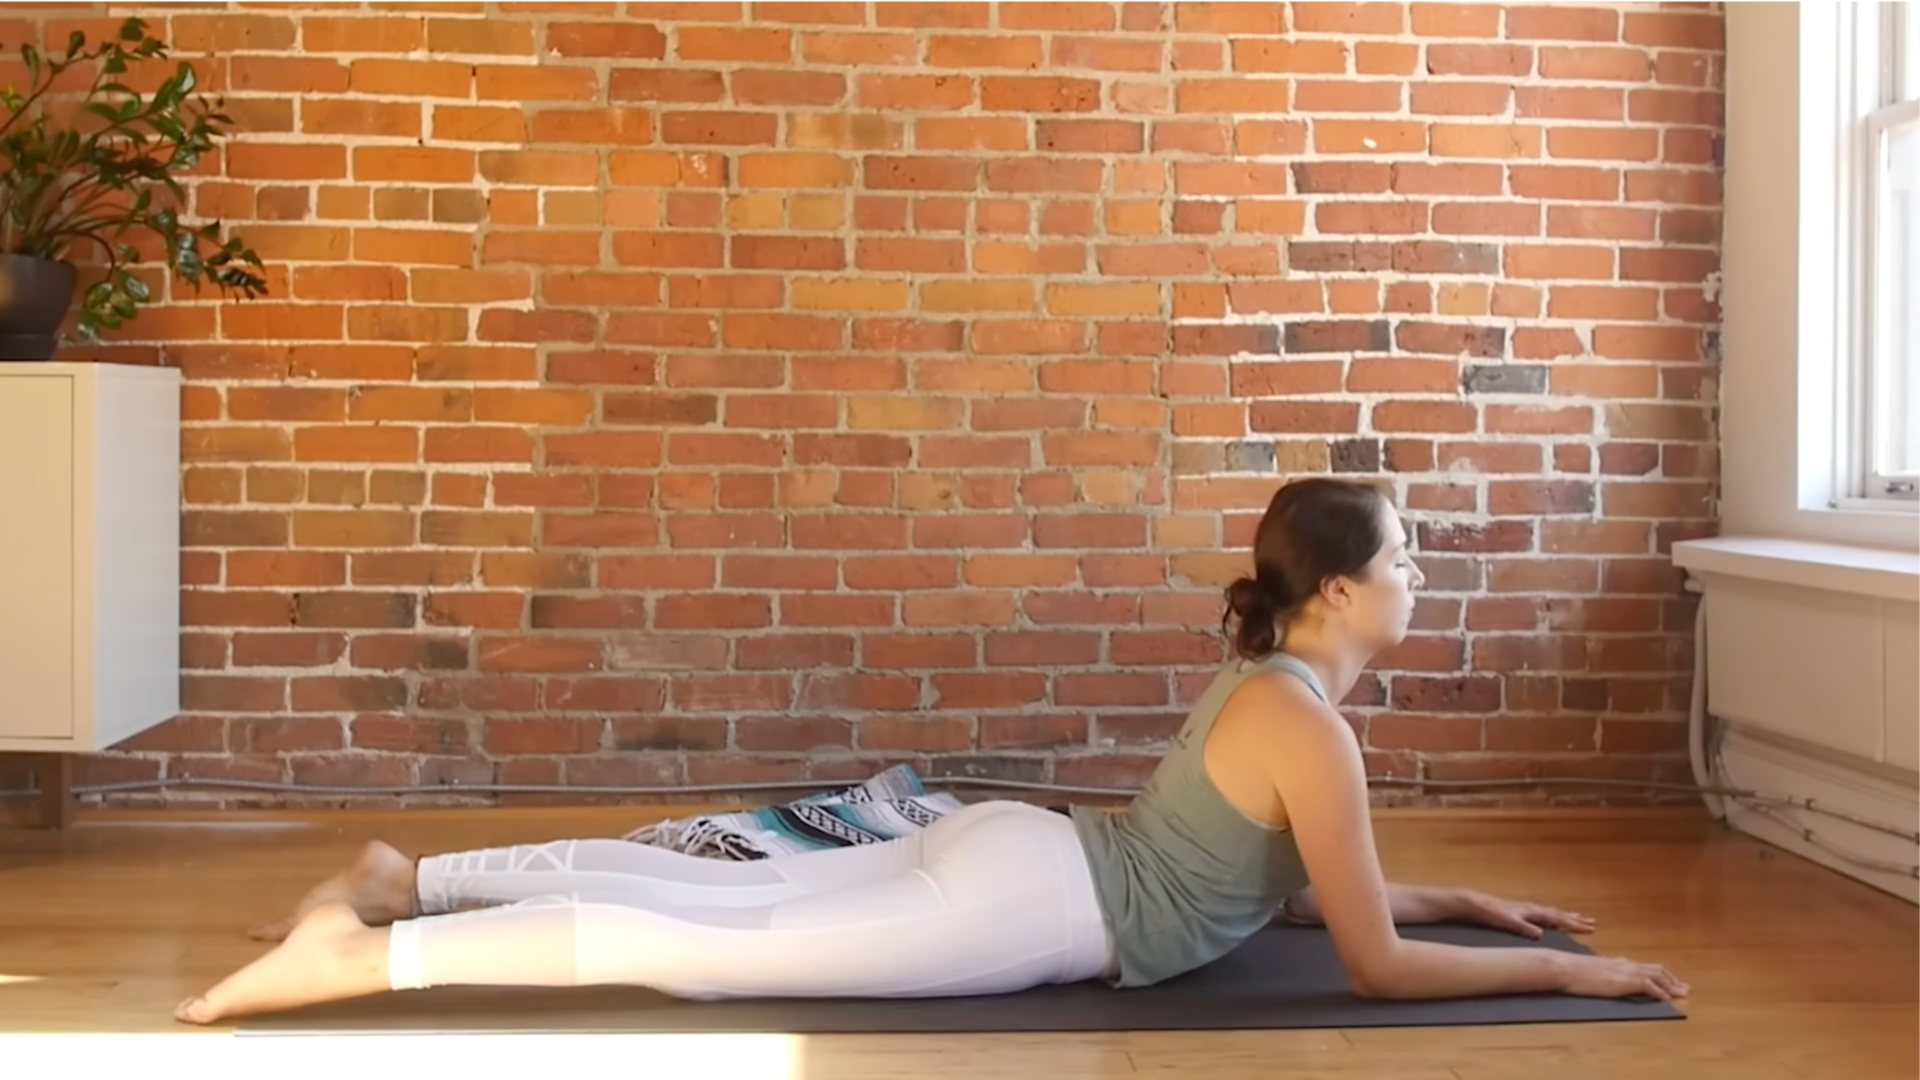
Make your way onto your belly and come onto your forearms, with your palms flat on the mat. Take your legs and feet hip-distance apart, tops of the feet resting on the mat and toes pointing straight back. Then lift your chin and chest in Sphinx Pose. Think of pushing the heads of your arm bones back into the shoulders and lengthening the crown of the head up, so you’re creating even more space through your neck. As you stretch through the front body, try to reach your tailbone toward your heels.
If you find that the backbend feels too intense, lower your chest a little closer to the mat by inching your forearms farther away from you.
Breathe here.
Reclined Pigeon Pose
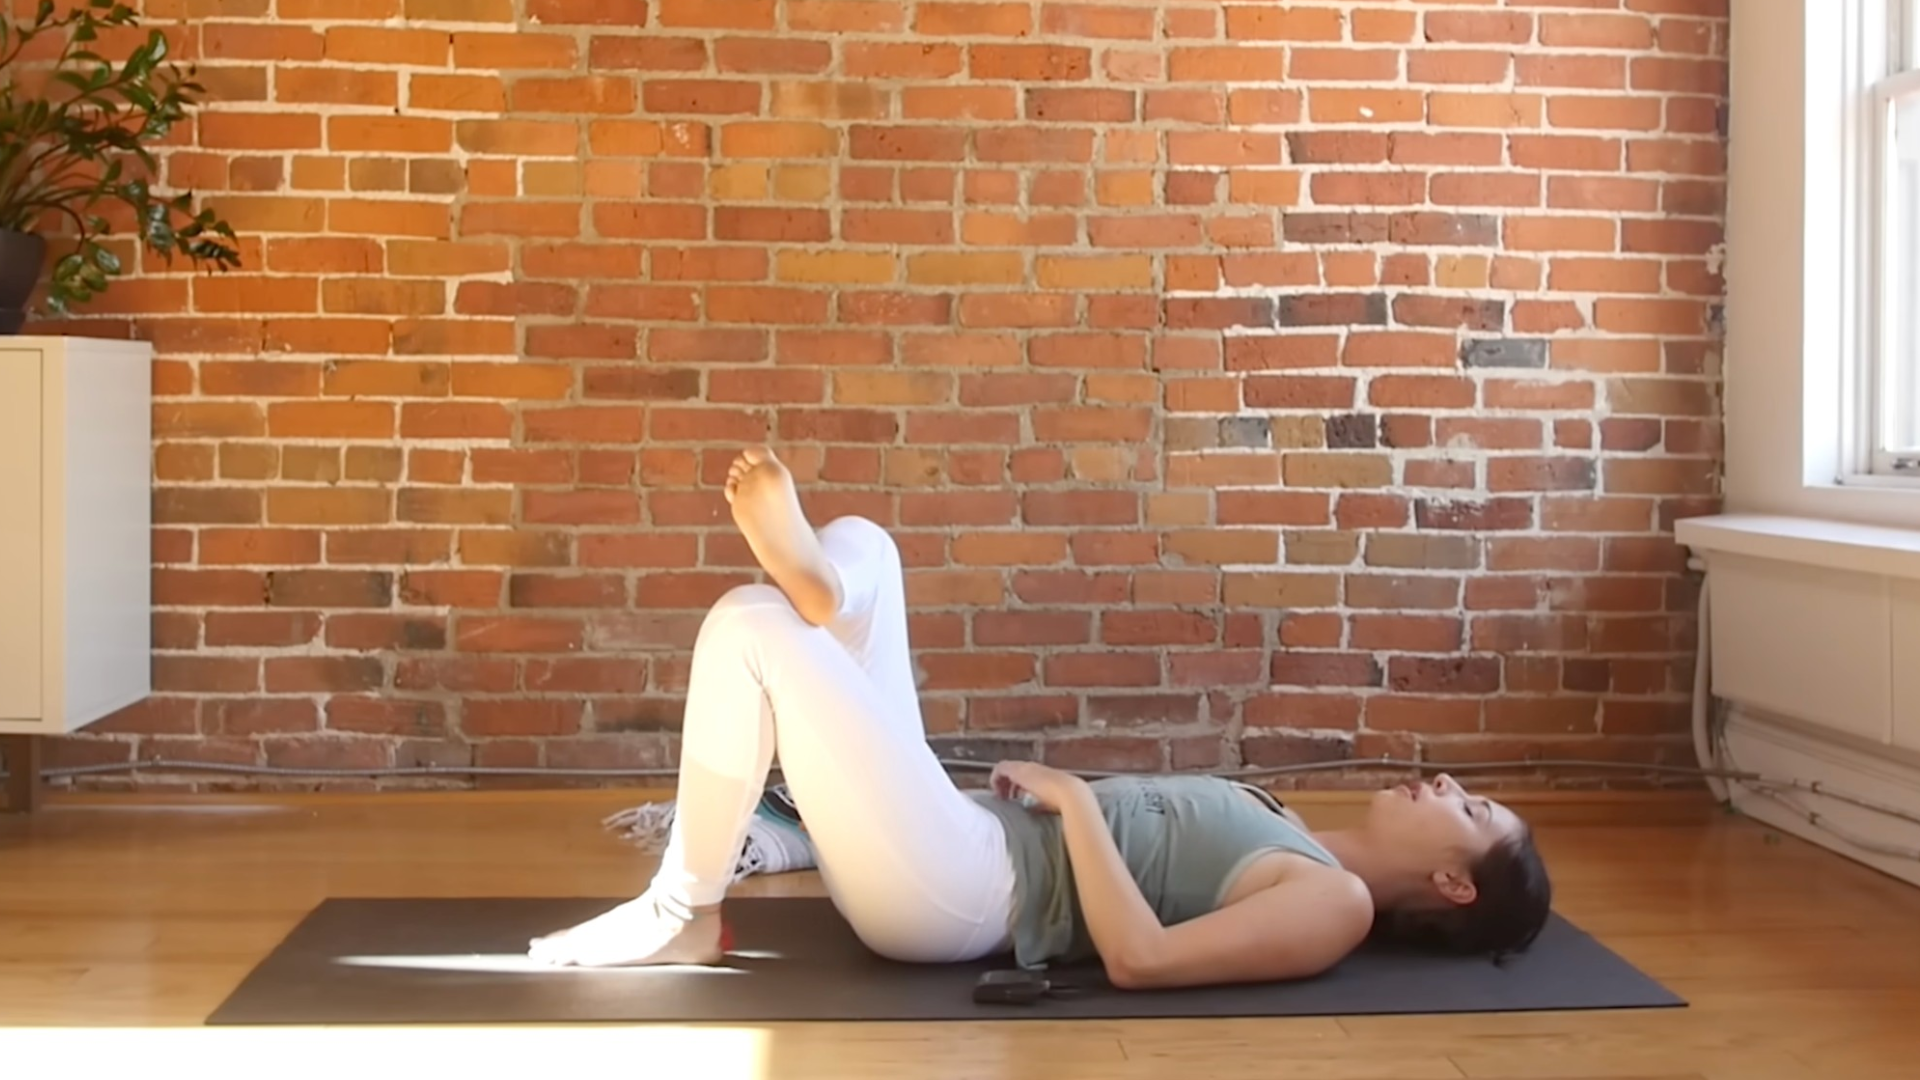
Release your chest to the mat and flip over onto your back. Bend your knees, bring your feet flat on the mat, and cross your right ankle over your left knee. Flex your right foot and try to lean your right thigh away from your body. You’re looking for a stretch into the outer right hip and right glute.
Stay where you are or, if you want to intensify the stretch, reach along either side of your left thigh with your hands and pull your left knee closer toward your belly.

Let your head and shoulders rest heavy on the mat and use only a little arm strength. Find some slow, steady breaths in and out through your nose.
Reclined Twist
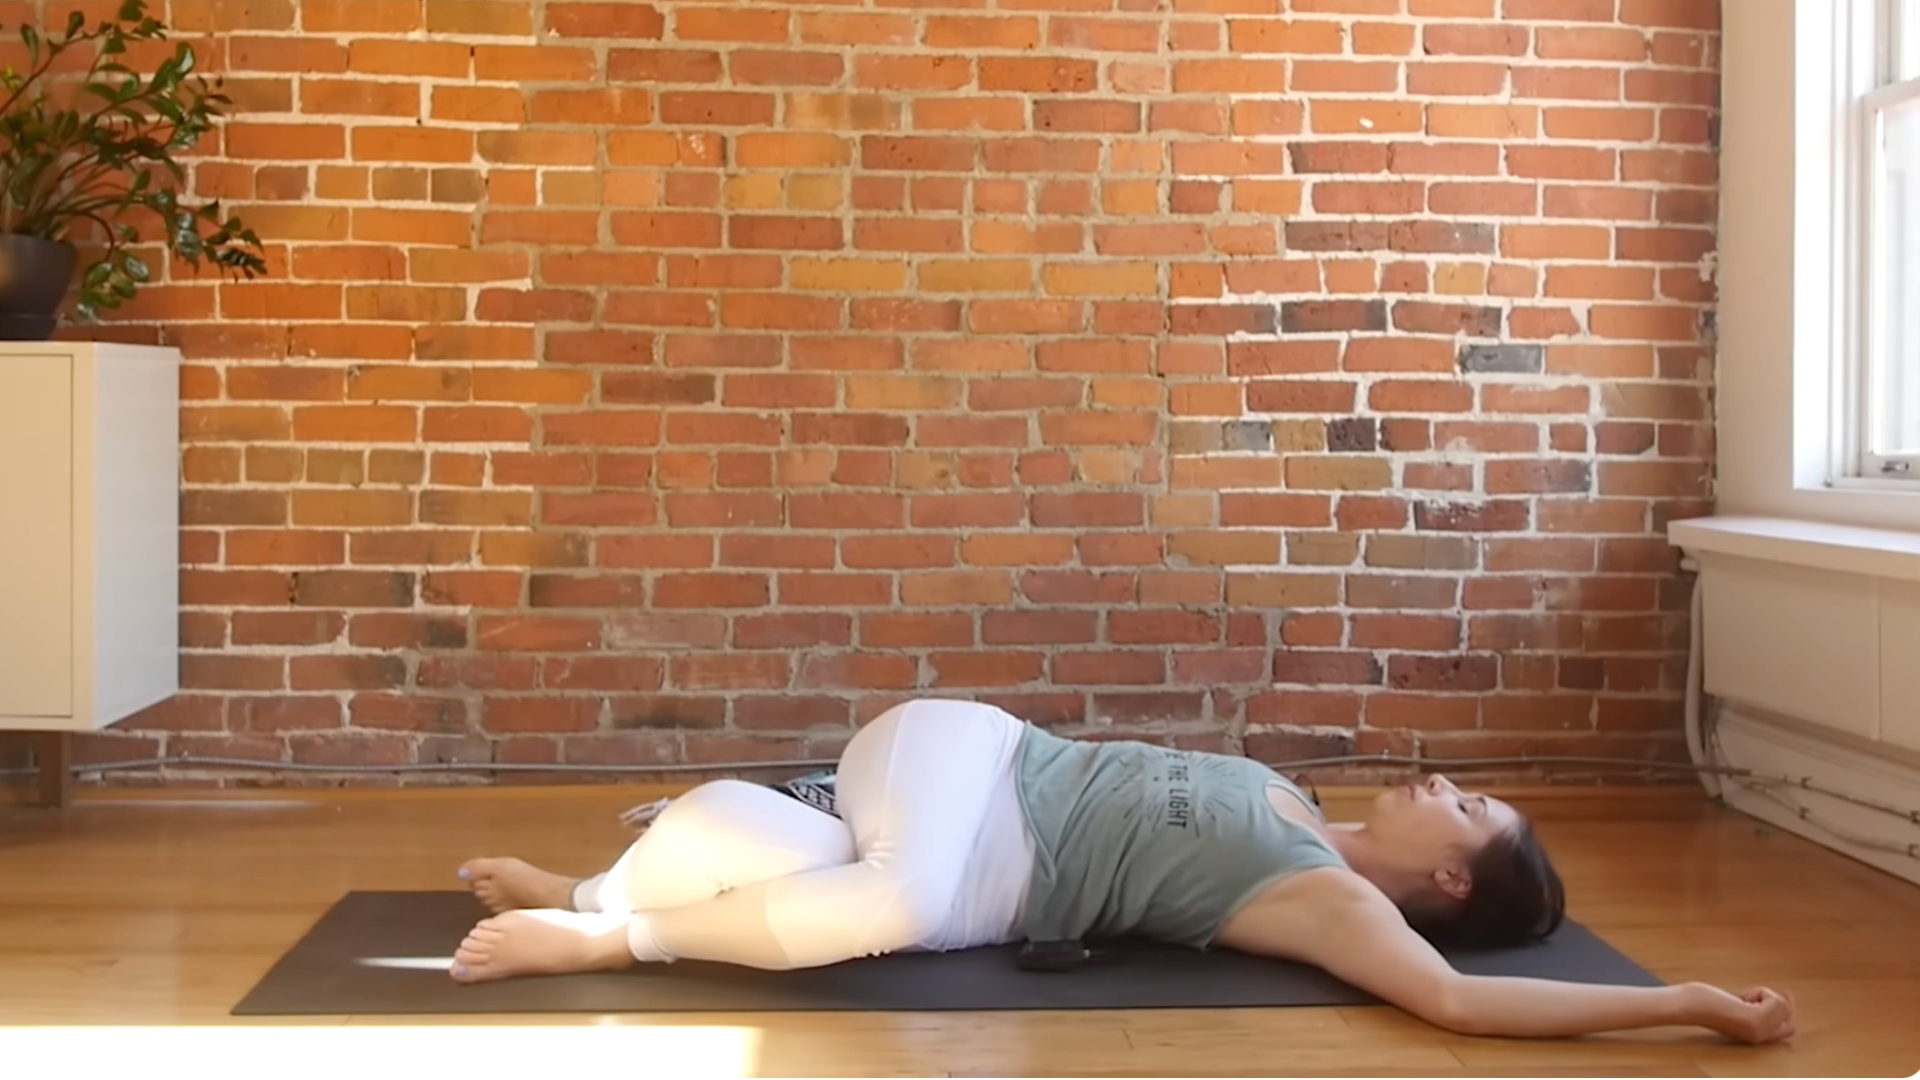
Set your left foot back on the mat but keep your right foot against your left knee. Before you repeat this shape on the other side, take a reclined spinal twist by crossing your right thigh over your left thigh to bring your legs closer together. Lift your hips, shift them a couple inches toward the right, and then lower your hips again. Lower your knees toward the left and reach your arms straight out from the shoulders in the shape of a T. Try to relax your right shoulder so it stays on the mat. So your chest faces up and you’re twisting from the mid to low back.
If this twist feels too intense, you can unwrap your legs and stack your right knee over your left and take them toward the left. Breathe here.
When you’re ready, slowly unwind and unwrap your legs. Bringing your hips back to center for Reclined Pigeon Pose and Reclined Twist on the other side. Let’s slowly lift your legs back to center and uncross them.
Savasana
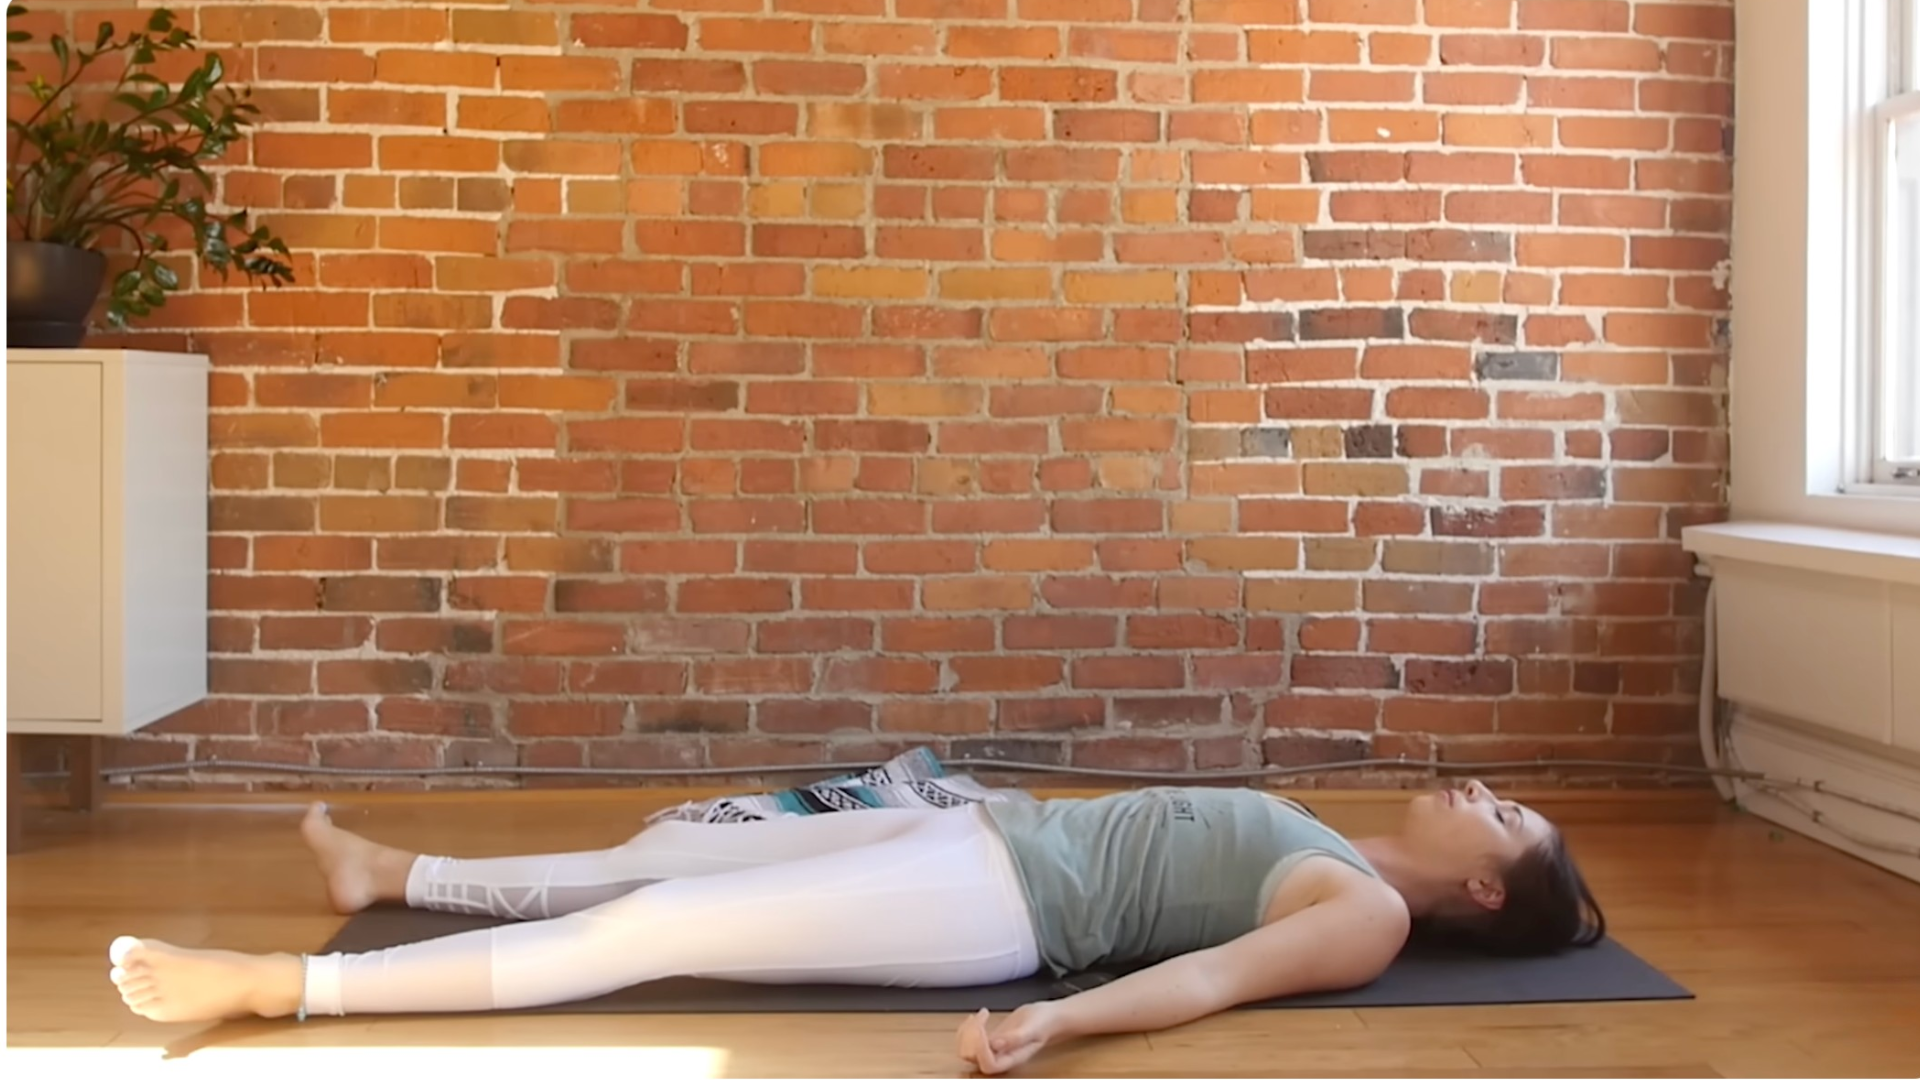
Technically, Savasana isn’t a yin yoga pose, although it is a way to relax your body and integrate all the stretches you just practiced.
To make your way into Savasana, your final resting pose, stretch out your arms and legs so they’re angled slightly away from you. Turn your palms to face upward and let your feet fall away from you. Take any little adjustments or movements here that are needed. Observe the way you feel now as opposed to when you began this practice. Notice the shifts that have occurred, the tension that has dissolved, and let yourself be really heavy. Stay here for at least a few minutes.
When you’re ready, begin to deepen your breath and then wiggle your fingers and toes, bringing life back into your body. You can take a big stretch if you like, reaching your arms overhead, and we’ll turn onto one side. Use your hands to help you come to a seated position, sitting in any way that is comfortable for you. Close your eyes, lengthen your back, and maybe you bring your palms together at the front of the heart and simply pause here.
Thank you so much, yogis, for doing this yin yoga for beginners practice. I hope you feel better in your body and that you try yin yoga again.


