
Published October 2, 2026 11:34AM
In Yoga Journal’s Archives series, we share a curated collection of articles originally published in past issues beginning in 1975. This article about how to do Revolved Triangle Pose first appeared in the July-August 1993 issue of Yoga Journal. Find more of our Archives here.
As Vanda Scaravelli relates in her book Awakening the Spine (Harper, San Francisco, 1991), “Goethe said that he could understand the falling of the apple [which gave Newton the idea of gravity], but he could not understand how a tree could grow in two opposite directions.” But in addition to the law of gravity, Newton also theorized that “to each action corresponds an equal and opposite reaction.” Therein lies the key to understanding how gravity can become a friendly force in our bodies. As much as gravity anchors and weights our bodies to the Earth, that same force, used intelligently, can rebound up through the body like a bouncing ball, creating lightness and length.
When you bounce a ball, the more strongly the ball presses into the ground, the higher the rebound will be. If the ball has too little air in it, it will fail to bounce back. Similarly, our bodies have to contain a certain dynamic energy in order to make gravity work for, rather than against, us.
In the human body, three primary anatomical planes intersect at one point. This point is the center of gravity around which all movement is organized. The center of gravity is generally located on the front of the spine between the fourth and fifth lumbar vertebrae. Just as a tree grows down from the roots and up from the trunk, the analogous dividing line in our bodies is at the level of the fourth and fifth vertebrae near the attachment of the back of the diaphragm.
The diaphragm, the primary respiratory muscle, is a dome-shaped sheet that forms the base of the thoracic cavity. The Native Americans saw the diaphragm as the horizon between Heaven and Earth. The struggle to find a balance between the spiritual and material aspects of the self is often embodied as tension in the diaphragm. With its central location in the body, dividing the thoracic and abdominal spaces, the diaphragm is usually described as a “separating structure.” When there is excess tension in this major muscle, separation indeed results, and freedom of movement becomes impossible.
Instead of considering the diaphragm a separating structure, begin to think of it as a *connecting structure* between the upper and lower body. Through the diaphragm and the breathing process, the mind and body meet. When you give the breath primacy in yoga practice, the asana becomes a meeting ground for the head, the heart, and the “gut” feelings of the lower body. Focusing on breathing provides the bridge between asana practice as merely a physical exercise and asana practice as a spiritual journey.
From this midpoint, with every breath cycle the spine releases down toward the heels and elongates or rebounds up toward the crown of the head. This rebound—what Scaravelli calls “anti-force”—can only occur when the breath is allowed to move freely and there is an “undoing” of muscular effort on the exhalation.
Gravity puts us in contact with the Earth. All movements begin from our connection with the ground underneath us. The more the pelvis and legs are released downward on the exhalation, the more potential rebounding force is possible. This potential rebounding energy can be utilized if the alignment of the body is clear and the joints are fluid so the energy is not impeded by excess muscular tension.
The pose we are going to focus on in this article is quite complex. Parivrtta Trikonasana (Revolved Triangle Pose) is a forward bend, a twist, and a balancing posture all in one. As you progress through the practice session, you may find yourself “getting” one aspect of the pose only to lose another. As you focus on the spinal twist, you may lose your groundedness. As you focus on anchoring your legs, you may temporarily be unable to twist. This struggle between groundedness and freedom may at first seem like an either/or dilemma. However, if you resolve to work slowly and tenaciously on creating a stable base for your movement, you may be surprised to find that freedom comes from stability. Unboundedness has its roots in the ground.
The following simple exercises will give you a solid foundation from which to move in all the standing poses.
Preliminary Exercise (With or Without a Partner)
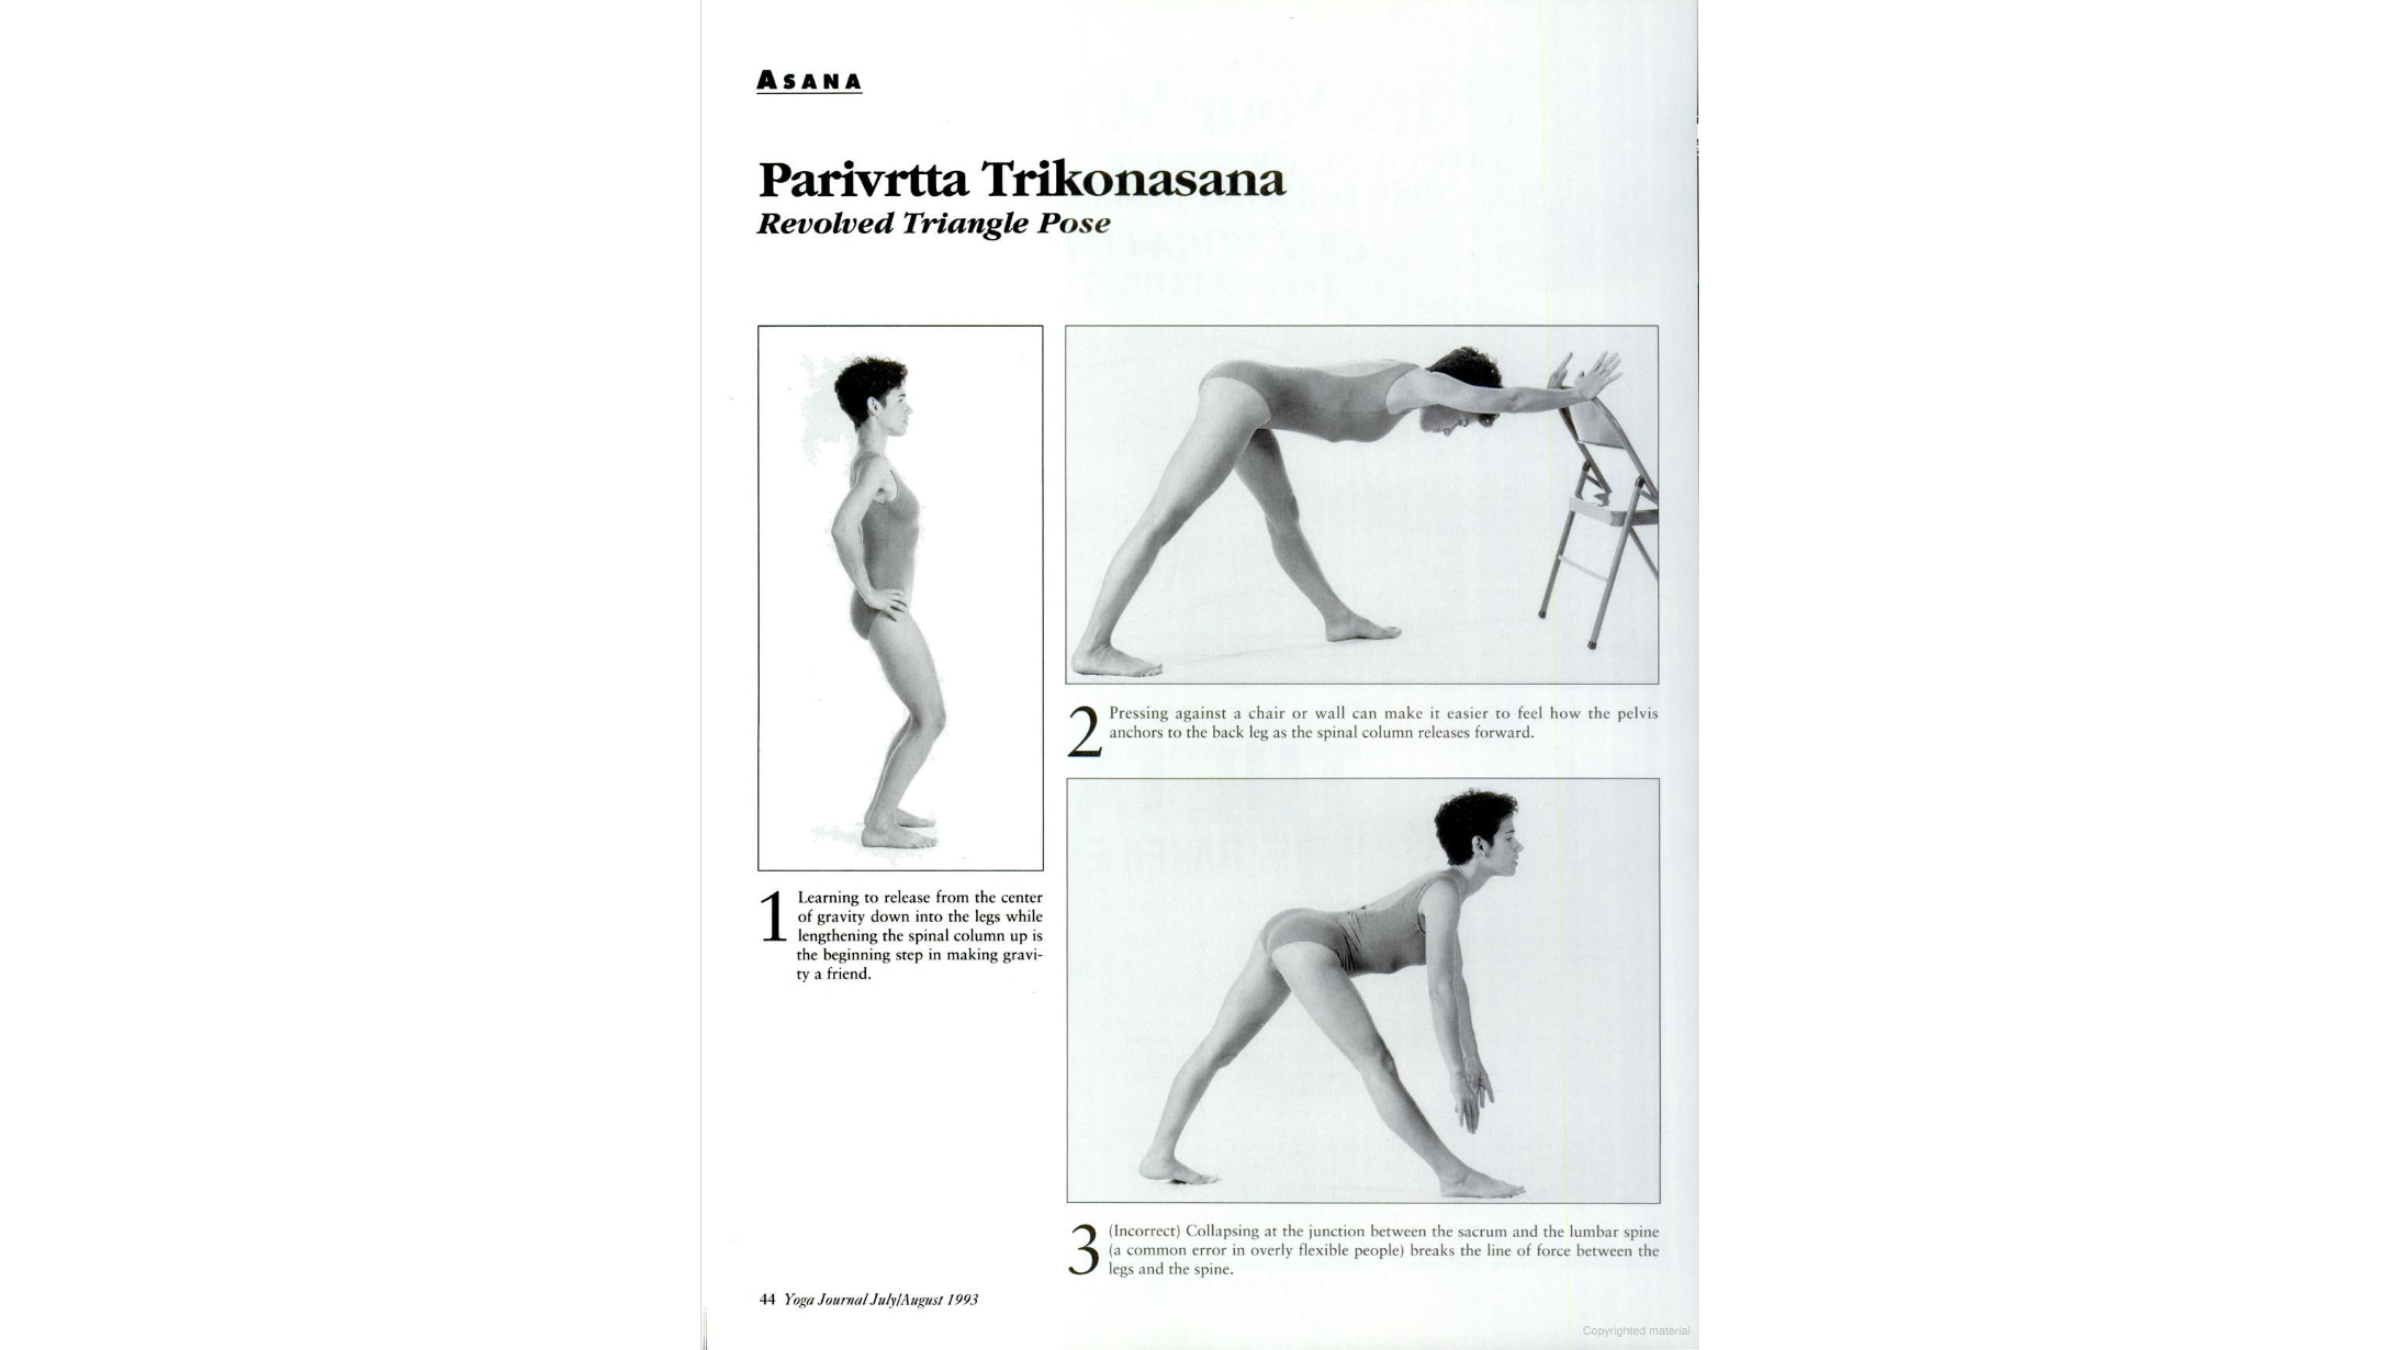
Come to a standing position (Tadasana) with the feet hip-width apart. Bend the knees slightly and, as you exhale, relax the pelvic floor and release the weight of the tailbone and sacrum downward (*Figure 1*). Place your hands (or have a partner do so) on the sides of the pelvis and press directly down.
At the same time, focus on releasing the spine in the opposite direction, from the back of the waist up toward the back of the skull. Working against resistance, attempt to straighten your legs, all the time pressing down with your hands on your pelvis. Be careful not to lock or jam the knee or hip joints, an action that will prevent the free flow of force up from the ground.
You should feel a constant tension between the downward pull of the legs and the upward release of the spine. These are the basic directions of spinal release in all asanas. The dynamic upward force is initiated by whatever part of the body touches the ground in a yoga posture—whether the hands in an arm balance, the head and elbows in Headstand, or the shoulders in Shoulderstand. In inversions, the same rebounding principle works within the body in a different relationship to gravity.
Beginner’s Practice
Place a chair against a wall with the back of the chair facing you. Stand with your right foot about one and a half feet away from the chair in front of you. Step the left leg back about three to three and a half feet and turn your left foot in at a 30-degree angle. The back foot must turn more than in other standing postures, so you can pivot the hips until they are parallel with the wall in front of you.
The feet should be hip-width apart so the sitting bone on each side of the pelvis is aligned with the heel of that leg. The alignment of the sitting bones (the bony protrusions at the base of each buttock where the hamstring muscles attach) provides a crucial connection between the feet and the pelvis. When the relationship between the two is clear, the downward force of the feet pressing into the floor can rebound clearly into the pelvis and spine.
Keeping the heels in line with the sitting bones also creates a very secure balance because it keeps the pelvis and spine aligned over the legs. This principle holds true not only in Parivrtta Trikonasana, but in every standing yoga posture. Whenever you bend to the side or bend the knee in a standing pose, the alignment of the sitting bone and the heel maintains the balance of the torso over the legs and protects the knees from stressful torque.
Maintaining firm contact with the back heel against the floor, place your hands on your hips and begin to tip forward, rotating the pelvis around the femurs (the heads of the thighbones). From the back of the pelvis, release down into the heels so that the pelvis feels anchored to the legs. When the spine is parallel to the floor, extend the hands to press firmly into the back of the chair (*Figure 2*).
If your back foot has come off the floor, you may need to raise the hands on the wall. Only go as far as you can while keeping the front of the abdomen and chest open and the spine fully elongated. As you inhale, anchor the pelvis and back heel toward the ground. Maintaining this connection, release the spine in the opposite direction on each exhalation. After about 10 breaths, walk the legs forward and practice the pose on the other side.
Now let’s try to integrate the twisting motion of the spine. To make it easier to keep the back heel down, place your left heel into a corner so that the inner, back, and outer heel are in contact with the walls. If you don’t have an appropriate corner in your home, simply press your back heel against a wall. Step your feet apart as in the previous variation. Place a block to the inside of the right foot. With your hands on your hips, once again tip forward, but this time bring your hands onto the block.
Check to make sure that your right sitting bone is still in line with your right heel. If the right hip swings out to the right, the entire spine will move to the left to counterbalance it. When the spine is no longer over the support of the legs, the muscles of the back begin to grip in order to prevent you from losing your balance (which you are indeed doing!).
Now place your right hand on your right hip and begin to rotate to the right as if you were turning your navel to look up at the ceiling. With each inhalation, focus on anchoring the pelvis into the legs, keeping the sitting bones aligned with the heels. As you exhale, progressively work your twist up the torso, first turning the abdomen, then the waist, then the rib cage, then the chest. Finally, extend the right arm straight up toward the ceiling. As you turn the neck and head, check that the right hand does not reach behind the plane of the right shoulder, a position that indicates that the arm is twisting beyond the capacity of the spine.
The moment you start to lose your balance, the spinal muscles will automatically tense, so your ability to release and rotate largely depends on your ability to balance. Make sure that your front hip is not hiked up toward your right shoulder, a distortion that will cause the spine to curve back toward the hip. As you bring the hips equidistant from the shoulders, the spine will extend between the two legs so that the crown of the head, the tailbone, and the back heel form one line. With this clear line of force, the balance will be steady and the rebounding force from the legs will move easily through the spinal column.
To come out of the pose, draw the sitting bones down into your heels so the pelvis anchors to the legs. Rather than initiating the ascent, the spine will simply go along for the ride as the legs press firmly down.
Advanced Practice
Stand in the center of the room with the feet three to three and a half feet apart. Turn the right foot out 90 degrees and the left foot in 30 degrees. In this variation of Parivrtta Trikonasana, bend forward and twist simultaneously. Begin by extending the left arm over the head. As you tip forward, turn slightly toward the right. Strongly reach the left arm away from the left heel, feeling the line of force from the tip of the fingers, through the spinal column, into the back leg, and down into the heel. Maintain this connection as you continue to rotate forward and around.
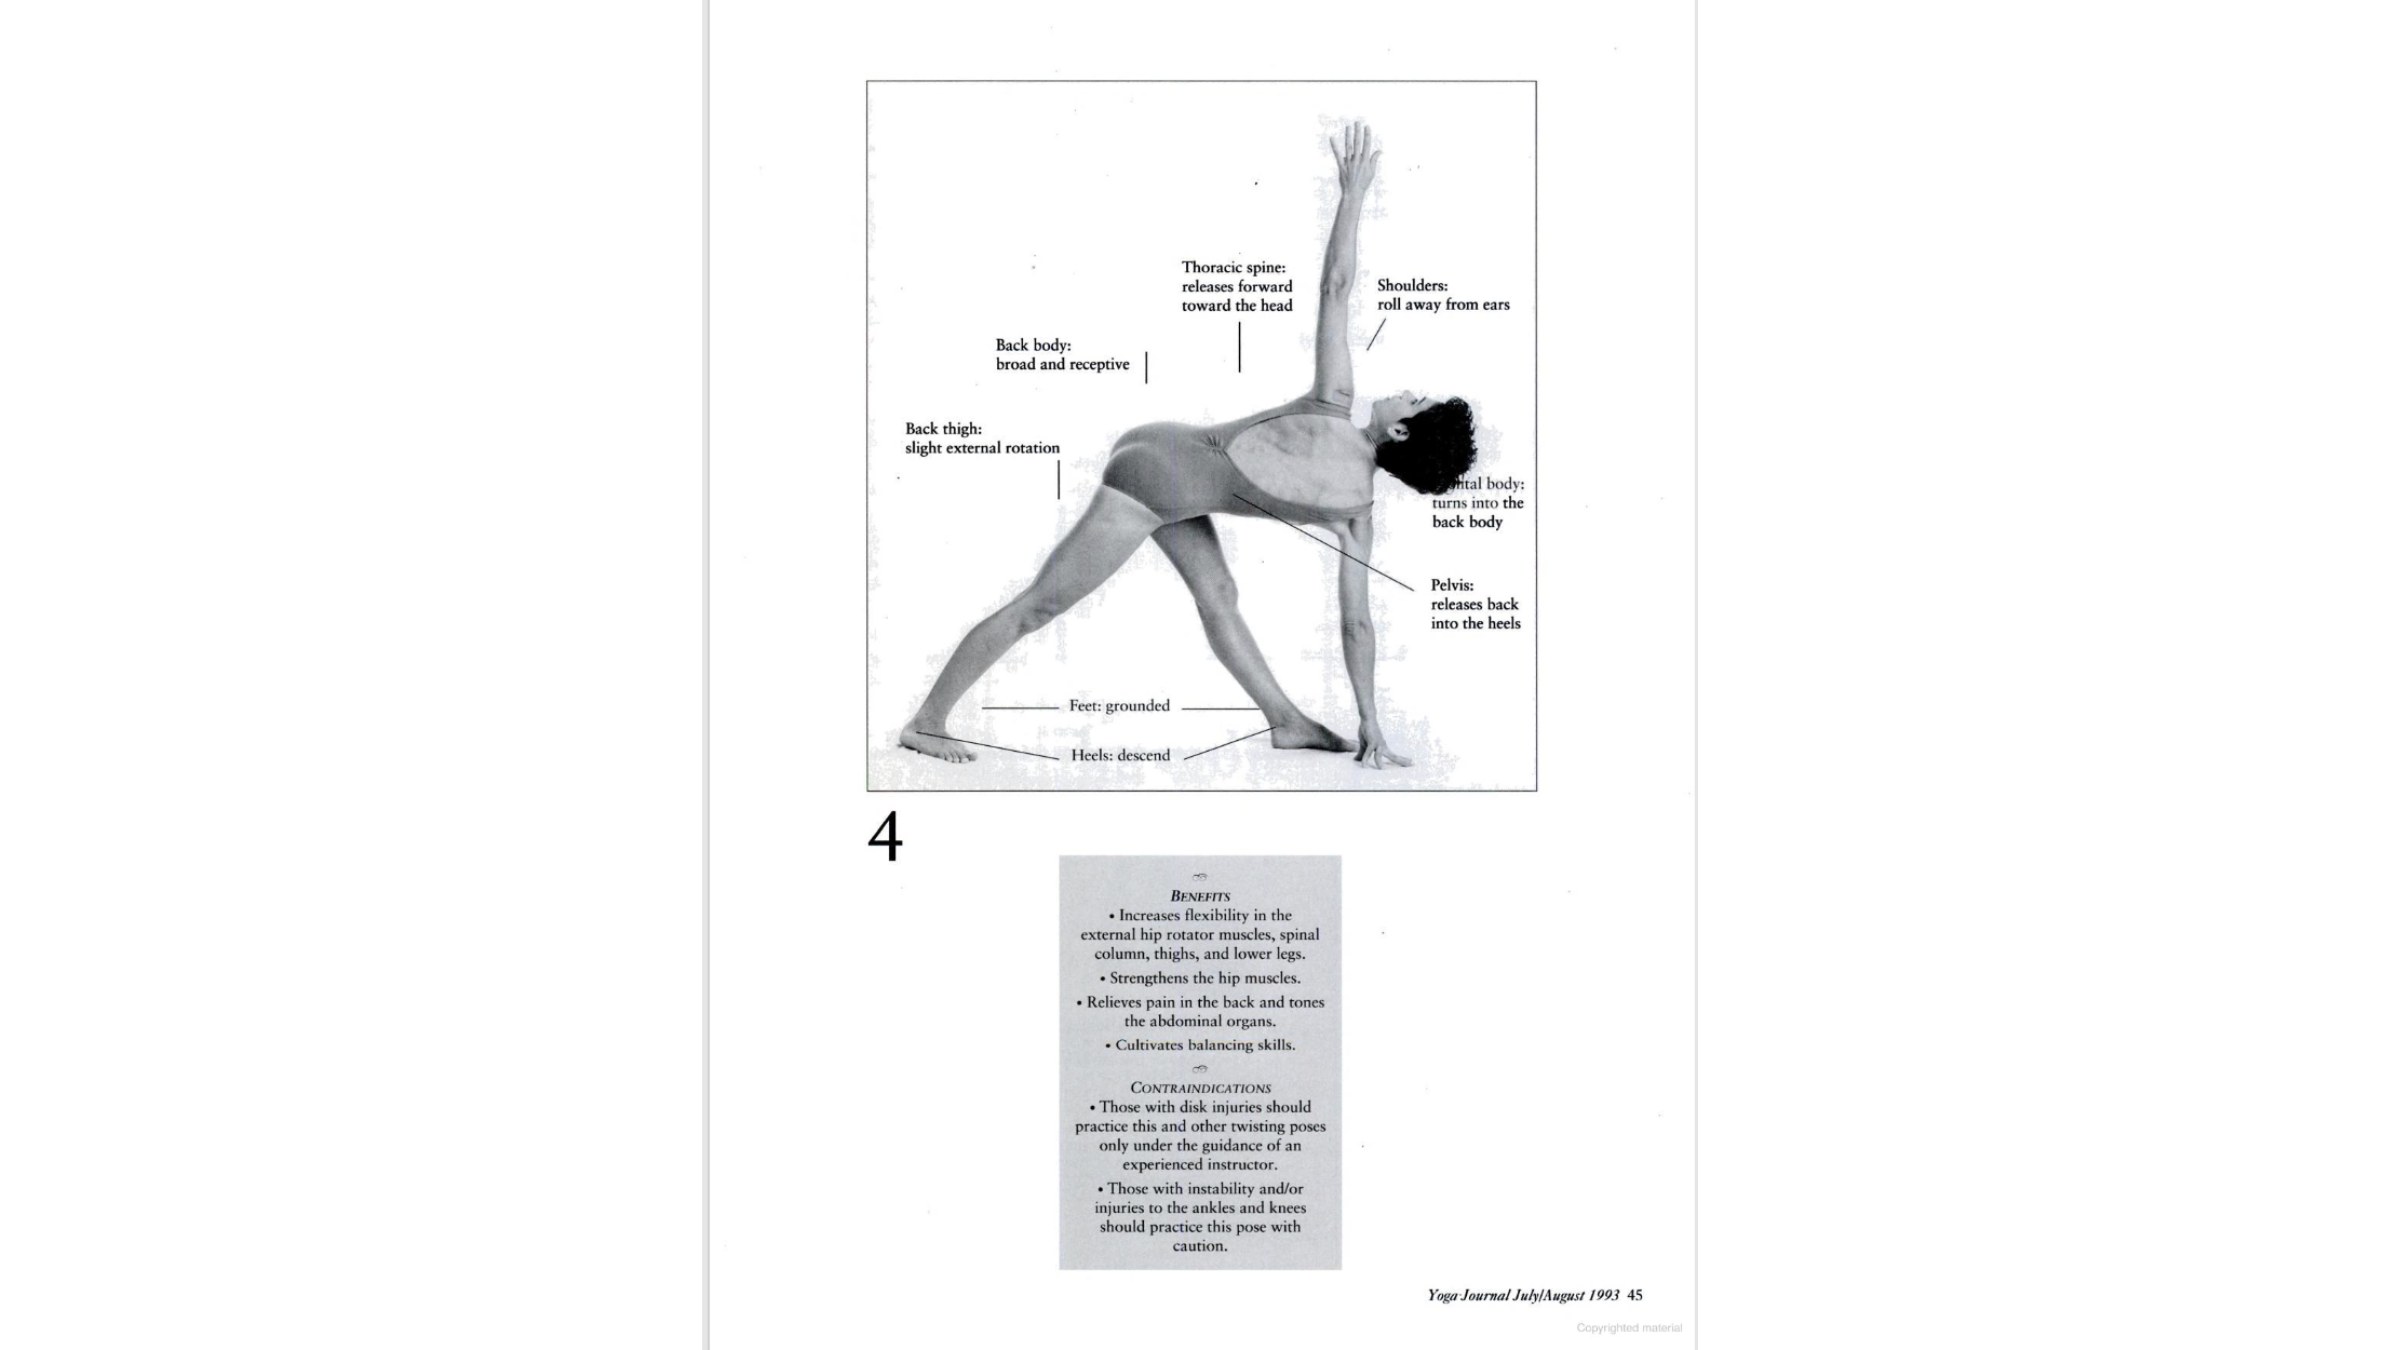
Very flexible people should be careful not to arch at the lumbosacral junction (the place where the sacrum and the lower back join), thereby breaking the line of force from the back leg into the torso (*Figure 3—incorrect*). Touch the left fingertips to the floor on the inside of the right foot as you stretch the right arm up (*Figure 4*). If you find that you are rounding your back and compressing the front of the diaphragm in order to reach the floor, use a block to raise the hand.
In any full spinal twist, two opposing forces will interact. When you open a jar, the base of the jar must stay fixed as you twist the lid. If the two move together in the same direction (as when a jar is slippery), you will be unable to open the lid. In the same way, as your spine twists to the right, the legs must resist the strong pull of the spine.
In Parivrtta Trikonasana this resistance, or counter force is provided by the back leg *slightly* turning out. The inner back arch will lift as the shin and knee turn slightly out, supporting the outward roll of the thigh. This action provides a kind of drag on the lower back so the spaces between the vertebrae open and elongate in both directions. Without this counter-force the spine would begin to twist into itself, compressing, collapsing, and losing its integrity. This tendency is most common in very flexible people. If your inner thighs are touching each other, you can be sure that sufficient counterforce is not present.
Instead of trying to establish this resistance by focusing on pressing the back heel down, bring your attention instead to the line that divides the spine at the back of the waist. As you release and soften with each successive exhalation, the pelvis will begin to anchor itself more and more into the back leg. This release at the level of the diaphragm will ground the legs even more, until they feel absolutely rooted into the Earth. The rebounding force through the legs will aid you in releasing the spinal column in the other direction—toward the crown of the head.
In this way you can use release, rather than effort, to feel your connection to and extension from the Earth. As you feel the upper back and chest release, drop the left arm out of the chest and extend the right arm even further up, so the arms express a clear line of force from the Earth to the sky. At this stage you may wish to bring the hand to the outside of the right foot for a deeper twist.
Releasing the spine will also be easier if the twist is initiated by softening the frontal body, rather than by exerting force on the spine with the two arms. Let the rib cage expand away from the spinal column on both sides and feel the shoulder blades broadening on the back. When the back of the body is wide and receptive, begin to roll the front of the body—the abdomen, chest, and lungs—into the back of the body as if turning oiled bread dough in a bowl. Each time you inhale, reestablish the width across the back. Maintain this width as you exhale and turn the front body into the twist. By following the lead of your exhalation, you will only twist as far as your body is able to integrate the opening. In this way, freedom and stability find resolution within each other.