
Published August 12, 2026 04:16AM
Yoga Journal’s archives series is a curated collection of articles originally published in past issues beginning in 1975. This article about Pyramid Pose (Parsvottanasana) first appeared in the May-June 1989 issue of Yoga Journal.
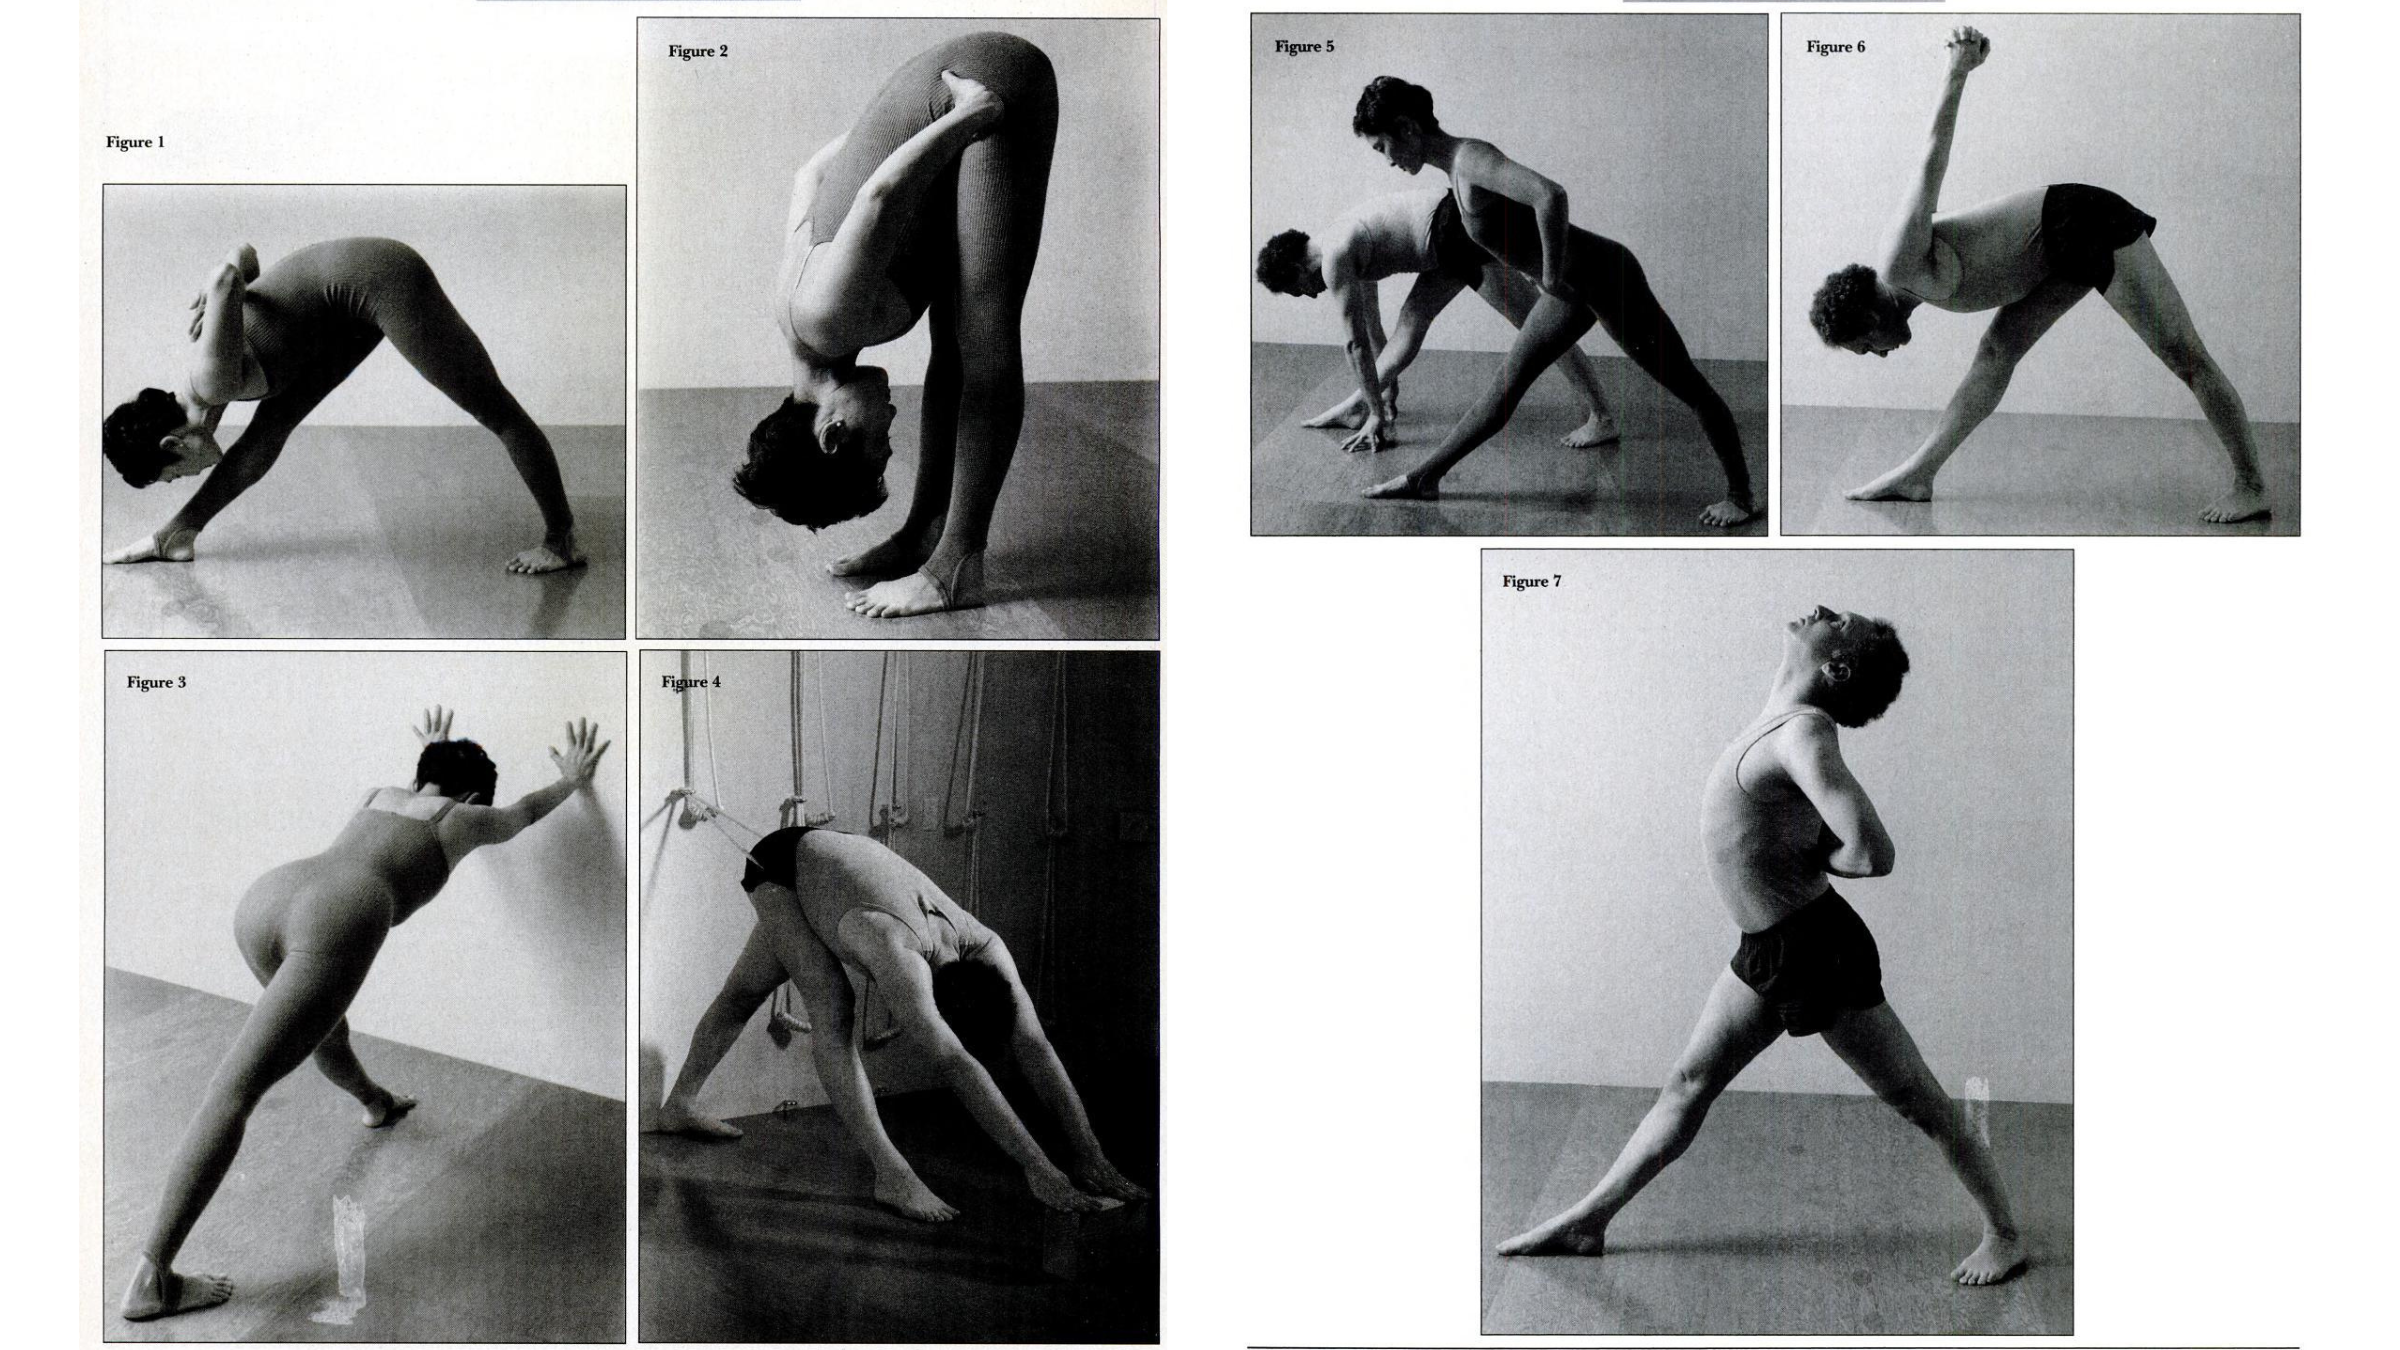
In my experience, the proper alignment of the pelvis is more difficult to achieve and maintain in Pyramid Pose (Parsvottanasana) than in any other standing pose. I am therefore presenting several variations of Pyramid Pose to help you develop an awareness of the pelvis as you move through space and enter the gateway of the pose (Figure 1).
For those of us who practice Hatha Yoga, the body itself is our labyrinth. With each new pose, we leave behind the comfort of the known and enter a world of nebulous sensations and shifting balances. Our journey begins in Mountain Pose (Tadasana), feeling the lift of the pelvis off the thighs and the openness of the chest, as the inner legs lengthen firmly from the groins to the floor. But when we move from Mountain Pose into another pose, we seem suddenly to turn a dark corner and to lose our sense of direction—our sense of the way one part of the body should move in relation to another. Especially in forward bends, we lose the sense of how the pelvis should move in relation to the thighs.
Let us explore the movement of the pelvis in Standing Forward Bend (Uttanasana). First stand in Mountain with the feet a few inches apart, the outer feet in line with the outer hips. Then raise the arms overhead with an inhalation, and extend the torso forward on an exhalation—placing the hands on the floor beside the feet, or taking hold of the elbows if you cannot reach the floor.
Now observe what happens when you try to pull the pelvis forward onto the thighs. For me, the back arches away from the legs, the abdomen pushes forward and feels somewhat bloated, and there is a heavy downward pressure on the thighs.
Next bring your hands onto the front hip bones as in Figure 2, and think of lifting the pelvis up and away from your fingers. The body responds to this change of direction in a very different way. The legs become active, the pelvis lifts away from the thighbones, creating space in the hip sockets, and the torso moves passively toward the thighs. Altogether, this movement feels more natural and less forced.
The movement of the pelvis away from the thighs can be practiced in a variety of sitting poses, such as Seated Forward Bend (Paschimottanasana) and Open Angle Pose (Upavista Konasana), by pressing the sitting bones back into the floor as you lengthen the torso forward. This movement pacifies the abdomen so there is no strain on the spine, and deepens the stretch of the legs. The lift of the pelvis away from the thighs helps to overcome a number of problems in the standing poses. In Triangle Pose (Utthita Trikonasana), if you lift the pelvis away from the front thigh, especially when coming into the pose, you prevent the weight of the torso from bearing down on the front leg, and thus avoid the discomfort of hyperextended knees.
The same movement in Side Angle Pose (Utthita Parsvakonasana), by creating space in the hip socket, relieves any painful compression in the groin muscles of the bent leg. In Half Moon Pose (Ardha Chandrasana) and Warrior III (Virabhadrasana III), the lift of the pelvis back and off the standing leg, as the spine lengthens forward, improves the balance and strength of the pose considerably.
How to Practice Pyramid Pose
The following preparation for Pyramid Pose, using the wall, is especially helpful for beginning students and for those with very tight hamstrings. First stand in Mountain Pose with your feet together, facing the wall and about 18 inches away from it. Then, maintaining the lift of the spine, step the left foot back with one full stride, and place the arch of the left foot in line with the heel of the right foot. The distance between the feet should be approximately the length of your leg, thus forming an equilateral triangle. Now turn your arms out from the shoulder joints, so that the upper chest expands, and raise the arms overhead with a deep inhalation. On the exhalation, think of lifting the pelvis off the thighs as you bend forward from the hip joints, and place your hands evenly on the wall (Figure 3).
With your arms fully extended and your torso parallel to the floor, draw the pelvis back away from the shoulders, and allow the lumbar spine to lengthen. Keep your breath soft, and broaden the back ribcage as you spread the center of the palms against the wall. Remain in the pose for about half a minute, then lift the torso and arms with a deeper inhalation. Return to Mountain Pose by bringing the left foot forward on the exhalation, then repeat to the other side.
The next variation of Pyramid Pose, using a rope or strap around the pelvis, is particularly recommended for students with lower back problems. If you do not have access to a set of wall-ropes as shown in Figure 4, you can improvise by taking a piece of rope about six or seven feet in length, or by tying two long straps together. First make a large loop with the rope or straps, then hook one end over a set of doorknobs, opening the door to a convenient angle for practicing.
Now step inside the loop, and stand in Mountain with your back to the wall or to the edge of the door, holding the strap with both hands. Take one full stride forward with the right leg, so the strap presses firmly across the hip crease and supports the pelvis. (The right foot should point directly forward, and the left foot should turn out about 30 degrees.) Then raise the arms overhead on an inhalation, and lengthen the torso forward on an exhalation. Bring the hands onto a chair if you are less flexible, or onto a block if you are more flexible, and stretch the arms forward until the back is fully extended.
For the next few cycles of breath, allow the weight of the torso to hang from the strap, and feel the stretch in the lower back, deep within the buttock muscles on the side of the forward leg When the back muscles have lengthened as much as possible in this passive stretch, press the right leg into the floor, and lift the pelvis away from the strap. As in Standing Forward Bend, described earlier, this movement lifts the pelvis over the head of the femur (thighbone), creating more space in the hip socket, and releasing the spine to extend even farther. Hold this position for several breaths, and then repeat on the other side.
The next variation of Pyramid Pose helps us to maintain the proper alignment of the pelvis as we move into the pose. First stand in Mountain Pose, and spring the feet three to three and one-half feet apart. Turn the left foot in about 30 degrees, and the right foot out 90 degrees—checking that the right foot is in line with the arch of the left foot Place the hands on the hips and turn the torso to face the right leg. In this position, there is a tendency to tilt the pelvis toward one side, so bring the hands to the top of the pelvis, and readjust the weight on the legs until the right side and left side are equidistant from the floor. Then bring the fingers to the front corner of the pelvic rim, making sure that one side of the pelvis is not farther forward than the other.
When practicing Pyramid to the right, the right side of the pelvis generally moves forward and down, and the left side tilts up and back, making the pose very lopsided. To maintain the proper alignment, keep the fingers in touch with the front pelvic rims. As you extend the torso forward on an exhalation, keep the right side of the pelvis lifting up, back and away from your right hand, and the left side of the pelvis moving forward into your left hand. In this way the pelvis will remain level throughout your movement into the pose. When you have rotated the pelvis forward to your maximum, place the hands on the floor on either side of the ankle, or use two blocks under your hands if you cannot easily reach the floor (Figure 5).
Hold this position for several breaths, lengthening the spine forward, then repeat to the other side.
The following variation of Pyramid is intended for more experienced students, as it requires both flexibility and sureness of balance. Start in Mountain Pose, and spring the feet three to three and one-half feet apart, turning the left foot in 60 degrees, and the right foot out. Turn the torso to face the right leg, and interlock the fingers behind the back. With the arms fully extended, draw the shoulder blades down toward the waist, stretching the back leg strongly and lifting the sides of the chest. Then with a deep inhalation, press the right leg into the floor, and with an exhalation, lengthen the front torso forward, keeping the shoulder blades in firm contact with the ribcage. This position of the arms and shoulder blades keeps the chest open and helps to create maximum extension of the spine. For flexible students, if the abdomen and lower ribcage come to rest on the thigh, you can bring the head to the shin bone by raising the arms farther overhead on the last few breaths (Figure 6). Remember to repeat the pose to the other side for an equal length of time.
For the final version of Pyramid Pose, stand with the feet together in Mountain, and bring the hands behind the back in namaste position (or fold the arms behind the back and take hold of the elbows, if this is not possible). On an inhalation, spring the feet three to three and one-half feet apart, turning the left foot in and the right foot out. On an exhalation, turn the torso to face the right leg, and press the center of the palms together, with the fingers evenly extended. With a deeper inhalation, draw the shoulder blades down toward the elbows, as you stretch the back leg firmly and lift the side ribcage, letting the head fall back as the upper chest expands (Figure 7).
Now press the inner right leg down toward the floor to create stability, and with an exhalation lengthen the torso forward by lifting the right side of the pelvis away from the thigh. Keep the torso fully extended until the abdomen and lower ribcage come into contact with the thigh, then raise the elbows toward the ceiling to bring the head closer to the right shin bone (Figure 1).
As you hold this position, make the legs strong with each inhalation, and with each exhalation, surrender the weight of the torso and the weight of the brain. When you have reached a place of stillness, inhale, come up, and repeat to the other side.
A Note About Instruction
The instructions in this article—in fact, any teacher’s instructions – are only “clues” and suggestions for your inward journey. As Charles V. W. Brooks maintains in Sensory Awareness, “Very many of us have been taught how to stretch—as though there could be a method for this simplest and most spontaneous of all expressive movements. We must start in an entirely different way. We must first come to enough inner quiet so that we can feel what may really be needed at this moment. Then stretching will become discovery and not performance, a meditation instead of an exercise.”
The first time the body responds to a new movement or instruction, the mind becomes suddenly clear. This freshness and heightened perception lasts only a short while; when you repeat the movement the next day and the day after, the muscles grow quickly accustomed to the new patterns, and the excitement of discovery quickly fades. When the body has a particular alertness about a movement, this is the time to explore and be creative in your practice.
When you are working with a new image or instruction, you should try to let go of any other instructions that might interfere with your response. Take that one image through a series of poses, and see how it affects the alignment of the pose, the breath, the extension of the spine. In this process, you will undoubtedly make some new discoveries. By the time the potency of the initial image has begun to fade, there are new questions and new insights to be explored. At this stage, your practice takes on its own momentum, and the poses themselves seem to give you information. A movement will come spontaneously in a pose, or you will have a sudden impulse to use a prop in a different way.
What is most remarkable here is that the information is revealed in an orderly way, leading methodically and deliberately from one part of the body to another, along a secret network. When I reflect on the inadvertent discoveries of my practice, they do not seem at all random, but contain an amazing inner logic. This inherent logic of what the body has revealed gives me the sense of a higher power locked within, which day by day is teaching me the very next thing I need to know.