
Published October 5, 2026 03:24PM
In Yoga Journal’s Archives series, we share a curated collection of articles originally published in past issues beginning in 1975. This article about the role of your hands in Downward-Facing Dog Pose first appeared in the November-December 1989 issue of Yoga Journal. Find more of our Archives here.
In Indian culture, the hands have always had a special significance. As far back as Vedic times, the priest would motion with his hands to accentuate the words of a ritual ceremony or would imitate with his fingers the initial letter of a sacred mantra. In Indian religious sculpture from the 3rd century B.C. onward, various divinities convey their message to mankind through the attributes or objects they hold in their multiple arms or through the formal gestures of their empty hands, known as mudra.
These hand gestures initially had broad meaning. For example, the hand held up with the palm facing out was meant to dispel fear (abhaya-mudra), whereas the hand extended downward was offering a gift or granting a boon (varamudra). Between the fourth and eighth centuries A.D., however, a highly complex symbolism developed around the practice of mudra in the newly flourishing Tantric cults, and “the hand became a sort of universe in miniature,”1 assuming shapes like magic hieroglyphs.
The word “mudra” itself means “seal” or the imprint left by a seal.” According to one scholar, a mudra is thus “the sign of a pact, of a most solemn contract, for it is the one that binds the worshipper to the world of the divinity, and integrates him into that world.”2 For Ajit Mookerjee, “Mudra is the ritualized body-language both of offering and of surrender.”3 A mudra, then, is both our declaration of intent and our passport to the world of the spirit. As one ancient text proclaims: “Possessing a seal, a man enters a country in peace. If he does not possess a seal, he may not enter.”4
You can feel for yourself the subtle effect of mudra by standing in Tadasana (Mountain Pose) with your hands together in front of your chest in namaste position. As you bring your awareness into your hands at the place where the center palms meet, observing how the right hand touches the left and the left hand sustains the right, the mind grows quiet and respectful. A feeling of completion, of resolution, arises as the two sides of your body, the two sides of your being, momentarily join.
This feeling of reverence and connectedness depends, of course, on the way you use your hands. If you stand in Tadasana with your hands in namaste and concentrate on pushing the bones of the hands into each other, your shoulders will hunch with tension, and your upper chest will collapse. If, however, you think of quietly broadening from the center of the palms, so the fingers lengthen upward, the shoulders will drop and the upper chest will expand. This broadening of the palms is beneficial not only in poses where the palms are together, such as Vrksasana (Tree Pose) and Parsvottanasana (Intense Side Stretch Pose), but also in poses where the hands are flat on the floor, such as Urdhva Dhanurasana (Upward-Facing Bow Pose) and Adho Mukha Svanasana (Downward-Facing Dog Pose). In Urdhva Dhanurasana, the broadening of the palms creates an opening in the shoulder joints and often helps to alleviate shoulder pain in the pose.
Yet in Adho Mukha Svanasana (Downward-Facing Dog Pose), the broadening of the palms is often made difficult by the uneven shape of the hands. For many students, the center of the palm is deeply indented, and the mound of the thumb is large and thick, protruding noticeably above the surface of the inner hand. Thus, when the hands are placed on the floor, the weight is thrown toward the outer hand, and the base of the index finger comes away from the floor. This imbalance can be partially corrected by lifting the fingers and broadening the palms out toward the fingertips, but the mound of the thumb still creates a slight obstruction that interferes with the balanced working of the hands and arms.
Ways to Revisit Your Downward Dog Hand Position
1. Adjust the Position of the Thumb
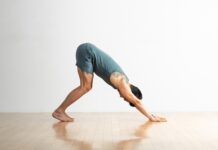
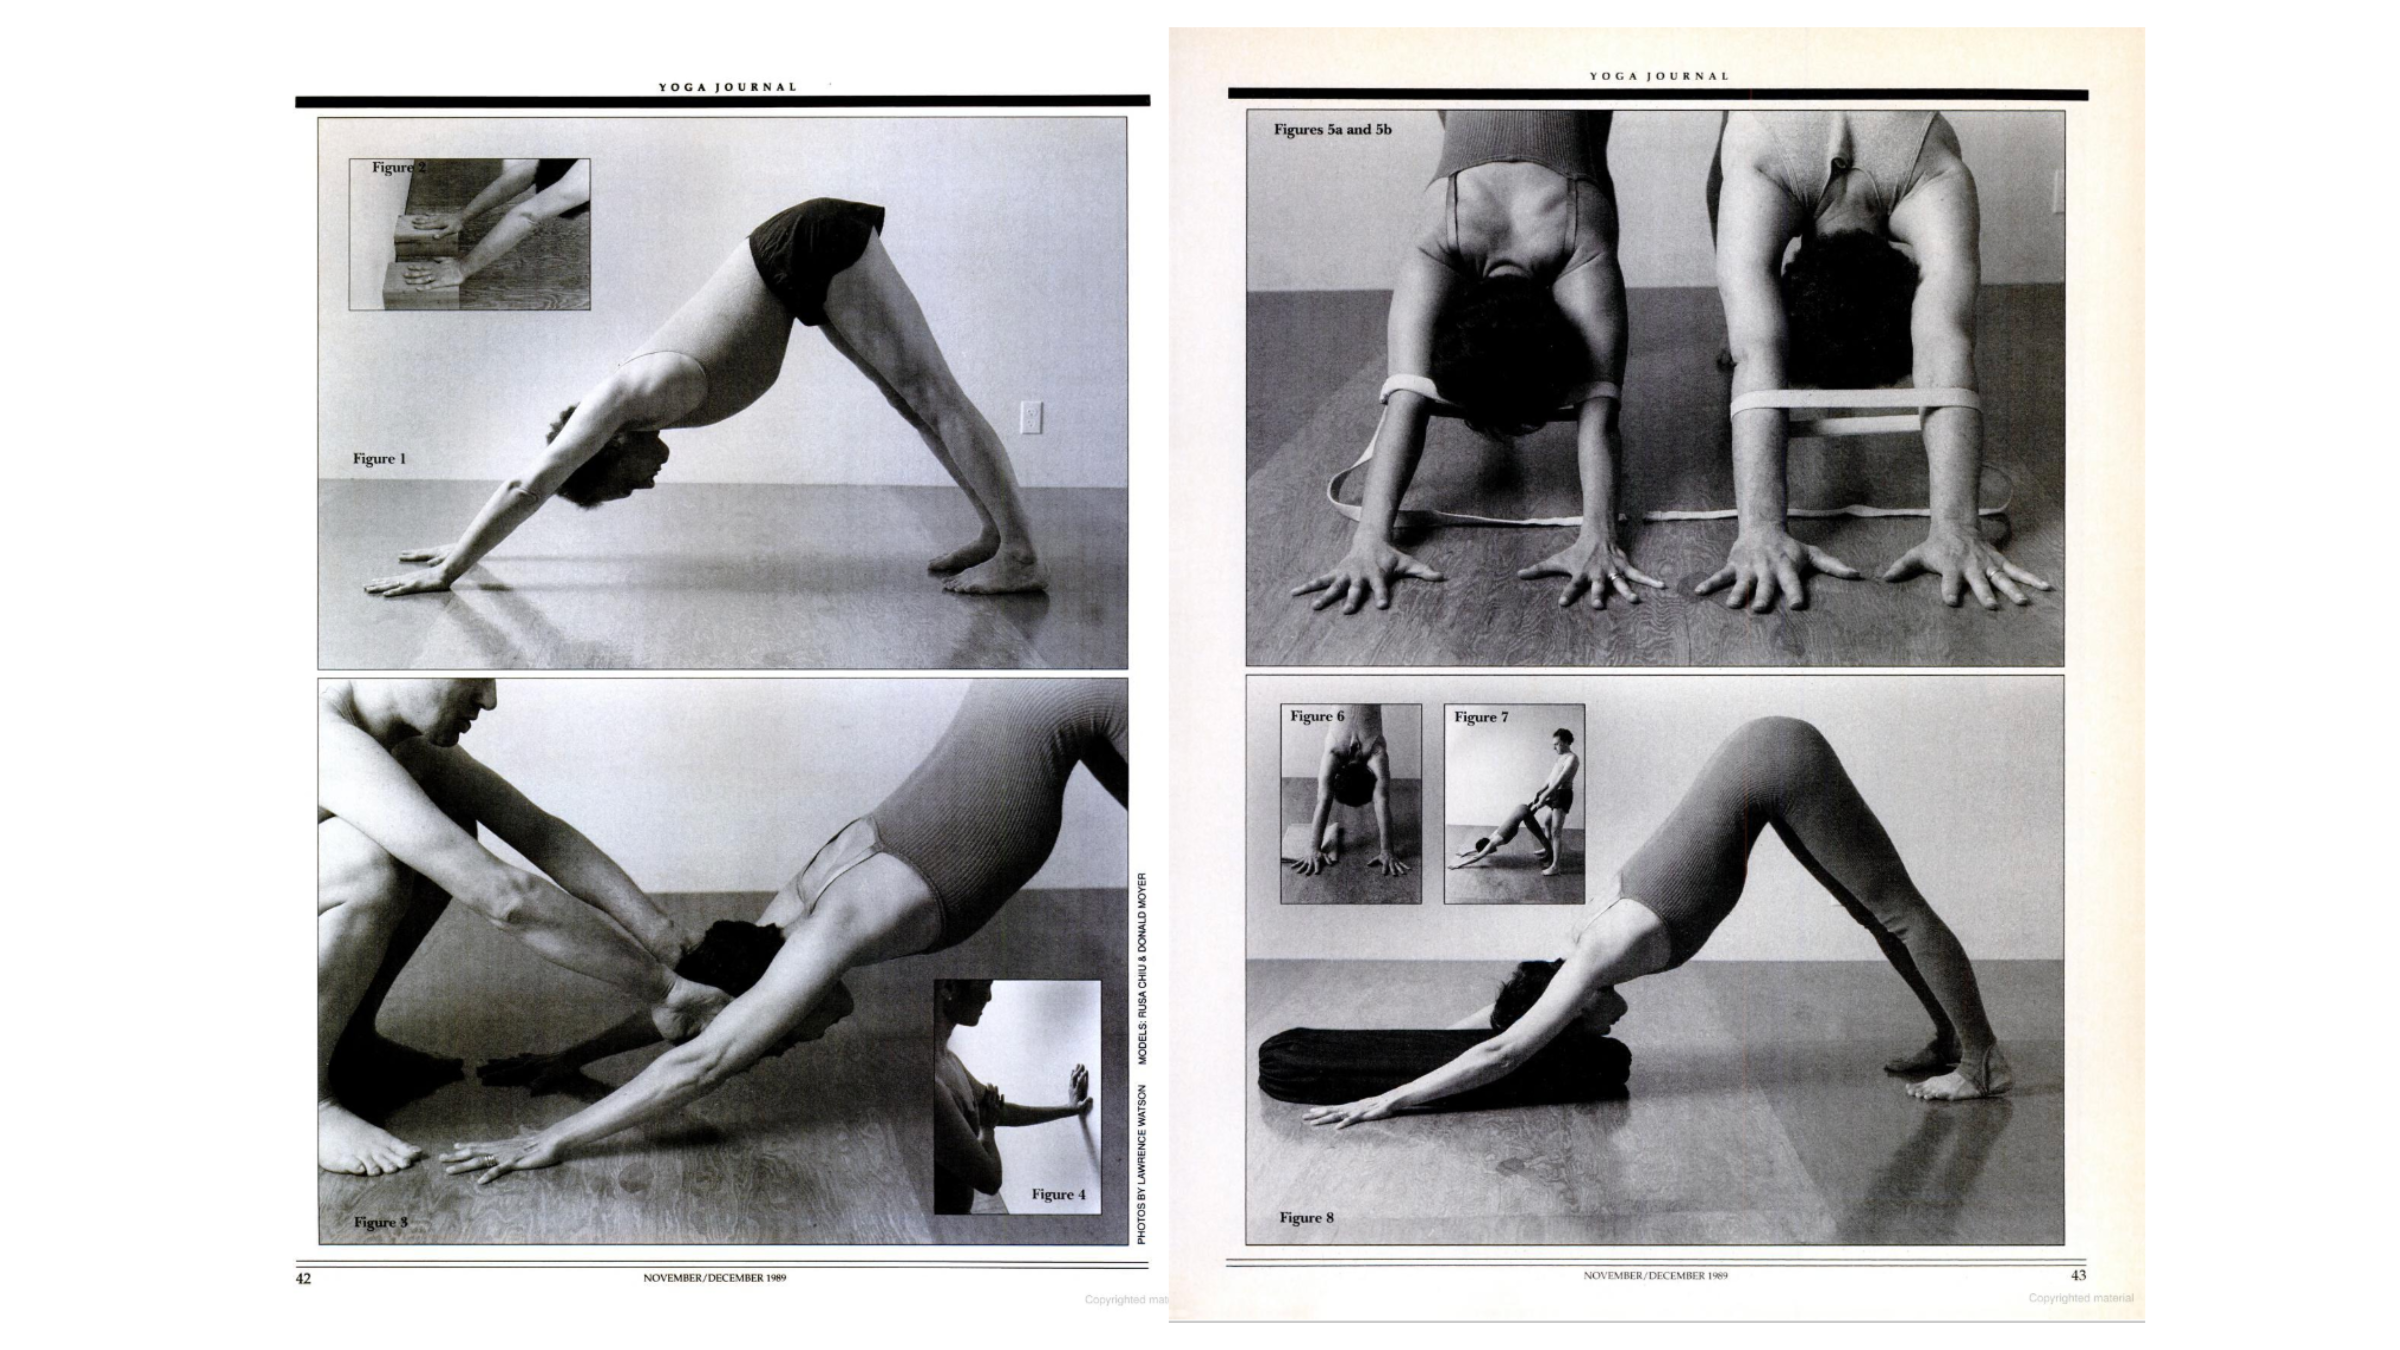
The most effective way to adjust the mound of the thumb requires the assistance of a teacher or helper. Start by sitting back on your heels, with your arms extended forward to establish the proper distance between your hands and feet. Then come up onto your hands and knees, checking that your upper arms are parallel to each other, and your knees and feet are hip-width apart. Lift one palm off the floor, and let your helper draw the inner mound of the thumb away from the center of the hand as you replace the palm on the floor. When both hands have been adjusted, straighten the legs and come into Adho Mukha Svanasana. Because the mound of the thumb is now broader and flatter, the weight falls more evenly on the whole of the hand, and the base of the index finger is in firmer contact with the floor (Figure 1).
If you do not have a teacher or helper to assist you, you can make the adjustment for yourself on one side only. First come onto your hands and knees, and choose the hand on the side of your tighter shoulder. Keep the fingers of this hand on the floor, but lift the palm. Then, with the fingers of the other hand, draw the skin and flesh of the inner mound of the thumb toward the outer mound, and carefully replace the palm on the floor. Now place the other hand on the floor, broadening the palm as much as possible, and straighten the legs to come into Adho Mukha Svanasana. When you make this adjustment on one side only, you become more acutely aware of the difference it makes to the pose. For me, not only does the weight spread more evenly on the palm of the adjusted hand, but the work penetrates more deeply into the shoulder joint, and the whole arm feels stabler and stronger. Hold this position for about a minute, and then come down, adjust the other hand, and repeat the pose for another minute.
2. Place Your Hands on Blocks
The following variation of Adho Mukha Svanasana, using blocks to support the hands, is useful for students with tight shoulders and for those with wrist problems. First place the blocks lengthwise against the wall. Then, sitting back on your heels, extend the arms forward and place your hands on the blocks. Now come to a kneeling position and check the alignment of your hands. If your wrists are weak, you can place the heels of the hands against the front edge of the block to give more support. Let the palms and fingers extend out from the center, even if the thumbs and little fingers overlap the sides of the blocks. Then lift the knees and come into Adho Mukha Svanasana, broadening the palms out to the fingertips and lengthening the pelvis toward the ceiling. The use of the block helps to bring more weight to the bases of the fingers and thus relieves some of the strain on the wrists (Figure 2).
3. Strengthen Your Your Upper Arms
In Adho Mukha Svanasana, the hands provide the foundation for the entire upper body and should therefore be carefully placed. Many teachers instruct their students to align the hands with the middle fingers pointing directly forward. I find for myself that when my middle fingers are pointing forward, my wrists are slightly turned in. I prefer to work with the line of the wrists parallel, and the fork of the second and third fingers pointing forward. This shift of the hands may be no more than half an inch, but the difference it makes is substantial. When I come into Adho Mukha Svanasana with the middle fingers pointing forward, the weight tends to fall on my outer hands and arms. My rib cage sinks heavily into the shoulder joints, and my upper abdomen feels very slack, as if there were no support from the front of the torso. However, when I place my hands with the line of the wrists going straight across, the energy of the pose is completely transformed. The bases of the index finger come into better contact with the floor, the inner arms are activated, and the rib cage lifts easily and naturally off the shoulders. Even the abdominal muscles feel better toned and lengthen back toward the spine. Try these two hand positions for yourself, and see which works best for you.
Even if the hands are placed with the line of the wrists parallel, the muscles of the inner arm may not be giving adequate support. The following variation of Adho Mukha Svanasana helps to strengthen the inner arms and thus open the shoulders. First come into Adho Mukha Svanasana, and let your teacher or helper kneel or squat in front of you, placing his or her hands firmly on your inner arms just above the inner elbows as in Figure 3. Now broaden your palms, and lengthen the muscles of the inner arms against your helper’s hands, as you lift the front of the rib cage toward the waist. If one inner arm feels noticeably stronger than the other, there is probably an imbalance between your two shoulders. As a general rule, the side with the weaker inner arm is the side of your tight or “problem” shoulder. As you begin to strengthen this inner arm in Adho Mukha Svanasana, the head of the upper armbone will rotate slightly out and sink deeper into the shoulder joint.
If you are working alone and do not have a teacher or helper to assist you, you can bring strength and awareness to the inner arms with the following isometric exercise. First stand in Tadasana (Mountain Pose) facing a wall, and place your left hand on the wall so that your forearm is parallel to the floor. Then press your right hand onto the inner left arm just above the inner elbow as in Figure 4. Now firm the inner arm muscles against your hand, and draw the upper armbone down toward the elbow. Hold this position for two or three cycles of breath, keeping the inner arm active. Then release and repeat to the other side.
This exercise for strengthening the inner arms is useful to practice not only before Adho Mukha Svanasana, but before all inverted poses requiring strength of the inner arms, such as Adho Mukha Vrksasana (Full Arm Balance or Handstand), Pincha Mayurasana (Elbow or Forearm Balance), Sirsasana (Headstand) and Sarvangasana (Supported Shoulderstand). In Sirsasana (Supported Headstand), for example, if the inner arms are weak, the elbows tend to slip out to the side, and the shoulders collapse toward the ears. When you activate the inner arms in Sirsasana, the upper back broadens, and the upper arm bones lift into the center of the shoulder joints, taking the weight off the neck. Likewise in Sarvangasana (Shoulderstand), bringing firmness to the inner arms creates more lift of the spine and keeps the elbows in place.
4. Use a Strap Around Your Forearms
The next variation of Adho Mukha Svanasana, using a strap around the elbows, is especially helpful for those whose shoulders are tight and who cannot straighten their arms in the pose. First tie a strap or belt around the elbows so the upper arms are parallel to each other (Figure 5a). Then come onto your hands and knees, turn your toes under, and straighten the legs to lift into Adho Mukha Svanasana. If the strap does not hold the arms snugly, either come down and readjust the strap or move the hands an inch or so further apart.
When holding the pose, do not rely on the strap completely, but continue to lengthen the inner arms, and lift the sides of the rib cage away from the shoulder joints. Those with hyperextended elbows may find that the use of the strap around the elbow creates pain or discomfort in the elbow joint. In this case, you might try placing the strap around the fleshy part of the forearm as in Figure 5b. Those who need to strengthen the muscles of the forearm rather than the upper arm will also find this a helpful variation.
5. Recognize Your Postural Patterns
Any imbalance that occurs in the use of your arms and shoulders in Adho Mukha Svanasana will generally be reflected in all your inverted poses. The following assessment of Adho Mukha Svanasana may help you to recognize this pattern of misalignment. First come onto your hands and knees, using a line on the floor as a guide. Make sure the hands and feet are placed an equal distance from this median line. Then bring your nose directly over the line, and, as you straighten your legs and lift the pelvis into Adho Mukha Svanasana, observe whether your nose shifts to the right or left of the line. You might need a teacher or friend to help you make this assessment.
If your weight shifts onto the right arm, your right shoulder is more open and flexible and probably sinks further toward the floor than the left. In this case, the left shoulder is likely your tight or problem shoulder, and may feel stuck or jammed, as though there is not enough room to extend the left arm fully.
If you find that one shoulder drops lower than the other in Adho Mukha Svanasana, you might want to try the following adjustment. Come down from the pose, and, if the right shoulder sinks lower, place a folded blanket under the heel of the right hand as in Figure 6. (If the left shoulder sinks lower, place the lift under the heel of the left hand.) Once again align yourself with the line on the floor, bringing your nose directly over the line. This time, as you lift into Adho Mukha Svanasana, you might find that the weight of the body does not shift to one side, and that you feel a greater freedom in the shoulder that was previously stuck because the arm can now lengthen to its maximum. Let your teacher or friend check to see that your shoulders are more level.
For the student who sinks into the right arm and shoulder in Adho Mukha Svanasana, we can also make some predictions about his or her Sirsasana (Headstand). This student will again let the weight shift onto the right arm. The weight on the head will rest a little to the right of the center of the crown, and the head may be tilted with the right car closer to the floor than the left. Meanwhile, the left elbow will slip out to the side, and the left shoulder will partially collapse because the upper armbone does not lift properly into the center of the shoulder joint.
The student who suffers from this kind of imbalance in Sirsasana can place a small lift under one elbow, in the same way that we placed a lift under one hand in Adho Mukha Svanasana. Make sure that the lift is under the tip of the elbow only, and not under the fleshy part of the forearm. Place the lift under the right elbow if your weight falls onto the right arm and right side of your head, or under the left elbow if your weight shifts toward the left side. Have your teacher or other helper check that the use of the lift keeps the elbows equidistant from the median line. If your weight feels more centered on the crown of your head, and your problem shoulder lifts more easily or feels more integrated, you will know that this adjustment is an appropriate one for you.
The same pattern of imbalance will prevail in Sarvangasana (Shoulderstand). For the student who sinks onto the right arm and right shoulder in Adho Mukha Svanasana, the weight in Sarvangasana will fall onto the right side of the body. This student will often experience stiffness or discomfort on the right side of the neck, because so much weight is bearing down on this side. Furthermore, the right elbow will not come into as firm a contact with the floor, and the left shoulder (in this case, the tight or problem shoulder) will not roll under as much as the right one. Again, some additional support can be placed on the right side (the more flexible side), this time under the tip of the elbow. Use a roll or pad about one or two inches thick, making sure that it is placed only under the elbow and not under the bulky part of the upper arm. With a lift under the right elbow, you can press down more firmly with the right arm. This action shifts some weight onto the left side and brings you higher onto the left shoulder. When you make this adjustment, look up at the median line of the body, checking that the hips and legs have now moved back into proper alignment.
6. Check if Your Thighs Are Activating
If your legs are not working properly in Adho Mukha Svanasana, the weight of your body will collapse onto your shoulders and arms. The following variation teaches us how to lift the thighs in order to lengthen the spine and reduce the weight on the arms. First come into Adho Mukha Svanasana, and let your teacher or helper stand behind you with a broad strap or belt held firmly across your upper front thighs, as in Figure 7. Now try to lift the thigh bones away from the strap without lifting your heels any higher. Your partner will feel the weight on the strap grow lighter and will see how your lower back extends. Maintain this position for two or three breaths, then once again lift the thighbones away from the strap and feel the length of the spine. Hold for another few breaths, then bend your knees and come down.
7. Relax Your Neck Muscles
For some students, whenever their arms are raised overhead, the trapezius muscles of the shoulder become rigid with tension, and the muscles at the side of the neck stand out like steel cords. The following variation of Adho Mukha Svanasana, resting the forehead on a bolster, helps to pacify and soften these neck muscles. This variation is also useful in relieving fatigue and headaches and after intense practice of backbends (Figure 8).
Start by sitting on your knees and heels with a bolster placed lengthwise in front of you. Then bend forward and lean your forehead against the bolster, extending your arms forward on either side of the bolster and spreading your palms on the floor. Come onto your knees, turn the toes under, and lift into Adho Mukha Svanasana. If your forehead does not touch the bolster, you will need to add a folded blanket or towel on top of the bolster to support your head. If the support under your head is too high, your neck will feel compressed. Ideally your forehead should rest on the upper part, just below the hairline. Hold this position for one or two minutes, gently pressing the forehead into the bolster to lengthen and release the neck. Then sit back on your heels, and come forward into Child’s Pose.
In our practice of hatha yoga, the whole of the body becomes a mudra, not just the hands. Each asana expresses our dedication, our commitment, and is our way of reaching into the known to touch the unknown. Explains Reb Anderson, a Zen priest and co-abbot of the San Francisco Zen Center:
“When you meditate or take a yoga posture, you are taking the yoga posture in the realm of knowing. What you are dealing with is not a direct experience; you’re dealing with a concept of your body, for at this stage your body is an object of awareness. Yet as you become more completely aware to the very limit of your ability in the realm of knowing, the body of direct experience comes to meet [the conceptual body). . . . Then this other realm, not under our control, gradually integrates itself. Little by little this practice, which starts out as a kind of conscious activity, gets a gift or infusion from a realm beyond our conception, which then gives us lots of energy, enthusiasm, and inspiration to work for the benefit of other beings and to encourage them also to integrate themselves.”5
NOTES
- E. Dale Saunders, Mudra: A Study of Symbolic Gestures in Japanese Buddhist Sculpture (Princeton, N.J.: Princeton University Press, 1985), p. 30.
- Ibid., p. 26.
- Ajit Mookerjee, Kundalini: The Arousal of the Inner Energy (Rochester, Vt.: Destiny Books, 1982), p. 31.
- E. Dale Saunders, op. cit., p. 104.
- Tenshin Reb Anderson, transcribed from a talk delivered on July 7, 1989.