
Published September 17, 2026 11:06AM
In Yoga Journal’s Archives series, we share a curated collection of articles originally published in past issues beginning in 1975. This article about Kapotasana (Pigeon Pose) first appeared in the July-August 2001 issue of Yoga Journal. Find more of our Archives here.
If you pay attention to how an accomplished teacher leads class, you will notice that each session consists of a deliberate sequence of postures that complement and nourish one another. The best guidance for sequencing I ever heard came from well-known teacher Angela Farmer, who described asanas not as poses but as “pauses in an ever-changing flow of movement.” By taking this perspective, you can free yourself to be absorbed in the sensations of the various paths of movement from which individual asanas emerge.
You can approach the challenging backbend Kapotasana (Pigeon Pose) in this spirit, using a sequence in which the simplest asana includes the essential movements needed for the final pose. These movements reappear organically and logically in each succeeding posture until you finally find yourself in Kapotasana. Just how far down this path you can go remains to be seen. What’s important is that you are on it. No matter how far you travel, you can receive the gifts of insight the process offers.
Backbending with a Bolster
I advise conscientious preparation for even simple backbends. Skill and attention are required to do these demanding poses in a way that renews your resources rather than overstimulating your nerves and depleting your energetic reserves. First, warm up your body with a general practice that includes back-strengthening poses such as Salabhasana (Locust Pose) variations. Then create a bolster with one or two rolled blankets, position it under your upper back, and spend at least five to 10 minutes lying back over it. Using a bolster allows you to remain in a back arch long enough to stimulate your back muscles, deepen your focus, and examine the nuances of backbending.
During your time over the bolster, feel the way arching your back affects your breathing. How you breathe greatly influences your backbends. If you hold your breath or gasp like a fish out of water, your backbends will be uncomfortable and stressful. Steady breathing, with a focus on completing your exhalations, inhibits overstimulation of your sympathetic nervous system and makes for a calmer pose.
In your bolster work, also notice the effect of arching on your back muscles. Do they react by tightening? If so, that response will only worsen when you do a deeper backbend. Instead of tensing, trust the support the bolster gives you. Relax onto it, let your spine be molded by it, and feel the sensations of tension dissolve as you release into a fluid backbend.
While arching over the bolster, use the assistance of your breath to consciously expand your chest. Notice how your chest naturally expands as you inhale; then, as you exhale, intentionally expand your chest even more. Expanding the chest while exhaling requires deliberate movement that opens the chest from the inside out. Notice the pumping rhythm that accompanies this coordination of breath and movement. Heightening your awareness of this process during a passive backbend will make you more skillful at sustaining these subtle sensations in more challenging poses. When you’re finished with the bolster, slide off and rest in Balasana (Child’s Pose).
Working with the Spine
Begin the flow of active poses leading toward Kapotasana by practicing Bhujangasana (Cobra Pose). Stretch out on the floor, face down, resting your forehead on your hands. First, simply relax your legs. Then exhale, lengthen your tailbone toward your heels, and drop it toward the floor. Don’t tuck your pelvis; instead, move the pubis away from the navel and draw it toward the tailbone. Compare and balance the actions of the tailbone and pubis until neither movement dominates the other. Finding this balance will engage muscles in the abdomen and pelvic floor, creating stability, lift, and support for your pelvis and lower back.
Consciously draw the front groins back and slightly up toward the abdomen. This action moves the thighbones back, creating a sense of increased depth and internal space within the hip joints. Finally, on an exhalation, lengthen your hamstrings and calves toward your heels to root the tops of the feet to the floor. Notice how rooting the lower legs nourishes the pose, inviting a lightness in the pelvis that will help your spine rise from the floor in the coming backbend.
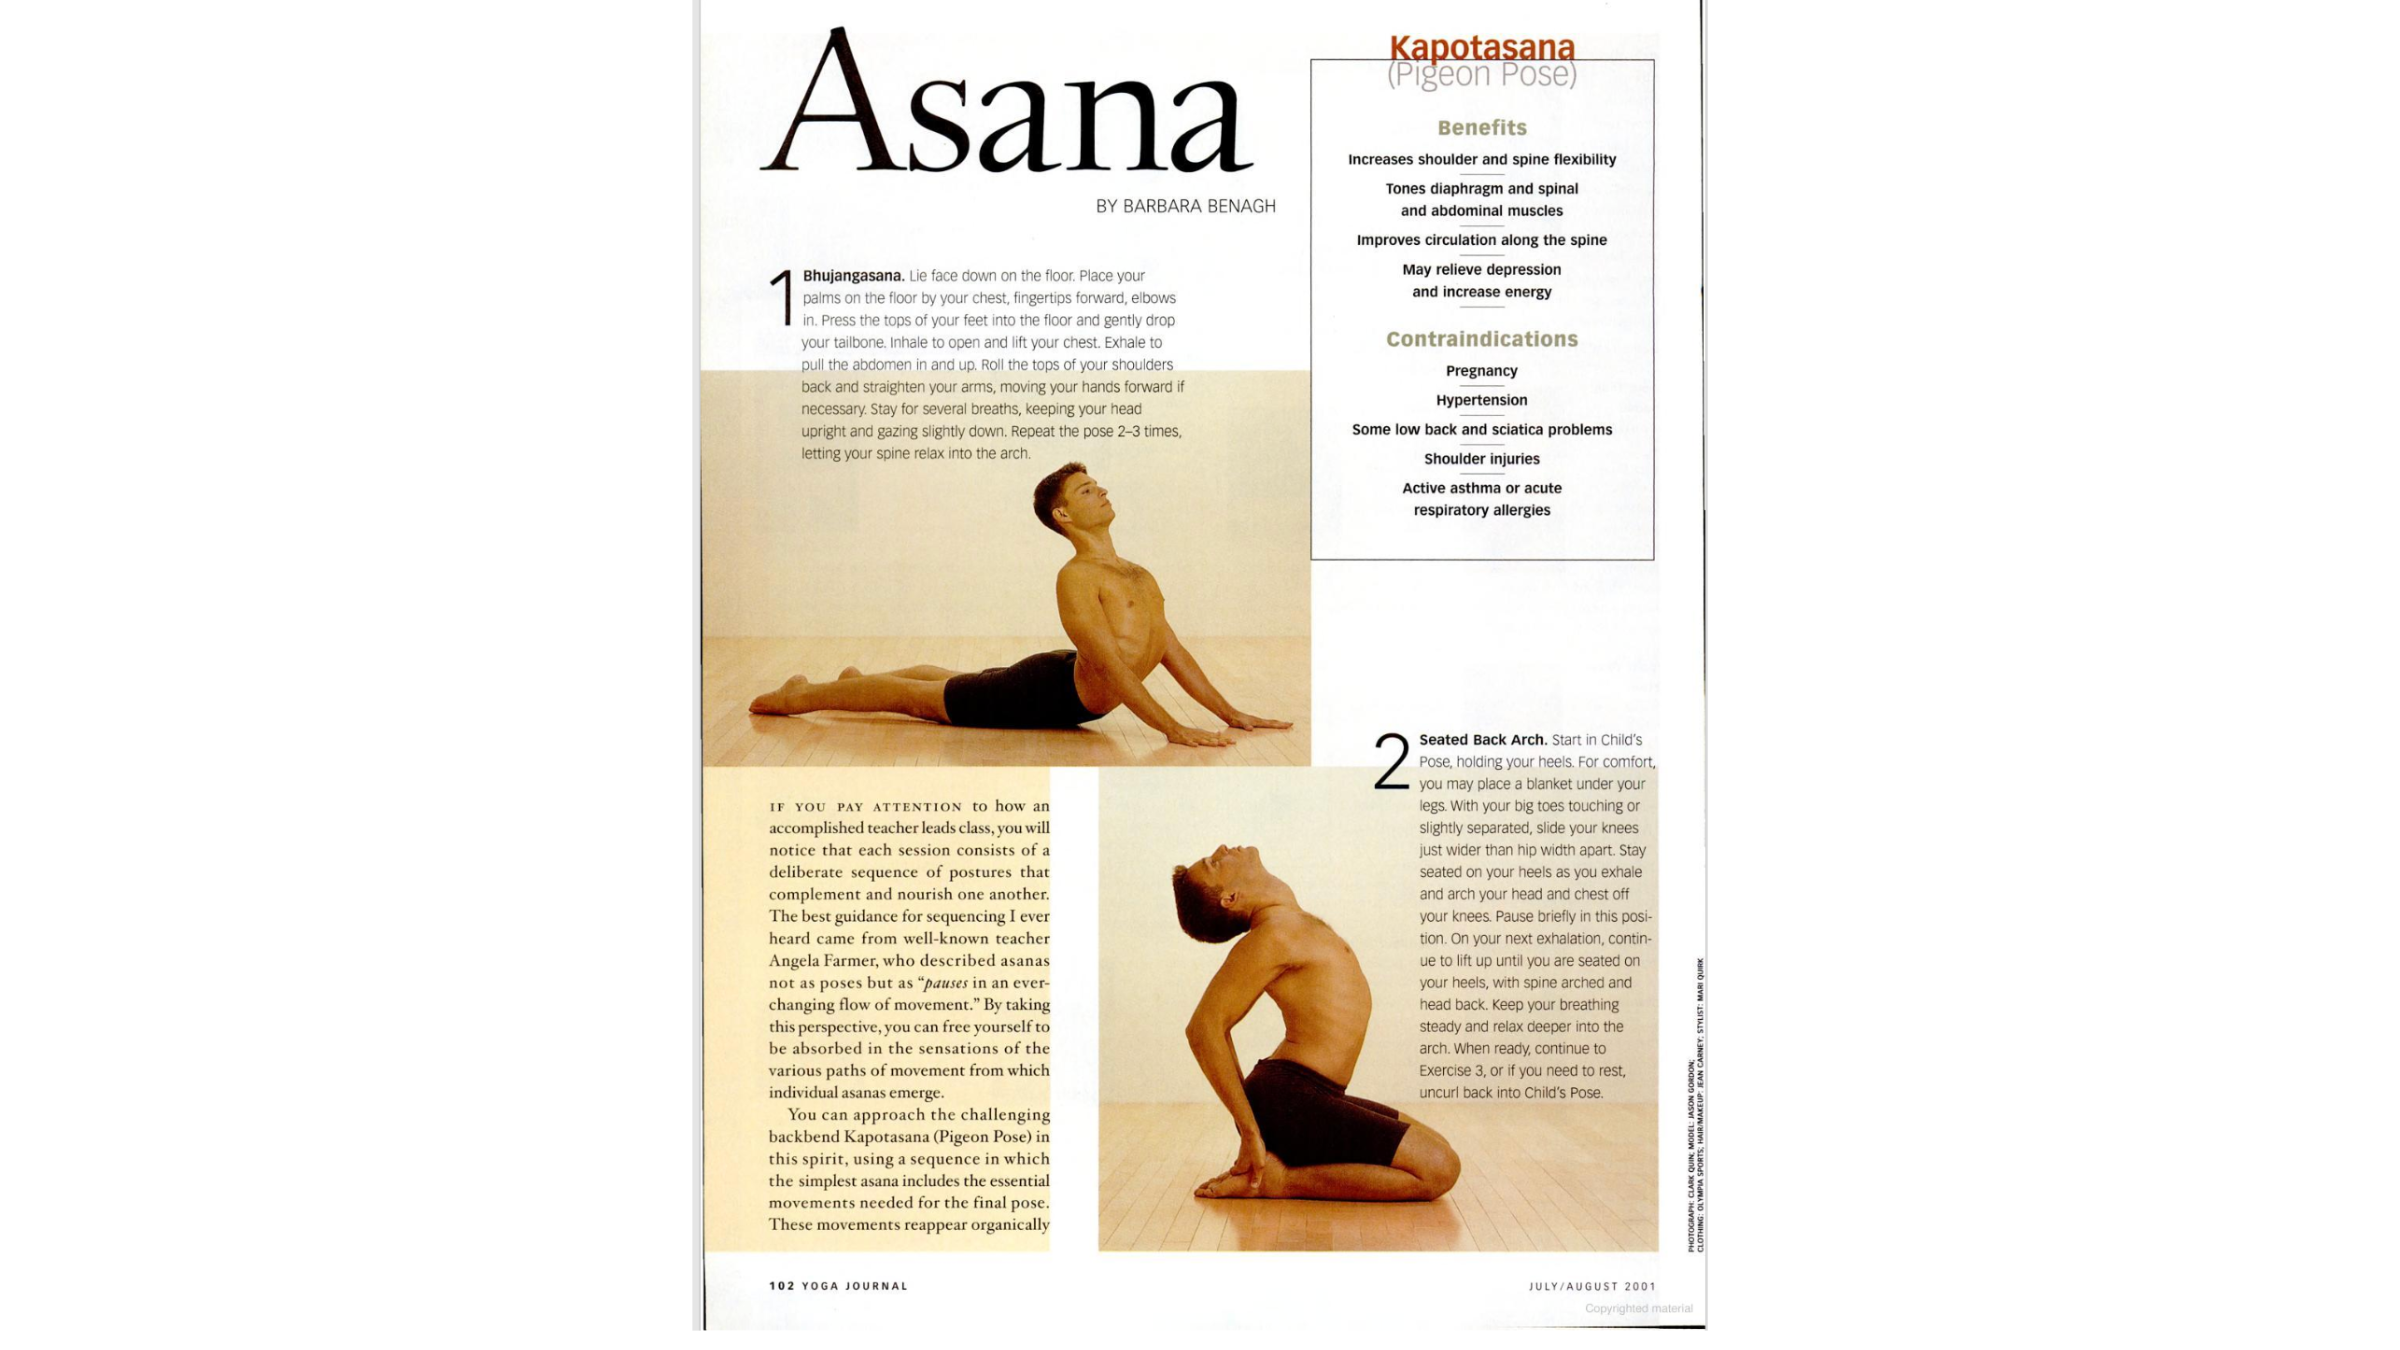
Now place your hands palms down on the floor by your ribs, fingers facing forward. Keep your elbows close to the body. With your legs firmly grounded, inhale, raise your head, and begin to arch your chest and spine off the floor. As you exhale, deepen the backbend by drawing the spine up from the very bottom of the pelvic floor. Continue to arch up by expanding your chest as you inhale and lifting the spine from its base as you exhale. Finally, extend your arms as straight as you can without compromising the continuity of the arch of the spine. Keep your neck long, directing your gaze forward and slightly down (Figure 1). Maintain a steady, rhythmic breath to help your body assimilate the stretch. Don’t stay up too long the first time.
After a few breaths, slowly uncurl back to the floor.
Allow the rest between backbends to be an integral part of the asana sequence. Enjoy the break in intensity but also use this time to feel the ways you are adapting to the backbend. If your exhalation has become shorter than your inhalation, mindfully re-extend the exhalation. If your lower back hurts, most likely your abdominal girdle wasn’t sufficiently supporting your lumbar spine or your upper spine wasn’t sufficiently participating in the arch (or both). Bring immediate relief to your lower back by briefly tucking the pelvis. Then, as you arch into Bhujangasana again, intensify your efforts to root your legs and lift your spine from the pelvic floor.
This time, also pay attention to whether your arms are helping or hindering the backbend. In Bhujangasana students all too often push desperately into the ground with their hands but allow the torso to hang off the arms with little or no vitality along the spine. This approach creates a dull pose I call “Cobra on Crutches.” One remedy is to bend your arms, which may help you draw the shoulders back and down and open your chest. But you may be able to achieve the same effect with completely straight arms if you increase your attention to the internal flow of movement that rises out of the pelvic floor and travels up the spine.
This spinal flow is the essential movement of the pose, the heart of the backbend. With each new breath, feel the spinal flow move up and back into a graceful arch. Imagine that you have a pair of eyes located just below your outer collarbones. Look up and over your shoulders with these “eyes,” roll the tops of your shoulders toward your tailbone, and surrender to the backbend more completely.
When you are unable to deepen your physical asana, turn your attention inward and recall the insights you gleaned from the time you spent over the bolster. Use conscious surrender and rhythmic breathing to soften any resistance you encounter. Allow the arch to deepen naturally—with strong intention, certainly, but without force. Just as you practiced over the bolster, let your chest expand spontaneously as you breathe in and open actively as you breathe out.
Repeat Bhujangasana as many times as feels comfortable. When you’re ready, rest in Balasana, allowing your back muscles to ease into the mild counterstretch this asana provides.
Feeling the Upward Arch
I have asked you to pay attention to the sensations of upward spinal flow in Bhujangasana to help clarify the fluid action of the spine as it emerges from its roots, the legs. The difference between the grounding action of the legs and upward flow of the spine becomes increasingly important as we move from Cobra into the next “pause,” Ustrasana (Camel Pose).
Ustrasana is usually approached from a kneeling position, but you can increase your awareness of the upward movement of the spine if you arch into Camel from Balasana. Begin in Child’s Pose with your knees slightly wider than hip-width apart. You can keep your big toes touching or separate your feet slightly, whichever feels best for you. Reach back and hold your heels, taking a moment to get in touch with the steady pace of your breathing. Inhale as you arch your head and chest up off your thighs; keep feeling that your spine is rising up from your tailbone, as it did in Bhujangasana. Use the next few breaths to expand your chest and lift it higher, deepening the arch in your back. Again look up and over your shoulders with the eyes of your chest, letting the upward flow arch your spine up into a Seated Back Arch (Figure 2).
This movement takes more attention than you might think. Move slowly into the backbend, constantly focusing on the essential upward flow of the spine and continuing to look over your shoulders with the eyes of your chest. Stay in the seated backbend for several breaths. Consciously ground your legs by deepening your groins, lengthening the hamstrings and calves, and pressing the tops of the feet into the floor. As you did when backbending over the bolster, gradually let go of resistance in your back muscles to help the arch deepen naturally. Continue to hold your heels and roll the tops of your shoulders toward your tailbone. Let your inhalation inflate your chest and then consciously continue to expand it as you exhale; let it bloom open from a sense of internal strength.
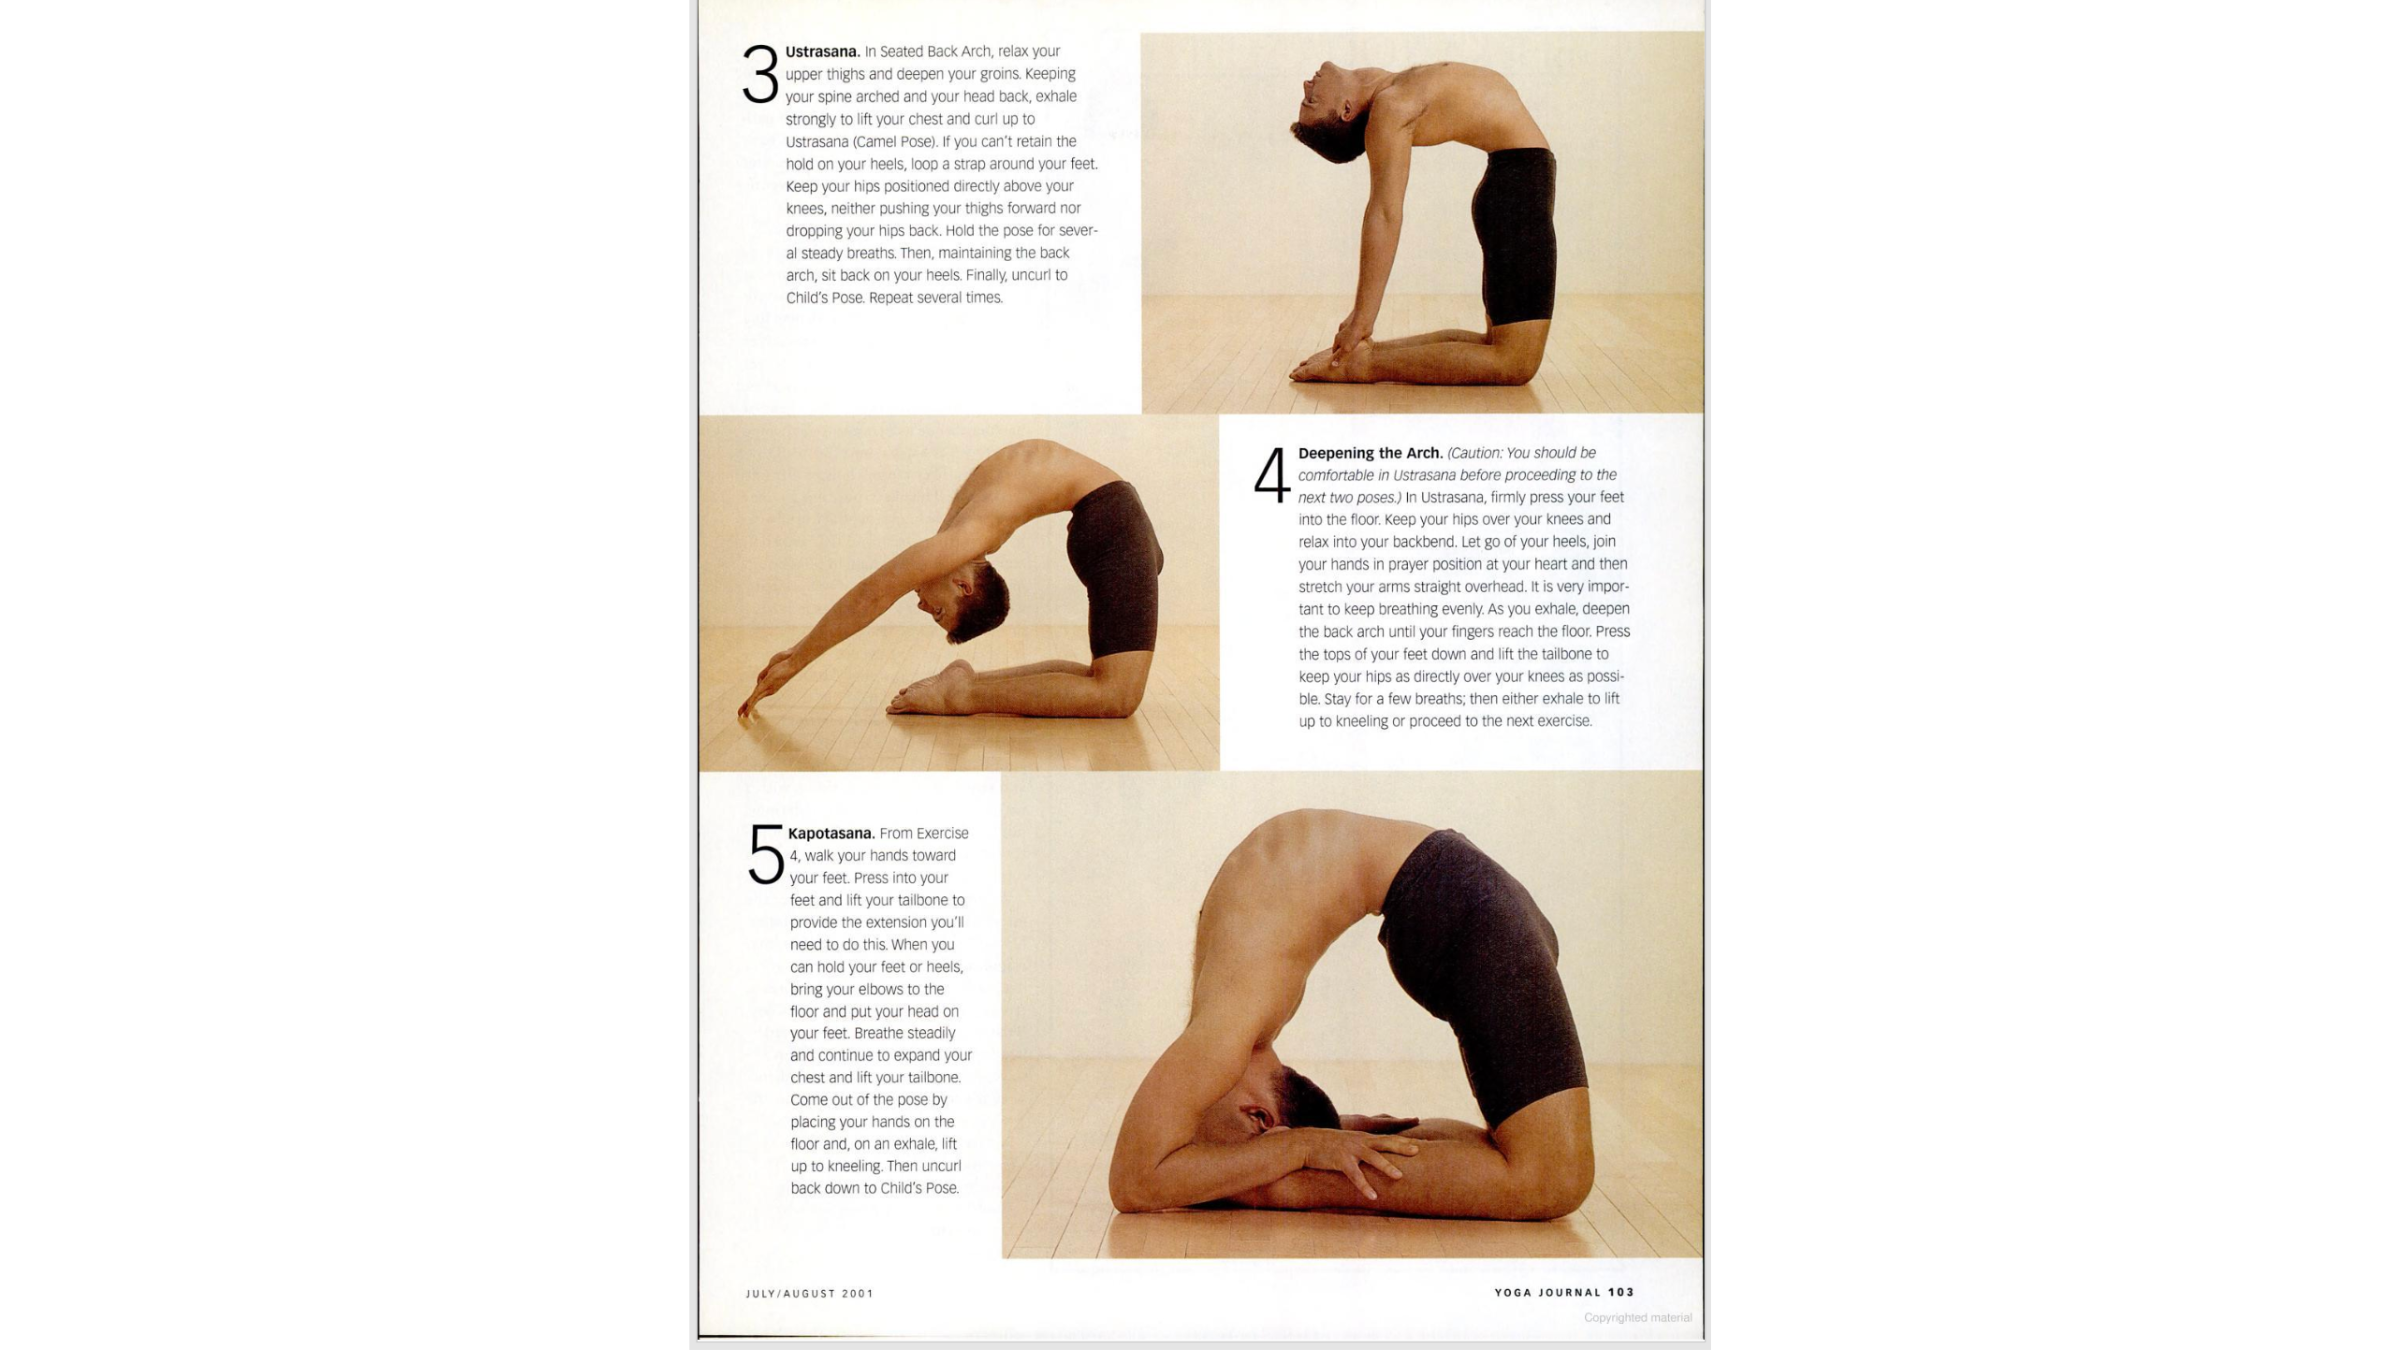
On your next exhalation, draw your spine up out of your hips so strongly that you pull your hips off your heels, repositioning them over your knees in Ustrasana (Figure 3). Throughout this transition, your spine should continue to arch freely all the way up into your head. Hold the pose for a few breaths and then come down by reversing the movement, melting back down to Balasana.
You may have discovered, much to your surprise, that you couldn’t maintain a constant flowing arch in your spine as you moved from Seated Back Arch to Ustrasana. This movement requires an integrated spinal flow and will not indulge any dull, blocked, unawakened areas along your spine. If you’re avoiding such areas, you’ll tend to push too far forward with the thighs and allow part of the back to round. You may also find you’re unable to maintain the grip on your heels as you transition into Camel Pose.
Because it’s easier to correct, let’s deal with the second problem first. Raise your heels by turning your toes under; if that still doesn’t give you enough height, run a strap between your feet and the floor, allowing enough slack to permit you to arch into Ustrasana without sacrificing the upward flow of the spine.
Pushing too far forward with your thighs and rounding your back to get into Ustrasana is a bigger problem. Ideally, when you backbend, the spine should form one flowing, integrated arch. In reality, blockages can appear anywhere along the spine. In Ustrasana, tension in the midspine is often the culprit. This tension can make your middle back immobile and unfeeling, a condition I call kinesthetic numbness.
We compensate for such kinesthetically numb areas in many ways. In Ustrasana, many people push the groins and thighs forward as a substitute for the proper spinal movement. This compensation may let you achieve the basic form of the pose, but it prevents your upper spine from arching adequately, leaves the chest weak, and places compression in the lumbar spine. And, in the long run, failing to awaken dull areas makes the spine more vulnerable to injury.
With all this information in mind, let’s again explore the transition from Seated Back Arch to Ustrasana. As you arch, soften the tops of your thighs, pull your groins in, and extend your calves back toward the heels to press the tops of the feet into the floor. Soften your midback and consciously direct movement to that area so it becomes part of the integrated upward flow of your spine. Your commitment to that flow must be stronger than any resistance you may encounter, so stay very focused as you exhale and lift into full Ustrasana once again. As the backbend unfolds, move your femur bones into the backs of your legs and position your hips directly over your knees. The upper legs have a tendency to push forward; to help you keep your hips correctly positioned, distribute your weight evenly between your knees and feet. As in Bhujangasana, draw your pubis and tailbone toward each other to stabilize the lower back.
When you are ready to come out of Ustrasana, come back down into Seated Back Arch while retaining your backbend. Continue to deepen your groins and look over your shoulders with the eyes of the chest while dropping your hips to your heels. Concentrate deeply while doing this, since keeping your midback fluid will be particularly difficult. Finally, curl back to Child’s Pose, head coming down last. I encourage you to practice the flow of the spine in backbends by moving from Child’s Pose to Camel and back again, over and over.
Become absorbed in the process, comparing the quality of movement all the way along the spine so you can identify dull areas. Focus your attention on these unintelligent spots, exploring how you can release them. In doing so, you will gradually surrender your old habits and blockages, and your backbends will become supple and strong.
As practice allows you to stay in Ustrasana longer and with more clarity, focus on the steady pulse of your breath reverberating through you. Continue to draw your femur bones toward the back of your legs and root your feet, establishing a stable base that will allow the spine to arch up and back freely. The spine itself should feel buoyed by a sense of inner space, particularly within your chest.
With each new breath, reaffirm the internal movement along the spine that flows from its roots in the legs.
Surrendering into Kapotasana
Up to this point in our backbend sequence, your arms have played an important role in supporting the spine. But once you’ve learned to maintain a powerful, deep arch without hardening the muscles along the spine, you can begin to lessen your reliance on the arms and move toward Kapotasana.
Establish a strong Ustrasana; then bend your elbows and relax the grip on your heels, testing whether your spine can safely accept the full weight of your upper body. It is quite possible that your back muscles are not ready for this. If your body tightens up or you can’t keep the breath steady, you might do better to continue with Ustrasana instead of trying Kapotasana.
There’s no shame in admitting that this particular “pause” represents—for the time being—too great an obstacle.
But it’s also possible that reluctance to give up the support of your arms doesn’t stem from a lack of physical readiness. It can also be rooted in fear of the surrender Kapotasana requires. In a culture that so often defines surrender as weakness, it’s no wonder we resist, thinking we have to be hard and forceful. But yoga helps teach us that clarity and effectiveness require a balance between effort and surrender. If we concentrate on this lucid equilibrium, we are capable of grace even in the most difficult circumstances, like Kapotasana, for instance.
Once you’ve decided it’s safe, completely let go with your arms and continue to deepen your backbend. Again roll the tops of your shoulders toward your tailbone, looking over your shoulders with the eyes of the chest as though trying to see your feet. Hanging in midair like this will probably feel intense. (I never said surrender was easy!) Join your hands in Anjali Mudra (prayer position) at your chest and then, keeping your hands together, slowly begin to extend them overhead toward the floor. Keep your elbows no wider than shoulder width apart. Continue to breathe fully, relying on the exhalation to give you the strength to move steadily. As your upper body descends, continue to focus on the technique of the backbend; your arch should actually curl more deeply.
Continue to extend through the backs of your legs to ground the feet, draw the front groins in, and keep the hips above the knees as long as possible. These actions will prevent you from descending too quickly and also reduce the tremendous burning in the thighs and compression in the lower back that occur if you push your thighs aggressively forward. Most importantly, continue to support the central action of the pose, the wave of movement up the spine from tailbone to skull as you descend as smoothly as possible to touch the floor (Figure 4).
Once your hands are down, press your fingers into the floor and exhale as you consciously expand and lift the chest. Use this action to lift the torso enough to walk your hands toward your feet. Repeat this process several times, pausing with each step to stabilize your breath and reinforce the upward movement of the spine. This deepening of the arch is the action that allows you to move your hands. Try to walk the hands in enough so that you can hold your toes, heels, or ankles. One grip isn’t better than another; the grip simply indicates the depth of your flexibility. Do not give up a stable breathing rhythm or your inner buoyancy to achieve a deeper grip.
When you have a firm hold on your feet, confirm that your legs are still actively grounding. In this position, inhale and expand your chest; then exhale and look over your shoulders with the eyes of the chest to help sustain the arch as you slowly bend your elbows to the floor and rest your head on your feet (Figure 5). Reach into your deepest resources and stay in Kapotasana for several breaths. With your clarity enhanced by conscious breathing, scan the inner landscape of the pose. Feel the action of the legs, the flow of the spine, the tops of the shoulders moving toward the tailbone—all the details that allow you to experience this pose clearly. To come out of the pose, release your feet as you inhale, lift the torso until you are kneeling, and melt down into Child’s Pose.
After such powerful concentration and effort, be respectful of your need to consciously unwind. Slow the breathing by extending your exhalation. You may also benefit by doing Adho Mukha Svanasana (Downward-Facing Dog) or a simple twist such as Jathara Parivartanasana (Revolved Abdomen Pose) with bent knees.
Finding a Common Thread
Such an advanced backbend as Kapotasana may seem far removed from Cobra Pose, but it really isn’t. If you look back over the trail you’ve followed, you will find a common thread of movement repeated in all these asanas. As you continue to investigate poses, you will discover more and more such connections. The key is to pay attention as you practice. When you truly understand that your full presence is your most valuable asset in yoga, you will gain the confidence to use any pose as a starting point for exploring the flow of movements from which asanas take form. And as you gain enough confidence to trust your insights and combine them with lessons learned from your teachers, you are well on your way to weaving asanas together into a cohesive, gratifying practice.